API Servers
One of the most common building blocks you will see in systems you create, extend, or maintain are API servers. These are continuously-running programs that listen on a port for incoming requests, process those requests, and write responses. The body of those requests and responses are structured data, encoded in something like JSON or protobuf, as opposed to content formatted for a particular user interface (e.g., HTML for a web browser).
Sending structured data instead of formatted content decouples your API servers from the clients that use them. The clients could be anything from a browser-based web application, to a native mobile application, to a command line utility, or even another API server. These different types of clients have vastly different user interfaces (or none at all), but they can all consume structured data and do something with it. For example, a web app will transform it into HTML shown on the current page, while a native mobile app will display it in native UI elements, and a command line utility might print it to the terminal.
In this tutorial we will dive into the details of API servers, but this won’t be a simple guide to building “Hello, World!” in some trendy scripting language. Instead, this tutorial will teach you the universal principles, techniques, and best practices used to build the kind of real-world services you use every day. You can apply these to any API server you build, in any programming language, with any framework.
important
The code examples in this tutorial assume you’ve already read the Authenticated Sessions tutorial. If you haven’t, you might want to read that first before proceeding.
Internal Architecture
If you use an AI model to generate a “Hello, World!” web server, it will probably spit out a bunch of badly-structured code all in one file. If you were to take this as a template, and simply keep extending it in the same style, with more and more functionality, you’d end up with a giant unmaintainable mess. If you want to build feature-rich servers, you need to adopt a better internal architecture from the start.
But what sort of architecture? When we started building HTTP servers in the 1990s, there wasn’t an obvious or established answer to that question. Many tried to replicate the Model-View-Controller (MVC) architecture that was used to build desktop applications like word processors and spreadsheets, but this was always a poor fit. MVC was designed for interactive, single-user, stateful applications, where the state was mutated in-memory and re-displayed after every keystroke. HTTP servers are quite different: they are multi-user, mostly-stateless programs that need to process a multitude of concurrent but independent network requests as quickly as possible.
As engineers gained experience with HTTP servers, and as new browser capabilities like AJAX were released, a common architectural pattern emerged that works well for most kinds of services:
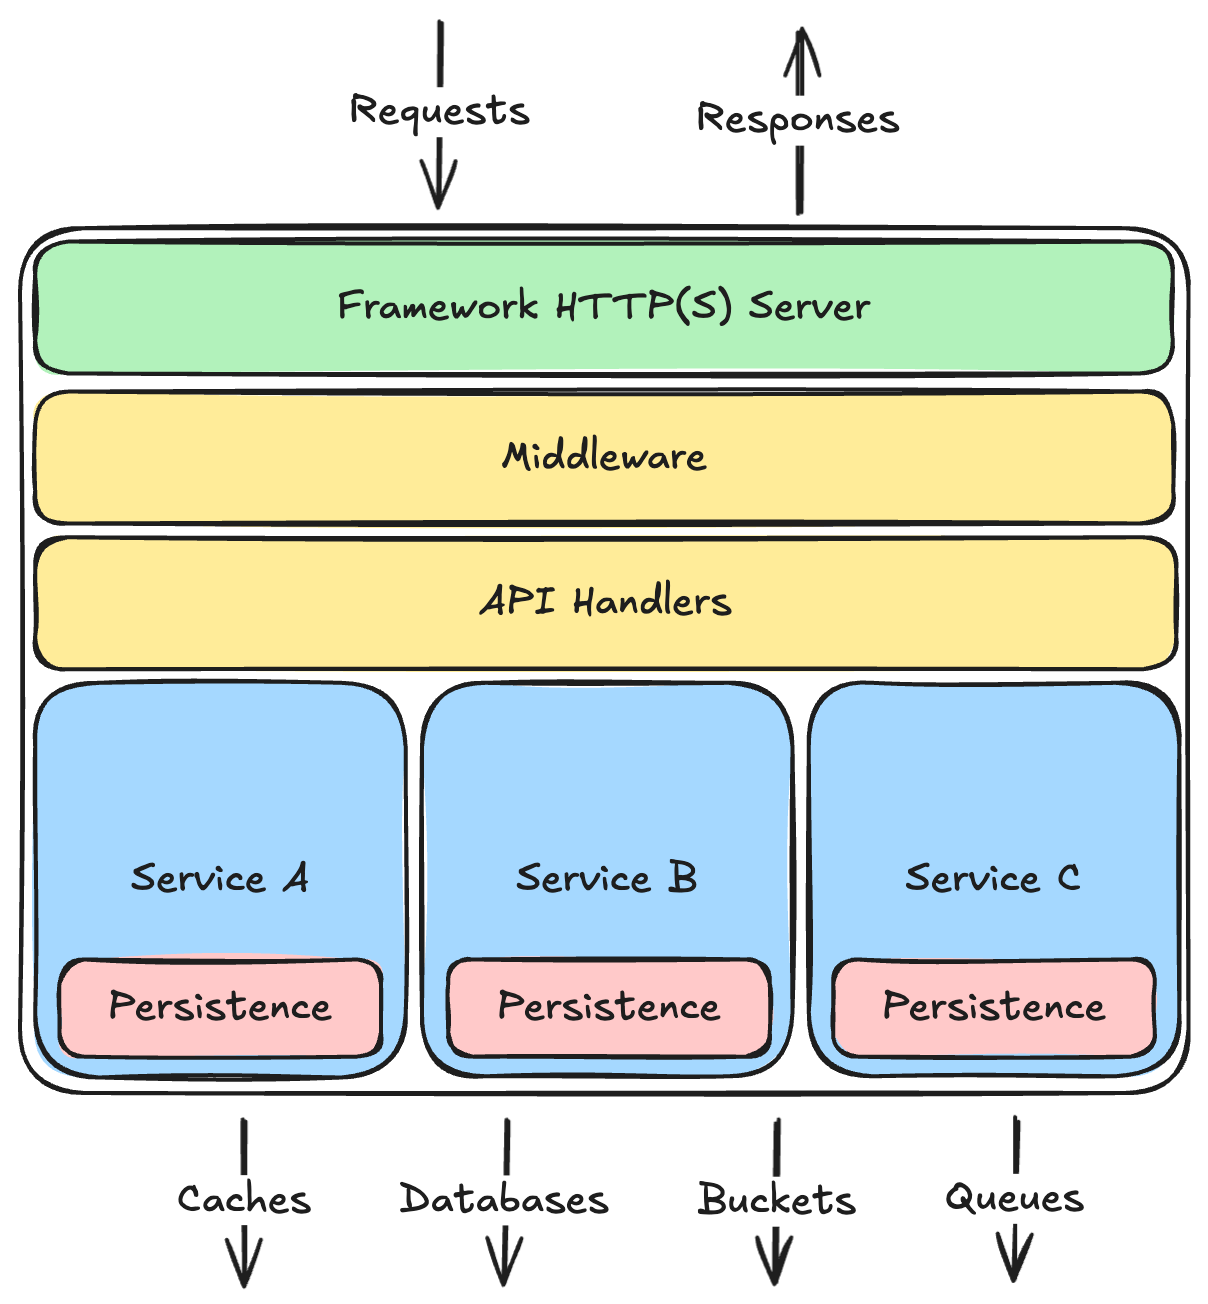
There are a few important things to note about this architecture:
- Divided into layers, with dependencies only running downward: Each layer depends on the ones below it, but never on the ones above it. In fact, each layer should have no specific knowledge about layers above it, and shouldn’t care if those layers completely change in the future.
- Layers use each other via internal APIs: Just like your overall server, each layer exposes an API to the layers above. Higher layers always talk to lower layers through their APIs, and all other code within the layer is considered private to that layer.
- Each layer has a separate concern: API handlers only deal with the API semantics, not business rules. Services only enforce business rules, not API semantics, nor persistence details. The persistence layer only knows how to save and load data, not how to properly validate or mutate it, and definitely has no idea what sort of API style the server is using. All of this keeps the layers relatively independent, and keeps core business logic (which tends to change more often than the rest) all in one place.
- Business logic is vertically segmented into isolated services: For example, in a social-media style system, the logic pertaining to user accounts should be isolated into an internal service that is separate from the logic pertaining to posts made by those accounts. These services will often need to interact with each other, but that is done through the same internal API the HTTP handlers use. This allows you to repackage a service into a separate HTTP server in the future if you need to scale or deploy it independently.
- Persistence abstracts the data stores and ensures data isolation: The persistence layer should be the only thing that knows what kind of databases or caches or message queues it talks to—the internal API this layer exposes to the services layer above should be simple enough to be supportable on different kinds of databases so you can change that over time.
All of this might be a bit abstract, so let’s look at how this works in practice with some real code. We will build upon what you read in the Authenticated Sessions tutorial by implementing a simple identity service within an API server. I’ll do this in Python, but the same principles and techniques apply to any language. Let’s start with the persistence layer and work our way up.
Persistence
As shown above, each service should have its own isolated persistence layer, so let’s begin by creating a directory structure for our code containing an identity service and its associated identity store interface:
.
└── src
    ├── main.py
    └── services
        └── identity
            ├── identity_service.py
            └── stores
                └── identity_store.py
I’m doing this in Python, but a similar directory structure can be used for most programming languages (except Java, which has some pretty specific requirements around directory structures). You can add __init__.py files in each of these packages if your tooling requires it, or if you want to re-export symbols at the package level for easier importing.
The identity_store.py will define a common programming interface that the identity_service.py will depend upon. We can then implement that interface over several different kinds of database engines. If we start out using a relational database, but decide later to switch to a key/value store like DynamoDB, the identity service doesn’t have to know or care—it just continues talking to the same common programming interface.
This common interface will define not only methods the service uses to read and write data, but also the data structures those methods will accept and return. Let’s start by defining those in the identity_store.py file.
# src/services/identity/stores/identity_store.py

from dataclasses import dataclass
from datetime import datetime

# See the Identifiers tutorial
# for details on BaseID.
from src.lib.ids import BaseID


class AccountID(BaseID):
    PREFIX = "acct"


class SessionID(BaseID):
    PREFIX = "ses"
    ORDERED = False


@dataclass(frozen=True)
class NewAccountRecord:
    id: AccountID
    email: str
    password_hash: str
    display_name: str


@dataclass(frozen=True)
class AccountRecord:
    id: AccountID
    email: str
    password_hash: str
    display_name: str
    created_at: datetime


@dataclass(frozen=True)
class AccountRecordUpdates:
    email: str | None = None
    password_hash: str | None = None
    display_name: str | None = None


@dataclass(frozen=True)
class NewSessionRecord:
    id: SessionID
    account_id: AccountID
    expires_at: datetime


@dataclass(frozen=True)
class SessionRecord:
    id: SessionID
    account_id: AccountID
    created_at: datetime
    expires_at: datetime


@dataclass(frozen=True)
class SessionWithAccountRecord:
    id: SessionID
    account_id: AccountID
    created_at: datetime
    expires_at: datetime
    account_email: str
    account_display_name: str
    account_created_at: datetime
I’m using basic data classes here because I did my implementation without using an Object-Relational Mapping (ORM) library. The SQL required to insert, select, and update these records is so simple that I didn’t feel the need to use an ORM, but if you want to use one, define these classes using your ORM’s base class instead (e.g., DeclarativeBase for the SQL Alchemy ORM).
We are using application-assigned IDs on these records for the reasons discussed in that tutorial. They will be created and assigned by the service layer, so the persistence layer only needs to save them to the database
When signing in, account holders will provide an email address and password, so the email address on a NewAccount must be unique across the system. How you ensure that will depend on what kind of database you are using. If your database supports unique constraints, you can simply add one to that column, but if not, you might need to query first or use some other technique. Regardless, we should also define a common error type that the store implementation will raise when the email already exists:
# src/services/identity/stores/identity_store.py

# ...code from above...

class EmailAlreadyExistsError(Exception):
    """
    Raised when inserting an account with an email address that is already registered
    with another existing account.
    """
Now let’s define the interface and methods that all identity stores must implement:
# src/services/identity/stores/identity_store.py

from typing import Protocol

# ...code from above...

class IdentityStore(Protocol):

    async def insert_account(self, new_account: NewAccountRecord) -> AccountRecord: ...

    async def get_account_by_id(self, id: AccountID) -> AccountRecord | None: ...

    async def get_account_by_email(self, email: str) -> AccountRecord | None: ...

    async def update_account(
        self, prev_record: AccountRecord, updates: AccountRecordUpdates
    ) -> AccountRecord: ...

    async def insert_session(self, new_session: NewSessionRecord) -> SessionRecord: ...

    async def get_session(
        self, session_id: SessionID
    ) -> SessionWithAccountRecord | None: ...

    async def delete_session(self, session_id: SessionID) -> None: ...

    async def delete_all_sessions(self, account_id: AccountID) -> None: ...
The only thing left now is to implement this interface for your chosen database engine. You could probably ask your favorite AI tool to do this for you based on the Protocol and data classes we’ve already defined.
If you want to see my implementation for PostgreSQL, check out the following files:
- schema.sql: SQL script to create the various tables and a
viewthat pre-joins the session rows to their related account rows. - pg_identity_store.py: Implementation of
IdentityStoreover that PostgreSQL schema. ThePostgresStorebase class has some common methods that any Postgres store would need, and theSqlGeneratorhelper class generates the various SQL statements easily and efficiently.
I also defined a Dockerfile and compose.yaml that make it easy to spin up a local PostgreSQL instance with that schema pre-installed (requires Docker Desktop). You can use this for testing not only on your local development machine, but also within a GitHub action runner, as they have Docker pre-installed.
Services
The services layer is where all of your business logic should be. The HTTP-related details will be handled by the API layer above, so this code won’t really be specific to an HTTP server at all—it will be just everyday classes or functions. And since the database-related details are handled by the persistence layer below, this code won’t contain any SQL or database-specific operations. That leaves just the business logic.
In a very simple API server, you might have only one internal service, but in most cases you’ll end up having several. These services may need to interact at points—for example, the accounts service may need to use the notifications service to send a welcome email to new accounts. To ensure these services remain isolated from each other, they should only talk to each other through the service’s public interface. Services should never directly query or manipulate the data belonging to another service, nor use another service’s private internal code.
To make this a bit more concrete, let’s see what the code would look like for an IdentityService that uses the IdentityStore we defined in the previous section. As a reminder, the current directory structure looks like this:
.
└── src
    ├── main.py
    └── services
        └── identity
            ├── identity_service.py
            └── stores
                ├── identity_store.py
                └── pg_identity_store.py # PostgreSQL implementation
For the IdentityStore we defined an interface (Python Protocol) that we could implement over different database engines. For the IdentityService there only needs to be one implementation, so it will be just a normal Python class. That class will expose methods that the API layer and other services will use to create accounts and authenticated sessions. Let’s start by defining the data structures those methods will accept and return:
# src/services/identity/identity_service.py

from datetime import datetime, timezone, timedelta
from dataclasses import dataclass
from argon2 import PasswordHasher

# Import all the things we defined
# in identity_store.py
from .stores.identity_store import (
    IdentityStore,
    AccountID,
    SessionID,
    AccountRecord,
    NewAccountRecord,
    NewSessionRecord,
)

@dataclass(frozen=True)
class NewAccount:
    email: str
    password: str
    display_name: str


@dataclass(frozen=True)
class Account:
    id: AccountID
    email: str
    display_name: str
    created_at: datetime


@dataclass(frozen=True)
class Credentials:
    email: str
    password: str


@dataclass(frozen=True)
class Session:
    token: str
    id: SessionID
    account_id: AccountID
    created_at: datetime
    expires_at: datetime
    account_email: str
    account_display_name: str
    account_created_at: datetime
These data classes are similar, but noticeably different from the ones we defined in the identity store. For example, when the API layer creates a NewAccount it will provide the password sent by the client, but the identity service will hash that to set the password_hash on NewAccountRecord passed to the persistence layer. Password hashing belongs in the service layer because we want passwords hashed regardless of whether the service is called from the API layer or another service. The same is true for generating the new AccountID.
We also want to define a few errors that the IdentityService can raise to callers.
# src/services/identity/identity_service.py

# ...code from above...

class InvalidCredentialsError(Exception):
    """
    Raised when the credentials provided during authentication
    are not correct. This can happen when the email or the
    password are incorrect, and no distinction is made to
    avoid leaking information to the attacker.
    """


class SessionExpiredError(Exception):
    """
    Raised when verifying a session that has expired.
    """
Now let’s start defining the IdentityService itself:
# src/services/identity/identity_service.py

# ...code from above...

class IdentityService:
    _store: IdentityStore
    _session_duration: timedelta
    _password_hasher: PasswordHasher

    def __init__(self, store: IdentityStore, session_duration: timedelta):
        self._store = store
        self._session_duration = session_duration
        self._password_hasher = PasswordHasher()
Note how a particular IdentityStore implementation is passed into the IdentityService constructor. This is a technique known as dependency injection (sometimes called “inversion of control”), where the things a class depends upon are injected via the constructor rather than created by that class directly. This allows you to pass a different IdentityStore in automated tests (e.g., a fake in-memory one) from the one your HTTP server uses in deployment.
Now let’s use that injected IdentityStore to implement a create_account() method on this IdentityService class:
class IdentityService:
    # ... __init__() code form above ...

    async def create_account(self, new_account: NewAccount) -> Account:
        password_hash = self._password_hasher.hash(new_account.password)
        new_record = NewAccountRecord(
            id=AccountID(),
            email=new_account.email,
            password_hash=password_hash,
            display_name=new_account.display_name,
        )
        record = await self._store.insert_account(new_record)
        return Account(
            id=record.id,
            email=record.email,
            display_name=record.display_name,
            created_at=record.created_at,
        )
Experienced Python developers are probably thinking that I could have converted the AccountRecord to an Account in one line, like this:
return Account(**asdict(record))
That would work for now because the source and target data classes happen to have all the same fields, but what would happen if in the future we decide to add a field to AccountRecord that we don’t want to expose on Account? Or change the name of a field on AccountRecord but not on Account? As soon as we did that, this code would break.
So while it is more cumbersome to type out all the various field assignments manually, it is less error-prone in the long run. If you use an AI-powered IDE, it could just generate this more explicit assignment code for you, so it’s not all that much of a burden.
Now that we can create accounts, let’s add methods to start and verify authenticated sessions:
from argon2.exceptions import InvalidHashError, VerificationError, VerifyMismatchError

class IdentityService:
    # ... all the methods already shown above ...

    async def authenticate(self, credentials: Credentials) -> Account:
        record = await self._store.get_account_by_email(credentials.email)
        if record is None:
            raise InvalidCredentialsError()
        else:
            try:
                self._password_hasher.verify(record.password_hash, credentials.password)
                return self._to_account(record)
            except (VerificationError, VerifyMismatchError, InvalidHashError):
                raise InvalidCredentialsError()

    async def start_session(self, credentials: Credentials) -> Session:
        account = await self.authenticate(credentials)
        record = NewSessionRecord(
            id=SessionID(),
            account_id=account.id,
            expires_at=datetime.now(timezone.utc) + self._session_duration,
        )
        inserted_session = await self._store.insert_session(record)

        # TokenSigner is a helper class with code like that
        # shown in the Authenticated Sessions tutorial.
        token = self._token_signer.sign(inserted_session.id.encode())

        return Session(
            token=token,
            id=inserted_session.id,
            account_id=inserted_session.account_id,
            created_at=inserted_session.created_at,
            expires_at=inserted_session.expires_at,
            account_email=account.email,
            account_display_name=account.display_name,
            account_created_at=account.created_at,
        )

    async def verify_session(self, session_token: SessionToken) -> Session:
        id_bytes = self._token_signer.verify(session_token)
        session_id = SessionID(id_bytes.decode())
        record = await self._store.get_session(session_id)
        if record is None or datetime.now(timezone.utc) >= record.expires_at:
            raise SessionExpiredError()

        return Session(
            token=session_token,
            id=record.id,
            account_id=record.account_id,
            created_at=record.created_at,
            expires_at=record.expires_at,
            account_email=record.account_email,
            account_display_name=record.account_display_name,
            account_created_at=record.account_created_at,
        )
Note how the start_session() method returns not only the session details, but also the digitally-signed session token. This work belongs in the services layer because any kind of API or other service that starts a session needs that token.
Given what we’ve done so far, you can add the rest of the methods to support ending a session and ending all sessions for an given account. Or you can see my implementation here.
API Handlers
API handlers are just functions that receive a parsed request and return a response. In some frameworks, these functions return nothing and use another input argument to write the response instead (e.g., a response or writer argument), but the gist is the same.
In most “Hello, World!” tutorials, you’ll typically see a lot of code in these API handlers, including direct calls to the database. Please hear me when I tell you that is a very Bad Idea™. Calls to the database are the responsibility of the persistence layer. Data validation and business rules are the responsibility of some service in the services layer.
The API handler functions should only concern themselves with the details of the API semantics, and nothing else. For example, during an account sign up request, the handler should only construct a NewAccount object and pass it to the AccountsService. The service will do all the data validation and business logic necessary to create a new AccountRecord, and the persistence layer will save that to the database. If an exception occurs, the API handler catches it and translates it into the appropriate HTTP response status code and message.
The reason for this strict separation is so you can evolve your API separately from your services. For example, many startups will at some point change their API in a backwards incompatible way, but still need to support older clients that haven’t yet moved to the new API. Or they may decide to move from a REST style to GraphQL or gRPC or whatever new shiny style emerges in the future. Regardless, both the new and old APIs can use the same set of internal services, making it relatively easy to support both with little code duplication.
To make this more concrete, let’s define a few API handler functions assuming we’re using the FastAPI web framework with pydantic for input validation. Start by creating a new api directory under src/ and a new file within that called susi.py (for sign-up/sign-in).
.
└── src
    ├── main.py
    ├── api
    │   └── susi.py
    └── services
        └── identity
            ├── identity_service.py
            └── stores
                ├── identity_store.py
                └── pg_identity_store.py
Let’s start by defining an API route for POST /accounts, which will let a customer sign up for a new account. We begin by defining what the request and response bodies will look like:
# src/api/susi.py

from datetime import datetime
from pydantic import BaseModel, EmailStr, Field
from fastapi import APIRouter, Depends, HTTPExceptio

class NewAccountRequest(BaseModel):
    email: EmailStr
    password: str = Field(min_length=6)
    display_name: str = Field(min_length=1)

class AccountResponse(BaseModel):
    id: str
    email: str
    display_name: str
    created_at: datetime
Pydantic models help you validate the request body JSON passed to your APIs. If a client omits one of the required fields defined in the model, the FastAPI framework will automatically respond with a detailed error. The same is true if the values sent are not of the correct data types, or fail the validations defined in the Field() definitions.
We can now reference these request and response types in a new API handler function.
# src/api/susi.py

# ...code from above...

router = APIRouter()

@router.post("/accounts", status_code=201)
async def post_accounts(
    new_account_request: NewAccountRequest,
    identity_service: IdentityService = Depends(identity_service),
) -> AccountResponse:
    new_account = NewAccount(
        email=new_account_request.email,
        password=new_account_request.password,
        display_name=new_account_request.display_name,
    )
    try:
        account = await identity_service.create_account(new_account)
    except EmailAlreadyExistsError:
        raise HTTPException(
            409, f"Email address '{new_account_request.email}' is already registered."
        )

    return AccountResponse(
        id=account.account_id,
        email=account.email,
        display_name=account.display_name,
        created_at=account.created_at,
    )
Note how the API handler code is actually quite simple. It’s job is merely to translate:
- the API request body into whatever the service requires as input;
- the return value from the service into the API response body;
- and any exceptions raised by the service into an HTTPException with the relevant response status code.
You might be wondering how the identity_service got passed as the second argument to that handler function. FastAPI has its own dependency injection features that make it rather easy to inject service instances into API handler functions. You can see the functions that provide these dependencies here.
Keep going and add APIs for signing in to start an authenticated session, and signing out!
Middleware
As we built more and more API servers throughout the 2000s, we discovered that we were doing the same sort of things over and over in all of our request handlers: logging, authentication, authorization, routing, response compression, etc. These are things you want to do on all, or at least most, of the requests sent to every API server. It would be handy to implement this logic once, and just inject it into the request processing stack. Thus was born middleware.
Middleware is just a fancy term for a function that wraps around your API handler functions, or another middleware function. For each request, the HTTP server invokes the top-level middleware function, which does some work, calls the next function in the chain, and then maybe does some more work after that function returns. Graphically it looks like this:
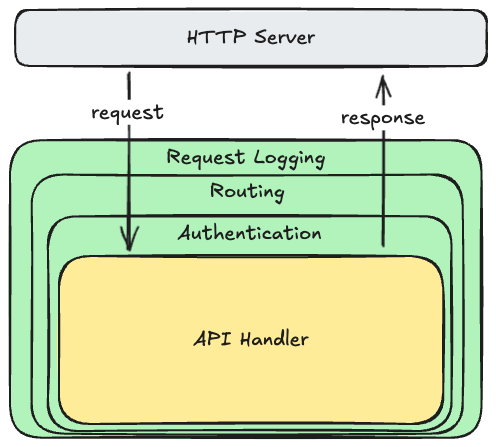
Because each middleware function wraps around the next, it can do work before and after the inner function executes. For example, the request logging middleware might start a timer and collect some information from the request on the way in (e.g., the method and the resource path), and then write a log line on the way out containing the request/response details and how long it took to process. Other middleware functions only do work on one side: for example the routing middleware will decide which API handler to call based on the request method and resource path, but doesn’t need to do anything after that handler returns.
The most common middleware you will see is a request router (the APIRouter() above is an example). This is responsible for deciding which of your API handler functions to invoke depending on what is in the request. For example, you can configure the router to call your signup() API handler when the request is for POST /accounts, but your signin() handler when the request is for POST /sessions. In some frameworks the router is exposed as part of the HTTP server, or passed to it during construction, but it’s really just a bit of middleware.
Most frameworks come with a wide array of built-in middleware already included, and more that you can simply plug into the server when you construct it. Most will allow you to write your own middleware functions as well. To see how, consult the documentation for your framework, or ask your favorite API model to generate some starting code for you. But keep this code separate from your API handlers and the rest of the layers.
HTTP(S) Server
The top-most HTTP(S) layer is typically provided by whatever web server framework you are using—you should never have to write this yourself. For example, if you’re using Node.js with Express, the Node runtime handles this part. If you’re using Rust with Axum, or Python with FastAPI, or Java with Spring, it’s a similar story. In Go, you could use just the standard library, or a more sophisticated package like Gin that builds upon it.
Most frameworks offer servers that can speak both version 1 and 2 of HTTP, though some older ones may only support version 1. If you supply a digital certificate and private key when constructing the server, it will also support HTTPS.
This layer is concerned only with managing network connections, protocol negotiation, encryption/decryption, parsing requests, invoking a top-level middleware or handler function, and writing responses to the network. Because it’s typically provided by your framework, it’s fairly generic and only knows about the top-level middleware or handler function you register with it.
Observability
Unlike a graphical client application, API servers are mostly invisible by default. If you send a request, you’ll be able to see the response, but you can’t see what it’s doing at other times. This makes it especially hard to know when your server is slowing down, running out of memory, encountering unexpected errors, or about to crash.
To overcome this, we typically add some functionality that lets us continuously observe and monitor our system components. For API servers, this usually consists of writing log messages about every request, and publishing various metrics.
Request and Error Logging
At the very least, your API servers should write a line to the standard output stream describing every request the server processes. Most web server frameworks will do this for you automatically, or via a request logging middleware library you can add.
You should also log any exception/errors that occur while processing requests. Again, many web server frameworks will do this automatically via try/catch blocks wrapped around your API handlers, but if you catch and handle exceptions lower-down in your services or persistence layers, you should also write those to standard out.
When developing and debugging on your local machine, you can see these messages in the terminal you used to start the server. In deployment, these are typically piped to a logging service like Splunk or something similar offered by your cloud provider (e.g., AWS CloudWatch).
Frameworks that do request logging automatically will typically include only the most basic details about the request and response: method, resource path, response status code, and latency. But many will let you extend this with other properties from the request and response that might be relevant to your API. For example, if you support idempotency keys for data creation APIs, you could include those in the log messages so you can see when these requests are being retried.
These log messages are useful not only for observing the current set of requests being made to your server, but also diagnosing failures when they occur. For example, if you see a lot of 5xx response status codes in the log, you can look at the exception messages to figure out what happened.
Metrics
Log messages are mostly useful for diagnosing problems after a failure has occurred, but it’s also useful to continuously monitor key metrics for your server, and alert when those metrics go out of acceptable range, before your server crashes.
Key metrics include things like:
- number of requests processed by the server
- latency of those requests at various percentiles
- number of requests with a successful response vs an error response
- number of exceptions caught
- number of queries being sent to the database, and their latency
- number of requests being made to other API servers, and their latency
- amount of memory currently in use, and how much memory is still free
- the percentage of available CPU that is being used
Note that these are values that constantly change over time, so your server must periodically report them in some way. In the past, we typically used a library called statsd to push these to a metrics and dashboard service like Graphite, but in 2025 it’s more common to expose them via another API that a metrics service like Prometheus calls periodically.
Most web server frameworks can track and report metrics related to HTTP requests automatically, or via middleware you add. But metrics about requests to your database, or other API services, must be added by your own code. How you do this will depend on what framework and metrics service you use—ask GitHub Copilot or your favorite LLM to generate some example code for your particular context.
Regardless of which metrics service you use, these metrics are used for two things:
- Dashboards that display these metrics on scrolling charts, so you can visualize what your server is doing.
- Automatic alerts that go off when a metric goes outside it’s acceptable bounds. For example, you can configure an alert to fire when your server experiences more than five error responses within five consecutive minutes, or when the latency of your APIs gets too high (or whatever makes sense for your API). These alerts can trigger emails, Slack messages, phone calls, or mobile push notifications via a service like PagerDuty. When these alerts go off, it’s usually a sign that your server is having troubles, and manual intervention might be necessary to avoid a crash.
Conclusion
We’ve covered a lot of details in this tutorial, but hopefully you’ve now learned some of the universal principles, techniques, and best practices professional engineers use to build the kind of real-world services you interact with every day. These principles and techniques can be applied to any API server you build, regardless of what programming language or framework you use.