Introduction
The world doesn’t need another “Hello, World!” tutorial.
You know the ones I mean: those articles that promise to teach you in ten minutes how to build a web server in whatever the trendy programming language is this week. You copy and paste some code (typically all in just one file) and, voilà! You have a web server running on your laptop that replies to every request with a simple greeting.
These tutorials can get you started, but they also leave you with a false sense of accomplishment. You’ve learned practically nothing about building a real system. You’re left at the edge of a cliff, wondering how to:
- expand this to do something meaningful?
- design an easy-to-use API?
- properly structure the code so it doesn’t turn into a giant ball of spaghetti as it grows and changes?
- protect the system against attack?
- authenticate callers and authorize their requests?
- reliably perform asynchronous and scheduled work?
- notify clients about new things that happen on the server?
- structure your data and handle changes to that structure over time?
- ensure the authenticity and integrity of that data?
- deploy to production and upgrade the system without downtime?
- monitor the system and automatically generate alerts when something goes wrong?
- scale up to meet increased usage, and scale back down during lulls?
- allow the system to be extended by others?
In short, how do I build not just a toy, but a complete system? How do I build something as complex and scalable as a social media platform, or an online retail store, or a consumer payment system?
These tutorials, and the courses that use them, will teach you how to build such things. It will definitely take you longer to go through these than one of those “Hello, World!” tutorials, but you’ll also learn a lot more. If you’re taking one of my courses, you’ll also get to put them into practice, which is the best way to really learn the concepts and techniques. By the end, you’ll have a conceptual foundation upon which you can build a successful career as a systems engineer.
So let’s get started! First up: a tour of the various building blocks that make up just about any transaction processing system.
System Building Blocks
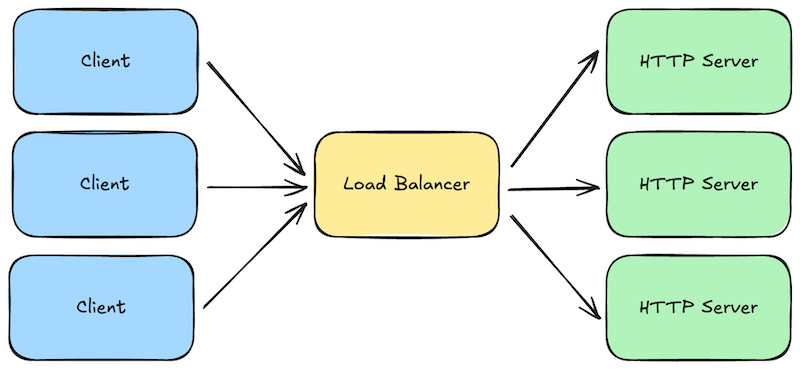
If you were to look at the architectures of the web sites you use most often, you would probably notice a lot of similarities. Most will have a set of HTTP servers, with load balancers in front, that respond to requests from clients. Those servers will likely talk to databases, caches, queues, and buckets to manage data. They might also use machine-learning (ML) models to make predictions. Event consumers will respond to new messages written to the queues, or changes to database records. Other jobs will run periodically to archive data, re-train ML models with new data, or perform other routine tasks. What these components do will no doubt vary from system to system, but the types of components used will come from a relatively small set of common building blocks.
This tutorial will give you an overview of these common building blocks. We will learn what each is typically used for, and some common options or variations you might see in practice. Once you understand these building blocks, you can combine them in various ways to build just about any kind of system.
Load Balancers and API Gateways
When a request is made to your web servers, either by a web browser or by a client calling your application programming interface (API), the first major system component to receive those requests is typically a load balancer. These are the front door to your system.
Load balancers are fairly generic components, meaning they are typically open-source software programs that can be used “off the shelf” with just a minimal amount of configuration. Popular examples include NGINX and HAProxy. Cloud providers also offer these as hosted services you can simply deploy—for example, AWS Elastic Load Balancer or Azure Load Balancer.
Load balancers perform several jobs that are critical to building highly-scalable and reliable systems:
- Load Balancing: Not surprisingly, the primary job of a load balancer is to distribute requests across a fleet of your “downstream” HTTP servers (i.e., load balancing). You configure the IP addresses for your domain to point to the load balancers, and each load balancer is configured with a set of addresses it can forward those requests to. The set of downstream addresses can then change over time as you roll out new versions or scale up/down. Balancers typically offer multiple strategies for balancing the load, from simple round-robin to more sophisticated ones that pay attention to how long requests are taking and how many outstanding requests each downstream server already has.
- Blocking and Rate Limiting: Load balancers also protect your downstream HTTP servers from attack and abuse. They are specifically designed to handle massive amounts of requests, and can be configured to block particular sources of traffic. They can also limit the number of requests a given client can make during a given time duration, so that one client doesn’t hog all the system resources.
- Caching: If your downstream HTTP servers mostly return static content that rarely changes, you can configure your load balancers to cache and replay some responses for a period of time. This reduces the load on your downstream servers.
- Request/Response Logging: Load balancers can be configured to log some data about each request and response so that you can analyze your traffic, or diagnose problems reported by your customers.
- HTTPS Termination: If your load balancer and downstream servers are all inside a trusted private network, and you don’t require secure/encrypted connections between your own servers, you can configure your load balancer to talk HTTPS with the Internet, but HTTP with your downstream servers. This used to be a common configuration when CPU speeds made HTTPS much slower than HTTP, but these days (in 2025) it’s common to just use HTTPS everywhere.
Load balancers are sometimes referred to as reverse proxies because they essentially do the reverse of a client-side proxy. Instead of collecting and forwarding requests from multiple clients within an organization’s internal network, load balancers collect requests from the Internet and forward forward them to downstream servers within your system.
Although load balancers can be used off-the-shelf with minimal configuration, many now support much more customized behavior via scripting. This customized behavior can be very specific to your use case, but common examples include:
- Authentication: If your servers and clients exchange digitally-signed authentication tokens, your load balancer scripts can verify the token signatures, and block obvious attempts to hijack sessions by tampering with those tokens. This reduces obviously fraudulent load on your downstream servers, saving resources.
- Authorization: Your scripts could also look up whether the authenticated user has permission to make the request they are making.
- Request Validation: If requests contain data that is easy to validate, you can perform those simple validations on your load balancers to block obviously invalid requests before they get to your downstream servers.
- Request Versioning: Sometimes you will want to change the API on your downstream servers, but you can’t force your existing clients to change their code, so you have to support multiple versions of your API at the same time. Your load balancer scripts can translate version 1 requests into version 2, and version 2 responses back into version 1 responses.
All of this custom functionality could occur within your downstream HTTP servers, but if you can move some of it into your load balancers, you can block obviously invalid requests early, reducing the load on your downstream servers. Load balancers are typically written in a high-performance language like C++ or Rust, so they can often handle much more load than downstream servers written in less-performant and scalable scripting languages like Python, Ruby, or JavaScript.
When load balancers become highly-customized for a given system, we often start to refer to them as API Gateways instead to reflect that they are specific to a particular Application Programming Interface (API). But they still serve the basic jobs described above, acting as the front door to the rest of your system.
HTTP Servers
Load balancers forward requests to one or more HTTP servers. These are simply programs that run continuously, listen for incoming requests on a given network port number, and write responses.
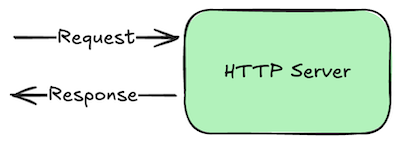
What makes them HTTP servers in particular is that the requests and responses adhere to the Hypertext Transfer Protocol (HTTP) standard. This is a relatively simple request/response protocol, so it’s quite easy to support. Nearly every programming language has built-in or library frameworks for building HTTP servers.
By default, HTTP is not encrypted, but we can add encryption by getting a digital certificate and supporting HTTPS, which stands for “HTTP Secure”. The core protocol remains the same, but the messages sent back and forth are encrypted using Transport Layer Security (TLS), and clients can use the digital certificate to verify that they are really talking to the server they think they are talking to.
Some HTTP servers are really just glorified file servers. Clients can request files from a specific directory on the server’s disk, and in some cases, the server might allow clients to update those files as well. These files are typically those that comprise the content of web pages: HTML, CSS, various image and video formats, and JavaScript.
But these days (in 2025) it’s more common to build HTTP servers that send and receive structured data instead of formatted content. For example, instead of returning a formatted HTML page showing the contents of your social media feed, these kinds of servers return just the data, encoded in an easily interpreted text-based format, such as JSON. Clients can then use that JSON in any way they want.
This decoupling is very powerful: it allows the same HTTP server to support many types of application platforms that render content very differently. For example, a web client can transform the JSON into HTML to display within a web page, while a native mobile app will put it into native UI elements. Scripts or AI models might only need the data itself, combining or transforming it before sending it somewhere else.
Because these kinds of HTTP servers expose a programming interface to applications, as opposed to files on disk, they are often referred to as API servers. Strictly speaking, they are “HTTP API servers” because they speak HTTP and not some other networking protocol, but HTTP is such a default choice these days that we typically leave off the “HTTP” part.
“Serverless” Functions
In a cloud computing environment (AWS, Azure, Google Cloud, etc.), API servers are usually deployed as a continuously-running virtual machine with a fixed amount of CPU and RAM. You pay for these machines as long as they are running, regardless of whether they are receiving requests. They are like always leaving the lights on in a room—that’s fine if people are always coming and going, but a bit of a waste if the room isn’t used very often.
If your API is only used sporadically, you can often save money by turning them into so-called “serverless” functions behind an API gateway. For example, on AWS you could use their API Gateway product to expose a set of APIs, and configure each to trigger a specific AWS Lambda function when requested.
When the API Gateway receives an HTTP request matching one of your configured APIs, it triggers the associated Lambda function, waits for its response, and transforms that into an appropriate HTTP response. The Lambda response can typically provide not only a status code and response body, but also various headers that should be included in the API Gateway’s response.
The API Gateway and your Lambda functions will scale automatically to handle just about any request load you might experience. But Lambda functions do tend to execute more slowly than a dedicated HTTP server. Lambda functions execute on AWS-managed servers, and those servers are also executing everyone else’s functions at the same time. Each server has only a fixed amount of resources, so your performance may vary depending on what the other functions are doing at the same time.
New server instances also need to download and initialize your Lambda function’s code on first execution, which can take a while if the code is particularly large or requires JIT compilation. This results in a cold-start problem, where the latency experienced by the client seems to spike on occasion for now particular reason. You might be able to avoid this using their SnapStart feature, but it currently has a lot of limitations.
But the good news is that you are only charged for the CPU and resources used by your Lambda function while it was actually running. If your API gets only a few requests per-day, you only pay for those few short invocations, not the rest of the time when the HTTP server was processing other requests for other people.
The economics of serverless functions, combined with their higher latency and cold start problem, imply that serverless functions can be a good choice for APIs that are used infrequently or sporadically. But if you are expecting many requests a second, at a more or less constant rate, and consistent performance really matters, then a continuously-running server is typically a better option.
WebSocket Servers
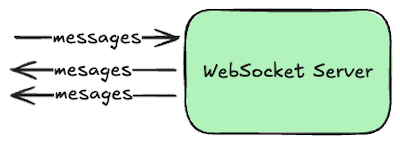
Although HTTP is built on top of lower-level network sockets, it remains a very simple request/response protocol. Clients can make requests to servers, and the servers can respond, but the server can’t tell the client about something without the client asking about it first. This is fine when your system only needs to answer questions posed by clients, but what if your system also needs to notify those clients about something they haven’t asked about yet?
In these cases we use the bi-directional WebSockets protocol instead, which allows either side of the conversation to send a new message at any time. Clients can still send request-like messages, and the server can send response-like messages in return, but the server can also send unsolicited messages to the client whenever it wants to. For example, the server might notify clients about new posts to a channel made by other clients, or that a long-running asynchronous job is now complete.
To get a WebSocket connection, clients actually start by talking HTTP and then requesting an “upgrade” to WebSockets. This allows a server to support both HTTP and WebSocket conversations over the same port number, which is handy when clients are behind a firewall that only allows traffic to the Internet over the customary web port numbers.
Once connected, both the server and the client can send messages to each other at any time. But either side may disconnect at any time as well, so your client and server code must be written to handle this. Typically we use queues and consumers in front of a WebSocket connection to ensure that all messages eventually get delivered to the other side. But if speed is more important than guaranteed delivered (e.g., multi-player games), just write directly to the WebSocket and discard messages that fail to send.
Databases
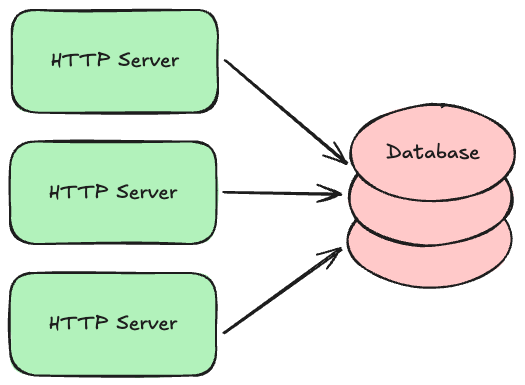
Most systems will eventually accept new data that you want to keep around for a while, and you typically need to ensure that data doesn’t accidentally get lost. The natural home for data like this is a persistent database with good durability guarantees.
There are several kinds of databases used to build transaction processing systems:
- Relational (SQL): The most common kind of database where data is organized into a set of tables, each of which has an explicit set of columns. Data can be flexibly queried by filtering and joining table rows together using common keys. Most relational databases also support transactions, which allow you to make multiple writes to different tables atomically. Common open-source examples include PostgreSQL, MySQL, and MariaDB. Most cloud providers also offer hosted versions of these, with automated backups.
- Document/Property-Oriented (aka “No SQL”): Instead of organizing the data into tables with explicit columns, these databases allow you to store records containing any set of properties, and those properties can in theory vary from record to record (though they often don’t in practice). In some systems you can only read and write a single document at a time given its unique key, but others support indexes and quasi-SQL querying capabilities. Common open-source examples include MongoDB, CouchDB, and Cassandra. Most cloud providers also offer their own hosted solutions, such as DynamoDB or Spanner.
- Simple Key/Value: Very simple but extremely fast data stores that only support reading and writing opaque binary values with a unique key. Common open-source examples include LevelDB and its successor RocksDB. These are currently just embedded libraries, so one typically builds a server around them to enable access to the database across a network.
Complex systems may use multiple types of databases at the same time. For example, your highly-structured billing records might be stored in a relational database, while your loosely-structured customer profile records might be stored in a document-oriented database.
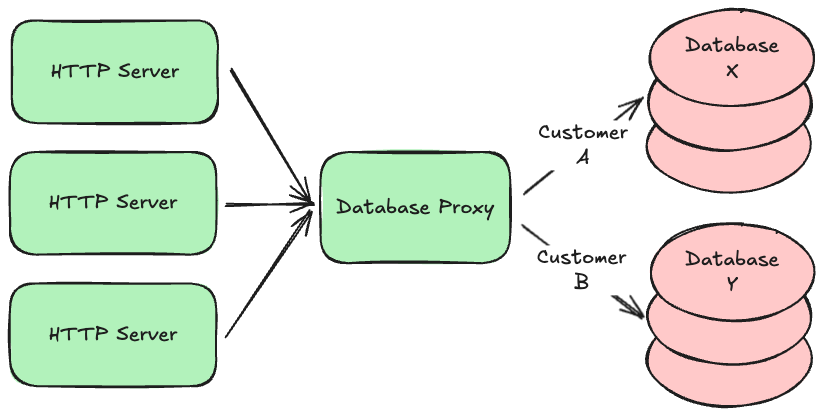
Regardless of which type you use, it is common to partition or “shard” your data across multiple database servers. For example, data belonging to customer A might exist on database server X, while data belonging to customer B might exist on database server Y. This allows your system to continue scaling up as the amount of data you store increases beyond what a single database server can handle. Knowing where a given customer’s data lives is often delegated to a component in the middle, similar to a load balancer or proxy, that directs requests to the appropriate locations. This allows you to change the partitioning strategy over time without having to update all your API servers.
Many of the hosted databases offered by cloud providers do this partitioning automatically—for example, both DynamoDB and Aurora automatically partition your data so that your data size can grow almost indefinitely. If you self-host your databases instead, look for an open-source partitioning proxy for your particular database engine (most have one).
Many database engines also support clustering where each partition consists of multiple physical servers working together as a single logical database. One server is typically elected to be the primary or leader. The others are known as secondaries, followers, or read replicas. Writes are always sent first to the primary, which replicates those writes to the secondaries. If strong durability is required, the primary will wait until a majority of the secondaries acknowledge the write before returning a response. If the secondaries are spread across multiple physical data centers, it then becomes extremely unlikely you will lose data, but your writes will take longer due to all the extra network hops.
Clusters also provide high availability by monitoring the primary and automatically electing a new one if it becomes unresponsive. The primary can then be fixed or replaced, and rejoin the cluster as a secondary. This process can also be used to incrementally upgrade the database engine software while keeping the cluster online and available.
Since all secondaries eventually get a copy of the same data, reads are often routed to the secondaries, especially if the calling application can tolerate slightly stale data. If not, the application can read from a majority of the secondaries and use the most up-to-date response. This keeps read traffic off of the primary so that it can handle a higher volume of writes.
Caches
In some kinds of systems, requests that read data far outnumber requests that write new data. We call these read-heavy systems as opposed to write-heavy ones. Read-heavy systems often benefit from caches, which are very fast, in-memory, non-durable key/value stores. They are typically used to hold on to data that takes a while to gather or calculate, but will likely be requested again in the near future. For example, social media sites often use caches to hold on to the contents of your feed so that they can render it more quickly the next time you view it. Popular open-source caches include redis and memcached.

Using a cache is about making a tradeoff between performance and data freshness. Since the data in the cache is a snapshot of data from your persistent database (or some other service), that data might have changed since you put the snapshot in the cache. But if you know that data doesn’t tend to change very often, or if your application can tolerate slightly stale data in some circumstances, reading from your cache instead of the original source will not only be faster, it will also reduce load on that source.
The main tuning parameter for this tradeoff is the Time to Live (TTL) setting for each value you put in the cache. This is the time duration for which the cache will hold on to the data. After the TTL expires, the cache will “forget” the data, and your application will have to read a fresh version again from the original source. A short TTL will improve data freshness but decrease performance, while a long TTL will do the opposite.
If your HTTP server tries to load some data from the cache but it’s no longer there (known as a cache miss), getting that data will actually be slower than if you didn’t have a cache at all, as your server had to make an additional network round-trip to the cache before going to the source. This is why it’s never free to just add a cache. You should only add one when you are confident that it will improve your average system performance. Analyze your system metrics before and after the introduction of a cache, and if it doesn’t result in a noticeable improvement, remove it.
Buckets
Databases are fantastic for small structured data records, but they are a poor choice for large binary content like documents, pictures, video, or music. These kinds of files are often referred to as BLOBs or “Binary Large Objects” and the best home for them are buckets.
A bucket is like a file system that is hosted by your cloud provider. You can write files to a particular file path, read them given that path, and list paths given a common prefix. Examples include AWS S3, Google Cloud Storage, and Azure Blob Storage.
Buckets are designed to store large numbers of potentially huge files, but most lack the ability to store structured metadata about those files, so we often combine them with databases. For example, a social media system might store a structured record about your post in a database, but put the pictures or videos attached to your post into a bucket.
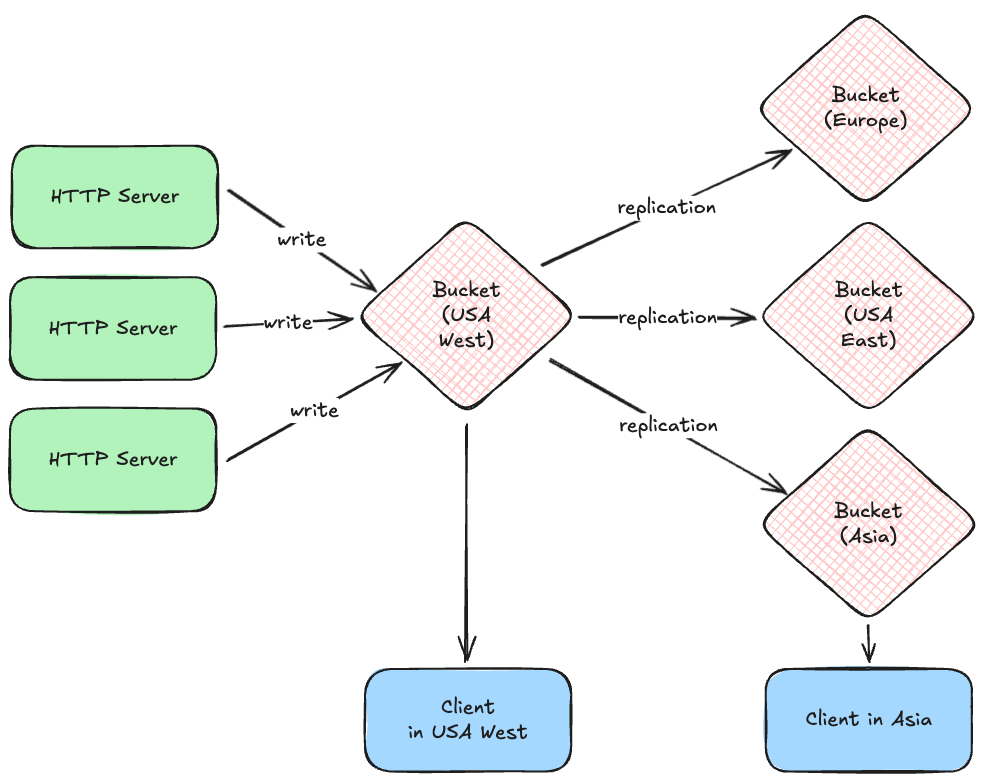
Most cloud providers give you the option of replicating bucket files between geographic regions, and obtaining region-specific URLs for files, so that your clients can quickly download them. For example, your system might write files initially to a bucket in a USA west coast data center, but those are quickly replicated to other regions, allowing a client in Asia to download the file from a much closer data center.
Queues and Consumers
When your HTTP server processes a request, it will likely need to read or write some data synchronously (i.e., before responding to the client), but some work could be done asynchronously. For example, when a customer signs up for a new account, the HTTP server must write a new record in the accounts database, but sending a confirmation or welcome email could be done later. To ensure this task actually gets done, we typically use a queue.
A queue is a special kind of database that tracks an ordered list of transient records, which are often called messages. Your HTTP server (or any system component) can publish new messages to the end of the queue, and other components consume those messages from the head of the queue, processing them in some way (e.g., send an email). If there are multiple consumers, queues can be configured to deliver each message to the first available consumer (job queue model), or each message to all consumers (broadcast model). Some queues will remove messages after consumers acknowledge successful processing, while others make consumers track where in the queue they would like to start reading.

Another common use of a queue is as a source for notifications that a WebSocket server should send to clients. For example, when a user makes a new posts to a social media system, the HTTP server processing that request will write the post to the database (and maybe attached media files to a bucket), and then publish a message about the post to a queue. The WebSocket servers then consume those messages from the queue, forwarding each message to all connected clients. This allows clients to immediately display the new post without having to ask the server for it.
Many queues will let you define multiple topics within the same server, which allows you to have multiple independent streams of messages. Different consumers can read from different topics: for example, you might define one topic for “new accounts” and another for “password resets” and have different consumers dedicated to each.
The most sophisticated queues also support running in clusters, similar to the database clusters discussed earlier. This allows the queue to remain available even when one of the servers goes down, or needs to be upgraded. It can also ensure durability by replicating new messages to a majority of the secondaries before responding to the publisher.
Common examples of open-source self-hosted queues are Kafka and RabbitMQ. Cloud providers also offer hosted versions of these products, or their own queuing solutions, such as AWS MSK or AWS SQS.
Periodic Jobs
So far all the system components we’ve discussed run continuously and react to things like synchronous requests or an asynchronous messages published to a queue. But in many systems we need other components that just run periodically, on a schedule. For example, payment systems need to generate clearing files of all approved transactions at least once a day and send them to the payment network. Or a system with an ML model might want to retrain that model once a week based on new observations.
These periodic jobs are just scripts that get executed by a scheduler. They start, run to completion, and exit. In between runs, nothing is executing except for the scheduler.
The schedulers primary job is to run jobs at the appropriate times, but most schedulers also record information about each run, including detailed log messages written by jobs as they execute. This allows operators to view whether jobs encountered errors, and diagnose the cause.
Examples of periodic job schedulers range from the simple yet tried and true cron to the very sophisticated and resilient Temporal.
ML Models
Many systems these days also use Machine Learning (ML) models to make predictions about the data they are processing, or the actions their users will likely take next. For example, a social media system might use ML models to predict tags for new images, or to screen new posts for malicious content. A payment system might use them to predict the probability of fraud, or the likelihood it will be declined.
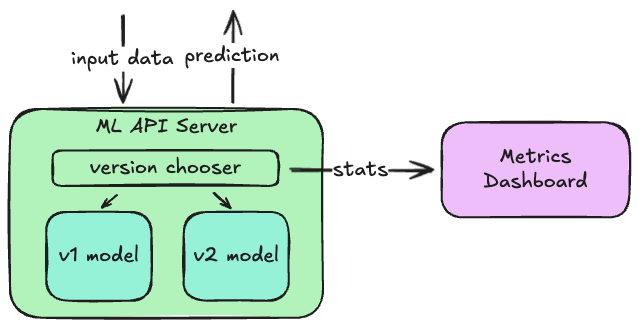
Sometimes these models can be run in-process with the main API servers, but it’s more common to host these in their own API server that are then called by either the main API servers or a message queue consumer. This is especially useful when you want to test new versions of a model: a small portion of requests can be routed to the new model, and its predictions can be compared to those made by the older model for the other requests. If the distributions of predictions is not what you expect, you can quickly switch back to the previous version without needing to update the callers.
Metrics and Logs
Unlike GUI clients, server-side components are pretty invisible on their own: you can make a request and observe the response, but you can’t really see the requests made by others or how well they are being processed. To make our system observable we publish metrics and logs from all the components. These are sent to, or collected by, other components that let us view these metrics on dashboard charts, or query the logs.
The most popular open-source metrics solution these days is Prometheus, which periodically gathers metrics from all your servers, aggregates and monitors them, and provides a query API to dashboard clients like Grafana. When metrics stray outside your established normal bounds, Prometheus can send alerts to your team via email, Slack, or PagerDuty.
Metrics can include machine-level things like CPU and memory usage, or API-level things like the percentage of error responses or the request latency distribution. When these metrics go out of tolerance, it’s likely a sign that something bad is happening, and an operator might need to intervene to keep the system running properly.
Log messages are typically written by a server to its standard output stream, and that can be read by various logging services. The most popular these days is Splunk, which provides a very sophisticated query language. API servers typically write log lines about every request they process, and every error they encounter, so that operators can get detailed information about what is happening and what went wrong.
Conclusion
Most systems you use every day are comprised of these basic building-blocks. Now that you know what they are and what to use them for, we can combine them to produce just about any sort of system we want to build!
Trade-Offs and Trapdoors
When you build a new system from scratch, you have to make a lot of decisions:
- Which programming languages should I use?
- Which framework should I use for my API server?
- Should I build “serverless” functions or continuously-running servers?
- Which database should I use?
- Should I build a web client, native mobile apps, or both?
- Which framework should I use for my web client?
- Should I build my mobile apps using native platform languages and tools, or using a cross platform framework?
It can be a bit overwhelming. Unfortunately, there is no one right answer to any of these questions beyond “it depends.” Perhaps a better way to say that is:
Every decision in software engineering is a trade-off that optimizes for some things at the cost of other things. And while some of these decisions can be easily reversed in the future, others are trapdoors.
This implies two questions to answer when making these kinds of decisions:
- What do I want to optimize for? What will actually make a difference toward achieving my goals, and what doesn’t really matter right now? Optimize for the things that actually matter, and don’t worry about the rest until you need to.
- How easily could this decision be reversed in the future if necessary? If it’s easy to reverse, don’t sweat it: make the appropriate tradeoff based on your current situation and move on. But some decisions are more like trapdoors in that they become prohibitively expensive to change after a short period of time. These can become a millstone around your neck if you make the wrong bet, so they require more consideration.
Let’s put these principles into practice by analyzing a few common trade-offs system builders have to make early on, many of which can become trapdoors. For each we will consider what qualities you could optimize for, and which would be most important given various contexts. For those that could be trapdoors, I’ll also discuss a few techniques you can use to mitigate the downsides of making the wrong decision.
Choosing Programming Languages and Frameworks
One of the earliest choices you have to make is which programming languages and frameworks you will use to build your system. Like all decisions in software, this is a trade-off, so it ultimately comes down to what you want to optimize for:
- Personal Familiarity: Founding engineers will typically gravitate towards languages and frameworks they already know well so they can make progress quickly. This is fine, but you should also consider…
- Available Labor Pool: If your system becomes successful, you will likely need to hire more engineers, so you should also consider how easy it will be to find, hire, and onboard engineers who can be productive in your chosen languages/frameworks. For example, the number of experienced Java or Python engineers in the world is far larger than the number of experienced Rust or Elixir engineers. It will be easier to find (and maybe cheaper to hire) the former than the latter.
- Legibility: Code bases written in languages that use static typing (or type hints) are typically more legible than those that use dynamic typing. This means that it’s easier for new engineers to read and understand the code, enabling them to be productive sooner. IDEs can also leverage the typing to provide features like statement completion, jump-to-source, and informational popups. Rust, Go, Java, Kotlin, and TypeScript are all statically-typed, while plain JavaScript is not. Languages like Python and Ruby have added support for optional type hints that various tooling can leverage to provide similar legibility features, but they are not required by default.
- Developer Experience and Velocity: How quickly will your engineers be able to implement a new feature, or make major changes to existing ones? Some languages simply require less code to accomplish the same tasks (e.g., Python or Ruby vs Java or Go), and some libraries make implementing particular features very easy. Static typing makes it easier to refactor existing code, and good compilers/linters make it easier to verify that refactors didn’t break anything. All of these lead to more efficient and happy engineers, which shortens your time-to-market.
- Runtime Execution Speed: A fully-compiled language like Rust, Go, or C++ will startup and run faster than JIT-compiled languages like Java and interpreted languages like Python or JavaScript. But this only really matters if your system is more compute-bound than I/O bound—that is, it spends more time executing the code you wrote than it does waiting for databases, network requests, and other I/O to complete. Most data-centric systems are actually I/O-bound, so the latency benefits of a fully-compiled language may or may not matter for them.
- Async I/O Support: The thing I/O-bound systems do benefit from greatly, however, is support for asynchronous I/O. With synchronous I/O, the CPU thread processing a given API server request is blocked while it waits for database queries and other network I/O to complete. With async I/O, the CPU can continue to make progress on other requests while the operating system waits for the database response. This greatly improves the number of concurrent requests a given server can handle, which allows you to scale up for less cost. Languages like Go and Node do this natively. Java, Kotlin, and Python have added support for it in the language, but older libraries and frameworks may still use synchronous I/O.
- Runtime Efficiency: Generally speaking, languages like Rust and C++ require less CPU and RAM than languages like Python or Ruby to accomplish the same tasks. This allows you to scale up with less resources, resulting in lower operating costs, regardless of whether you are using async I/O.
- Libraries and Tooling: Sometimes the choice of language is highly-swayed by particular libraries or tooling you want to use. For example, machine-learning pipelines often use Python because of libraries like NumPy and Pandas. Command-line interfaces (CLIs) like Docker and Terraform are typically written in Go because the tooling makes it easy to build standalone executables for multiple platforms.
- Longevity: Languages, and especially frameworks, come and go. What’s hot today may not be hot tomorrow. But some languages (C++, Java, Node, Python, Go) and frameworks have stood the test of time and are used pervasively. They are already very optimized, battle-tested, well-documented, and likely to be supported for decades to come. It’s also relatively easy to find engineers who are at least familiar with them, if not experienced in using them.
Which of these qualities you optimize for will probably depend on your particular context:
- Young Startup: If you are a young startup looking for product-market fit (PMF), you should definitely optimize for developer velocity in the short run. If you end up running out of money because it took too long to build the right product, it won’t matter which languages you chose. But if you do succeed, you will need to hire more engineers, which is when you want to optimize for legibility and available labor pool as well.
- Low-Margin Business: If you’re building a system to support a low-margin business, you might want to optimize for qualities that allow you to scale up while keeping operating costs low: async I/O, runtime efficiency, larger labor pool with cheaper engineers, etc.
- Critical-Path Component: If you are building a system component that needs to be very efficient and high performance, you should obviously optimize for those qualities over others like developer velocity.
- Open-Source Project: If you are starting a new open-source project, you might want to optimize for available labor pool and legibility, so that you can attract and retain contributors.
If you just want some general advice, I generally follow these rules:
- Favor statically-typed languages: The benefits of static typing far outweighs the minor inconvenience of declaring method argument and return types (most languages automatically work out the types of local variables and constants). Code bases without declared types are fragile and hard to read.
- Use async I/O when I/O-bound: If your API servers spend most of their time talking to databases and other servers, use a language, framework, and libraries that all have solid support for async I/O. This will improve performance and allow you to scale with less operational cost. But beware of languages where async I/O was recently bolted-on, as most frameworks and libraries won’t support it yet.
- Avoid trendy but unproven languages/frameworks: What works in a proof-of-concept may not work in production at scale. Choose languages and frameworks that have a proven track record.
When I build I/O-bound API servers or message queue consumers, I generally prefer Go or TypeScript on Node. Rust is very performant and efficient, and has a fabulous tool chain, but it’s difficult to learn so it’s harder to find other engineers who can be productive in it quickly. Java or Kotlin are also fine choices if you use a framework with good async I/O support (e.g., Reactor or Spring WebFlux). The same could be said for Python if you require the use of async I/O and type hints.
Regardless of which languages you choose, this decision will likely be a trapdoor one. Once you write a bunch of code, it becomes very costly and time-consuming to rewrite it in another language (though AI might make some of this more tractable). But there are a few techniques you can use to mitigate the costs of changing languages in the future:
- Separate System Components: Your API servers, message consumers, and periodic jobs will naturally be separate executables, so they can be implemented in different languages. Early on you will likely want to use the same language for all of them so you can share code and reduce the cognitive load. But if you decide to change languages in the future, you can rewrite the components incrementally without having to change the others at the same time.
- Serverless Functions: If it makes sense to build your system with so-called “serverless” functions, those are also separate components that can be ported to a new language incrementally. API gateways and other functions call them via network requests, so you can change the implementation language over time without having to rewrite the callers as well.
- Segmented API Servers: If you have a single API server and decide to rewrite it in a different language, you can do so incrementally by segmenting it into multiple servers behind an API gateway. Taken to an extreme, this approach is known as microservices and it can introduce more problems than it solves, but you don’t have to be so extreme. Assuming you are just changing languages, and don’t need to scale them differently, the segmented servers can still all run on the same machine, and communicate with each other over an efficient local inter-process channel such as Unix domain sockets.
Choosing Databases
Another critical decision system builders need to make early on is which kind of database to use. This also quickly becomes a trapdoor decision once you start writing production data to it—at that point, switching databases can get very complicated, especially if your system can’t have any downtime.
Like all decisions in software, choosing a database is all about making trade-offs. But unlike programming languages, the set of things you can optimize for tends to collapse into just a few dimensions:
- Administration vs Operating Cost: In the bad old days, we had to run our own database instances, monitor them closely, scale up and partition manually, and run periodic backups. As the amount of data grew, this typically required hiring a dedicated team of database administrators (DBAs). These days you can outsource this to the various cloud providers (AWS, Google, Azure) by using one of their hosted auto-scaling solutions—for example, DynamoDB, AWS Aurora Serverless, Spanner, or Cosmos DB. These typically cost more to run than a self-hosted solution, but you also don’t have to hire a team of DBAs, nor do any ongoing administration.
- Features vs Scalability and Performance: Very simple key/value stores like DynamoDB can scale as much as you need while maintaining great performance. But they also don’t offer much in the way of features, so your application logic often has to make up for that. Thankfully, cloud providers have recently made this trade-off less onerous by offering hosted auto-scaling relational database solutions that are quite feature-rich (e.g., AWS Aurora Serverless and Spanner).
- Database vs Application Schema: Relational databases have fairly rigid schemas, which need to be migrated when you add or change the shape of tables. Document-oriented databases like DynamoDB or MongoDB allow records to contain whatever properties they want, and vary from record to record. This flexibility can be handy, but the truth is that you must enforce some amount of schema somewhere if you want to do anything intelligent with the data you store in your database. If you can’t count on records having a particular shape, you can’t really write logic that manipulates or reacts to them. So the trade-off here is really about where (not if) you define schema and handle migration of old records. With relational databases you do this in the database itself; with document-oriented databases you do this in your application code.
Which side you optimize for on these trade-off dimensions will likely depend on your context, but these days (2025), using a hosted auto-scaling solution is almost always the right choice. The only reason to run your own database instances is if you are a low-margin business and you think you can do it cheaper than the hosted solution.
The auto-scaling relational solutions like Spanner or AWS Aurora Serverless also make the second trade-off less relevant than it used to be. These days you can get automatic scaling with consistent performance and have access to most of the powerful relational features: flexible queries with joins, range updates and deletes, pre-defined views, multiple strongly-consistent indexes, constraints, etc.
If you need those relational features, then that determines the last trade-off as well: schema will be defined in the database and migrations will typically be done by executing Data Definition Language (DDL) scripts. But if you don’t need relational features, you can define your schema and implement migration logic in your application code instead.
Although choosing a database is a trapdoor decision, you can make it easier to change databases in the future by using a layered internal architecture that isolates your database-specific code in the persistence layer. If you change databases, you only need to rewrite that layer—all the layers above shouldn’t have to change.
Moving the existing production data to your new database can be more challenging. If you can afford a small bit of downtime, you can shut down your API servers, copy the data to the new database, and deploy the new version of your API servers pointed at the new database. But if you can’t afford downtime, you can do dual-writes while you cut over to the new database—that is, you send inserts and updates to both the new and old databases to keep them in-sync while you shift which database is the source of truth. Once the cut-over is complete, you stop writing to the old database and only write to the new one.
Conclusion
Every decision in software engineering is a trade-off that optimizes for some things at the cost of other things. Some of those decisions can be easily reversed in the future, but some are more like trapdoors that become prohibitively expensive to change after a short period of time.
Making good decisions can be tricky, but if you focus on what you actually need to optimize for, as opposed to what would be nice to have, that will often lead you to the correct choice.
The Hypertext Transfer Protocol (HTTP)
The thing that defines the web more than anything else is its underlying communication standard: the HyperText Transfer Protocol (HTTP). If you want to build successful web applications, you need to understand this protocol and how it works. The good news is that it’s stupidly simple. One of the reasons the web grew as fast as it did is because the underlying protocol is clear, straightforward, and uncomplicated. Anyone can learn it in a matter of minutes, and once you learn it, you’ll understand what’s really happening when you browse the web, make HTTP requests from JavaScript, or handle those requests within an HTTP server.
Key Terms
Before we look at the protocol itself, we need to review and solidify a few key terms. The best way to do that is to look at the anatomy of a URL. A URL is a string of characters, but it’s divided into a few distinct parts, each of which is used during an HTTP request.
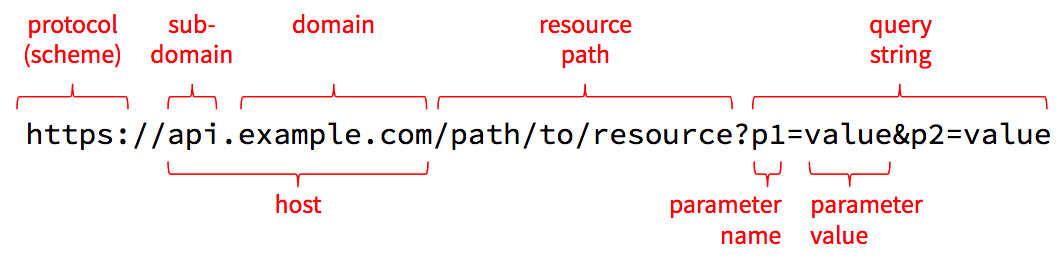
Protocol
The first part of the URL names the protocol to use, which is sometimes referred to as the scheme. The name http refers to HTTP, and https refers to a combination of HTTP and Transport Layer Security (TLS). When using TLS, all requests and responses are encrypted as they are sent across the network so that an attacker in the middle can’t read the contents. This results in a bit of computational and size overhead, but today’s computers and networks are fast-enough that HTTPS is quickly becoming the standard for all web traffic.
Never enter sensitive information into a web page where the URL starts with http, and never send sensitive data from JavaScript over an http connection. Anyone with access to the network can read everything sent over http in plain text. Make sure you use https when transmitting sensitive information.
Host
The next part is the host which is the name of the computer we want to talk to. The host can be a domain name such as example.com, or it can be a sub-domain like api.example.com. Domain names have to be purchased from domain registrars, but once you register one, you can create as many sub-domains as you like and adjust them whenever necessary.
To make a network connection, the client needs to translate the host name into a numeric IP address. It does this using the Domain Name System (DNS). The DNS is a bit like a telephone book that one can use to resolve a host name to an IP address, and you can access it right from the command line.
Open a new command-line window (Terminal on Mac or a Linux Subsystem on Windows) and type this command:
nslookup google.com
Sample Output (yours may differ)
Name:	google.com
Address: 142.251.33.78
In addition to nslookup, Mac and Linux users can also use the more concise host command:
host google.com
Sample Output
google.com has address 142.251.33.78
google.com has IPv6 address 2607:f8b0:400a:805::200e
google.com mail is handled by 10 smtp.google.com.
The google.com host name resolved to just one IP address for me, but other domain names might resolve to multiple. For example, try microsoft.com instead. It should return several IP addresses, any of which can be used by a web client.
Mac and Linux users can also use the more powerful dig command to see details about the query sent to the DNS and its reply:
dig google.com
These commands talk to the DNS, but they also consult a hosts file on your local computer that contains well-known host names and their associated IP addresses. On Mac and Linux, this file is at /etc/hosts, and on Windows it’s at c:\Windows\System32\Drivers\etc\hosts. To see the contents of this file use this command:
# on Mac and Linux
cat /etc/hosts

# on Windows
cat c:\Windows\System32\Drivers\etc\hosts
You’ll probably have at least one line in that file that defines the host localhost to be the IPv4 address 127.0.0.1, and possibly another line that defines the IPv6 address to be ::1. These are known as loopback addresses because they just loop back to the same machine from which the request is made: your local computer. Thus, the host localhost is an alias for your computer.
Port
The host and associated IP address can get you connected to a server across the Internet, but that server might be listening for network requests on many different ports. You can think of an IP address like the street address of an apartment building, while the port number is the number of a specific apartment inside. To connect to a web server, we need both the host/IP and a port number.
As a convention, web servers listen on port 80 for unencrypted HTTP requests, and port 443 for encrypted HTTPS requests. If you don’t specify a port number in your URL, the browser will assume these conventional ports. But you can override this by including a port number in your URL, like so: http://localhost:4000/path/to/resource. This tells the client to connect to port 4000 instead of the conventional port 80.
Many Unix-based systems (including MacOS) do not allow non-root users to listen on ports lower than 1024, so when you want to build and test an HTTP server on your own machine, you typically need to listen on a higher port number like 4000. Your server will work exactly the same—you just need to include that port number when connecting to your server from a web browser or testing tool.
Origin
A quick aside: the combination of the protocol, host, and port defines an origin in HTTP. Origins are the primary security boundary within web browsers. Data written to local storage can be read only by code served from the same origin. Cookies are automatically sent during requests to the same origin from which the cookie came, but never to other origins. By default, HTTP requests initiated from JavaScript are limited to the same origin from which the JavaScript came (see the API Servers tutorial for more details on how to override this on the server).
Resource Path
After the host and optional port number, the segment up until the ? is known as the resource path. Technically, this can take any form that the server knows how to interpret, so it doesn’t strictly need to look like a file path, but that path syntax is useful for modeling any set of hierarchically-organized resources.
Although this looks like a file path, it’s critical to understand that it can refer to anything the server can manipulate: a file, a database table/record, an in-memory game state, an AI model, a connected device, or even a controller for a giant mechanical killer robot. The term “resource” is purposely vague and open-ended so that one can enable the manipulation of just about anything via HTTP requests.
Query String, Parameters, and Values
The last part of the URL above contains the query string, which allows the client to pass additional parameters and values that are relevant for the requested resource. These parameters are typically used only when getting the state of the resource, and they are often used to supply filters, sorts, or other options supported by the resource. For example, when getting the /accounts resource, which represents all user accounts in the system, one might supply a query string like ?q=dave&max=50 to find the first 50 users with the name dave.
The query string starts with a ? and is followed by one or more name/value pairs. The name/value pairs are separated by &. The name and value are separated by =. For obvious reasons, literal & and = characters within parameter names or values must be encoded as %26 and %3D respectively, and a literal % must be encoded as %25. The number after the % is the hex representation of the character’s Unicode number. The encodeURIComponent() function in JavaScript can be used to do this encoding in the browser, and similar functions are available in most other languages.
Technically speaking, - _ . ! ~ * ' ( ) and space must also be encoded, as well as characters outside the ASCII range, but most client libraries handle this for you, so you rarely need to worry about this.
HTTP Requests
Now that we have our terms straight, let’s see how these URL elements are used in an HTTP request.
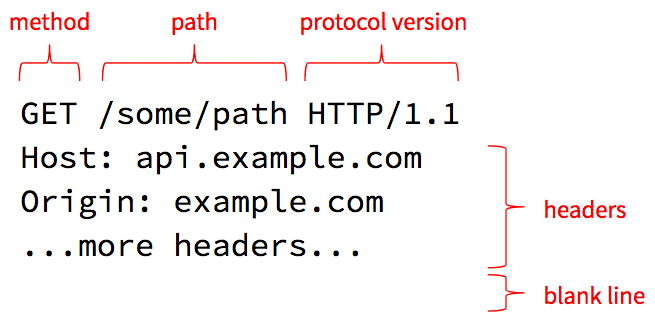
HTTP 1.1 requests are just plain text, so you can easily read and type them. The first line (simply called the “request line”) contains the method, resource path (which we already discussed earlier), and requested protocol version.
Methods and Resources
The core philosophy of HTTP is that clients invoke methods on resources. The resource is the object and the method is the verb. Or to put it another way, the resource path identifies a thing the server can manage, and the method specifies an action the server should take on that resource.
There are several methods defined in the HTTP standard, and the most commonly-used are as follows:
| method | meaning |
|---|---|
| GET | return the current state of the resource |
| PUT | completely replace the current state of the resource |
| PATCH | partially update the current state of the resource |
| POST | add a new child resource |
| DELETE | delete the resource |
| LINK | link the resource to some other resource |
| UNLINK | unlink the resource from some other resource |
| OPTIONS | list the methods the current user is allowed to use on this resource |
Servers may choose to support other methods, including custom methods they define. This is generally fine, but sometimes you can run into troubles if there is a proxy server in the middle that rejects requests with non-standard methods for security reasons. In that case, developers commonly use POST with a query string parameter or other custom header that indicates what the real method is.
Protocol Version
The request line ends with a protocol version the client wishes to speak. HTTP, like all standards, is an evolving one, and there have been a few versions of HTTP defined over the years. The example above uses HTTP/1.1 which is widely supported, but HTTP/2 was introduced in 2015 is now also widely supported.
By allowing clients to request a particular protocol version, servers and clients can start supporting the newer version while still being able to fall back to the older version if the other side doesn’t yet support the new version. For example, a client can request HTTP/2.0 but the server can reply saying it only supports HTTP/1.1. The client can then gracefully downgrade and use the 1.1 version for the rest of the conversation.
Headers
The next lines in the request specify one or more headers. A header is a name/value pair, like a parameter, that provides some additional meta-data about the request. The Host header is required on all requests and must be set to the host name the client thinks it is talking to. This allows a single server to host several different web sites at the same time: it can use the Host header to determine which site the client is requesting.
The HTTP specification defines several standard headers. The ones you will most commonly use when making requests are as follows:
| header | meaning |
|---|---|
| Authorization | Some sort of token that identifies an authenticated session or a user account. The server defines what it accepts in this header. |
| Content-Length | If you are sending content to the server, this specifies how many bytes you are sending. This is typically set for you automatically by the library you use to make the request. This tells the server how much data to expect so it knows when its done reading the request off the network. |
| Content-Type | If you are sending content, this specifies the MIME type you are using for that data (e.g., JSON, XML, HTML, or some sort of media type). |
| Cookie | A value the server provided in the Set-Cookie response header during a previous request. Cookies are handled automatically within the browser and by most HTTP client libraries that offer a “cookie jar” implementation. |
| If-Modified-Since | If set to a date/time, the server will respond with the resource’s state only if that state has been modified since the specified date/time. Useful when requesting large resources that don’t change very often (video, large images, etc). |
Let’s Try It!
As noted earlier, HTTP/1.1 is just plain text so you can manually type HTTP requests at the command line. So let’s do it! We will use the nc (netcat) command to manually send an HTTP request to Google’s web server and view the responses.
In your terminal, use the nc command to connect to port 80 on Google’s web server:
nc www.google.com 80
Now type the following two lines of text exactly as you see them below, and then hit Enter twice to send a blank line, which signals the end of your request.
GET / HTTP/1.1
Host: www.google.com
After you send the blank line it should respond with a standard HTTP response message followed by a bunch of HTML. That’s Google’s home page! You requested the resource path /, which is the home page for the entire web site.
Hit Ctrl+c to exit out of netcat and return to your own command prompt.
What you just did is what your web browser does when you enter http://www.google.com/ into the address bar. The browser parses the URL and determines that the protocol is http, the host is www.google.com and the resource path is /. It then opens a network connection to port 80 (default for HTTP) on www.google.com and sends at least those two lines (most browsers include a bunch more headers that provide the server with extra meta-data).
HTTP Responses
After making your request, the server will respond with a message that looks something like this:
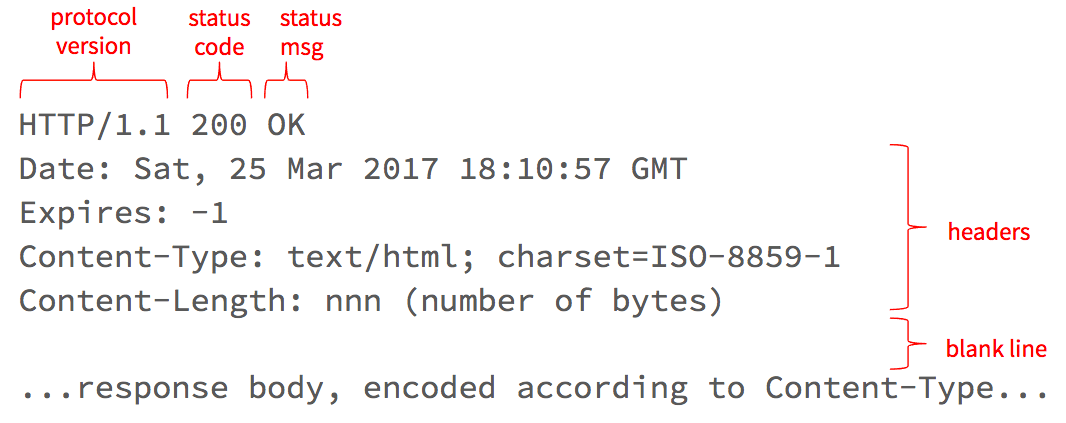
The first line tells the client what version of the protocol the server is using, as well as the response status code and message.
Status Codes
The status code tells the client whether the request was successful or not. There are several status codes defined in the HTTP standard, but they bucket into the following ranges:
| range | meaning |
|---|---|
| 100-199 | still working on it, more to come |
| 200-299 | successful |
| 300-399 | request the URL in the Location response header instead |
| 400-499 | client made a bad request |
| 500-599 | something went wrong on the server-side |
Most HTTP client libraries will handle 100 and 300-range status codes automatically, so your client-side code only has to deal with 200, 400, and 500-range codes. In general, you should treat any code >= 400 as an error, but note that these error-range codes are distinct from a network error: if the host is unreachable you will get a network error and no response at all.
The message that follows the status code is mostly redundant, but it’s helpful in cases where a service defines new non-standard status codes, such as those defined in the now famous HyperText Coffee Pot Control Protocol (check out the meaning of status code 418).
Response Headers
Similar to requests, HTTP responses also contain one or more headers. These headers can provide additional meta-data about the response. The most commonly-used ones are as follows:
| header | meaning |
|---|---|
| Content-Type | The MIME type used for the data in the response body. For example application/json; charset=utf-8 means that the response body contains data encoded into JSON using the UTF-8 character set. |
| Content-Length | The number of bytes the server is sending in the response body. |
| Expires and Cache-Control | Specifies if and for how long the client may cache the response body. |
| Last-Modified | The date/time the resource was last modified (can be used in the If-Modified-Since header during subsequent requests for this resource if the server says its OK to cache the response). |
| Location | For 300-range (Redirect) responses, a URL that the client should ask for instead; for 201 (Created) responses, the URL for the newly-created resource. |
| Retry-After | The number of seconds, or a specific date/time, after which the client may ask for the resource. This is commonly returned when the server is throttling requests and the client makes too many within a given time period. The client should wait until the Retry-After time before making another request. |
| Set-Cookie | A cookie value that should be sent back in the Cookie header with all subsequent requests to this same origin. Cookies are handled automatically in the browser and by most HTTP client libraries that support a “cookie jar” implementation. |
Response Body
Following the response headers is the response body. For a GET request, this will be the current state of the requested resource, encoded in the MIME type specified in the Content-Type response header. The number of bytes in the response body is indicated by the Content-Length header. If the server doesn’t know the final total size, but still wants to start writing the data is has, the server can use chunked transfer encoding, which involves writing chunks of data at a time, each proceeded by a content length.
HTTP/2
The examples so far have been in version 1.1 of HTTP, which uses simple plain-text, human-readable messages. Although these plain text messages make the protocol easy to see and understand, they are not as efficient as a more-compact, binary protocol would be. These inefficiencies led many browser and server vendors to experiment with binary protocols (e.g., SPDY), which eventually became the basis for a new version 2.0 of HTTP, known as HTTP/2. This version is now supported by all the major browser vendors, as well as more recent web server frameworks.
Although HTTP/2 is no longer human-readable, it still retains all the same concepts outlined in this tutorial. The developer tools within the browsers will still show you all the request and response headers, bodies, and status codes, but on the wire they are encoded into a very company binary format. This should increase the overall speed of requests/responses, while also reducing the number of bytes that have to be transmitted across our networks.
Stateless Protocol
HTTP differs from older internet protocol in an important way: it is stateless. You might find that odd given that GET requests return the “current state of the resource,” but the state we are talking about here is not about the resources passed back and forth, but the network connection itself.
In older protocols like FTP, clients connect to servers and then execute commands similar to those you execute at the command line on your local computer. For example, you can cd to a different directory and then all subsequent commands executed on that same FTP connection will be interpreted by the server relative to that new directory. But that also implies that all subsequent requests must be sent to the same server, as only that server knows what the current directory is.
With HTTP, there is no state maintained about the connection in-between requests. Each request is processed independently from all other requests sent on the same connection. This is what we mean by “stateless.”
This keeps HTTP very simple, but it also allows it to scale. If requests sent by the same client are independent of each other, they can be routed to different servers on the backend by load balancers. As we get more and more concurrent requests, we can simply increase the number of those downstream servers, and maybe add another load balancer. This is known as horizontal scaling because we are increasing the number of servers, not the size of the existing servers. Horizontal scaling is possible precisely because HTTP is a stateless protocol.
But like all things in software, this stateless quality is a tradeoff: it enables horizontal scaling, but it makes other things much more difficult. For example, supporting authenticated sessions—where a user signs-in during one request, and then accesses private resources in subsequent requests—is tricky when requests are independent and could be routed to different servers on the backend. We will return to this when we discuss Session and Authorization Tokens.
Environment Variables
The bash shell is really a programming language interpreter in disguise. Whenever you execute something at the command line, you are really running a small program. These programs typically launch other programs, but there’s quite a bit of interpretation that can occur before those programs are executed.
One of the things that gets interpreted by the bash shell are environment variables. Environment variables are just like variables in other languages:
- they have a name
- they have a scope that determines where they are visible and where they are not
- they can be assigned a value and that value can change over time
- they can be used in expressions where you want the current value of the variable to be used
Declaring and Using Environment Variables
Open a new command-line (terminal) window, so you can follow along as I explain the various commands. To declare a new environment variable that is visible to your current command-line shell and any programs launched from it, use this simple syntax:
export MY_VARIABLE="some value"
This creates a new environment variable named MY_VARIABLE set to the string "some value". The double-quotes around "some value" allow us to embed a space in the string while still treating it as a singular value.
To see the value of an environment variable, use the echo command and refer to the variable with a preceding $ like so:
echo $MY_VARIABLE
This will print the current value of the variable named MY_VARIABLE, which at this point is some value. Note that you use a $ on the front when you refer to the variable in a command; that way the shell knows you are referring to an environment variable, as opposed to a file or some other program.
When the shell sees the $ prefix, it “expands” the variable into its current value, and then continues processing the overall command. In this case, the shell expand this into echo "some value" and then runs the echo command passing that string as the first and only parameter. The echo command simply prints whatever you pass to it, so it prints some value and exits.
You can name your variables whatever you want, and you can actually use any casing you want, but we traditionally use all caps for environment variables, and an underscore to separate words. This keeps them visibly separate from the myriad of commands, programs, and files you can refer to at the command line, which are typically in lower-case.
Predefined Environment Variables
You can use environment variables in any command, and there are several that are already defined for you on most systems. For example, the environment variable $USER is typically set to the name of the currently signed-in user. You can check the value of this using that same echo command, but this time we can also add a little greeting:
echo "Hello, $USER"
Notice the use of double quotation marks. As noted above, these are used to wrap a string that might contains spaces, but note that you can also use environment variables within these strings. The variables will be expanded into their current value before the string is passed to the echo command. This expansion happens only when you use double-quotes; if you use single quotes, the $USER will be treated as literal text and not a variable to be expanded.
Another one that is typically set for you is $HOME, which is the file path to your home directory. You can use this with the ls command, just like you’d use any other file path:
ls $HOME
That will list all the files in your home directory. If you want to change to your home directory, use that same variable with the cd command:
cd $HOME
Since this is such a common operation, most shells provide the shorter ~ symbol as a synonym for the $HOME variable:
# this changes to your home directory
cd ~
# and this lists the files in the Documents folder in your home directory
ls ~/Documents
# and this changes back to whatever directory you were in last
cd -
The lines above that are prefixed with # are comments, just like comments you add to your Java or JavaScript source files. Anything following a # character on the same line will be ignored by the command-line shell.
The PATH Variable
The other critical environment variable that is already set for you is the $PATH variable, which determines which directories the shell looks in for programs that you try to execute at the command-line. You can see your current path using that same echo command:
echo $PATH
Your output will likely contain several directories, separated by :. The shell will look in each of those directories, in the order specified, to find the bare commands you execute. For example, the ls command ran above is actually a small executable that lives in a directory included in your $PATH. To find out which one, use this command:
which ls
You can adjust the PATH variable by resetting it, but it’s more common to add to it by referring to its existing value. For example, to add a new directory to the end of your path, you can use a command like this:
export PATH=$PATH:$HOME/bin
The shell will first expand $PATH to be the current value of the PATH environment variable, and then expand $HOME to be the current value of the HOME environment variable (your home directory). So in total, this command will add the bin directory within your home directory to the path.
But that change will only affect the current command-line shell window. To make that change persistent across all shell windows you might open, we first need to understand the scoping rules for environment variables.
Scoping Rules for Environment Variables
When you declare a variable inside a function in languages like Java or JavaScript, that variable is visible only inside that function. We call that the variable’s “scope.” Environment variables have a scope as well, and understanding their scoping rules will help you realize why some environment variables are visible in every command line shell, while others are not.
When we declared a variable above, we used the keyword export in front of the variable name. This sets the variable’s scope so that it is visible in the current command-line shell, and any other program launched from that shell. If you omit the export keyword, the shell will create the variable, but it will be visible only in the current shell, and not in any other program launched from that shell. Unexported private variables can be useful at times, but we typically create environment variables so that other programs can read them, so you will most often use export when declaring a new environment variable.
But even if you use the export keyword, the variable you declare won’t be visible to another command-line shell that you start from your desktop. To see this in action, start another command-line (terminal) window and type that echo command again:
echo $MY_VARIABLE
Since this is a new and different shell from the one in which you declared the variable, you won’t be able to see this MY_VARIABLE variable, so the echo command should return only a blank line. Unlike other programming languages, it won’t generate an error when referring to an unset environment variable—instead, it just expands that variable to an empty string and invokes the echo command with an empty string argument.
To declare a variable that is visible in every command-line shell you open, we need to declare it at a higher scope. How you do this depends on which operating system you are using.
Declaring Persistent User-Global Variables
Now that we understand the scoping rules for environment variables, I can now explain how to set persistent variables that are global for the current operating system user. Follow the instructions below for your particular operating system.
MacOS and Linux
Both MacOS (formerly OS X) and Linux are based on Unix, and both use a derivative of the original Bourne shell. MacOS now uses zsh and Linux distros tend to use bash.
Shells derived from Bourne have a handy feature where they will execute a script each time you open a new Terminal window, or whenever you sign-in to an account via the command-line (e.g., ssh or su). These scripts are simply text files containing commands you would have normally typed manually at the command-line. The shell will execute them silently before you see a prompt.
On MacOS, zsh will run the script stored in ~/.zshenv whenever you open a new Terminal window, or whenever you sign-in to an account via the command line. On Linux, bash will run the script in ~/.bashrc when you open a new Terminal window, but will run the script in ~/.bash_profile when you sign-in to an account at the command line.
Since these scripts are run every time you open a new Terminal window, we can use them to declare persistent environment variables that will be available in all new Terminal windows we open.
If you’re on a Mac, open ~/.zshenv in your favorite text editor. On Linux, open ~./bashrc. If you installed Visual Studio Code and enabled the code shell command, you can open the file in VS Code using this command:
# on Mac
code ~/.zshenv

# on Linux
code ~/.bashrc
These scripts are just simple text files containing commands you would have normally typed manually at the command-line. These commands are run sequentially when you start a new Terminal, as if you typed them yourself. So to create an environment variable that gets declared every time you open a new Terminal window, just add the variable declaration to the file using the same syntax you used at the command-line:
# new line inside ~/.zshenv (Mac) or ~/.bashrc (Linux)
export MY_VARIABLE="some value"
Save the file, open a new Terminal window, and then echo $MY_VARIABLE. You should now see the value in the new Terminal window, and any other Terminal window you start from now on.
To undo this, just re-edit ~/.zshenv (Mac) or ~/.bashrc (Linux) and remove that variable declaration. After you save, all new Terminal windows will no longer have that variable set.
Editing these files has no effect on existing Terminal windows because that script is run just once when you first open the Terminal, but you can re-run the script at any time using the source command:
# re-run the start-up script in the current shell
source ~/.zshenv
This is handy whenever you add or change an environment variable, and want that value available in your current Terminal window. It’s such a common operation that the shell also provides the . symbol as a shorter synonym for the source command:
# same as `source ~/.zshenv`
. ~/.zshenv
Windows
If you are using Windows and want to work with command-line tools, I highly recommend using the Windows Subsystem for Linux (WSL). This allows you to use bash and all the various commands found in a typical Linux distribution. Once you activate the WSL, you can alter you .bashrc file just like you would on a Linux machine.
Unsetting Environment Variables
If you ever need to unset an environment variable that has been declared in your current shell, use the unset command:
unset MY_VARIABLE
Note that here you don’t use the $ prefix because you don’t want the shell to expand the variable into its current value. Instead, you want to pass the variable name itself to the unset command.
Just as when you declare variables manually in the current shell, this will unset the variable in the current shell only. All other shells remain unaffected.
Intro to Cryptography
If you want to design, build, or manage software services on the Internet, you need to understand at least the basics of cryptography. You don’t need to fully understand the math—few people do! And you should never implement the core algorithms yourself—instead always use the canonical library for your chosen programming language. But you do need to understand what these core algorithms are, what they can and cannot do, and how to combine them to create secure systems.
In this tutorial I’ll explain the basics of cryptographic hashing, symmetric and asymmetric encryption, digital signatures, and digital certificates. We will use these algorithms in subsequent tutorials, so take the time to read carefully and understand their guarantees and weaknesses.
This tutorial won’t magically turn you into a security engineer—that takes years of diligent study, and a lot more detail. But it will help you talk to a security engineer and understand (most of) what they are saying to you. It will also set you up to understand lots of related topics like HTTPS/TLS, authenticated sessions, e-signing, and blockchains.
Cryptographic Hashing
The first family of algorithms to understand are cryptographic hashing functions. These are one-way functions that turn arbitrarily-sized input data into a relatively small, fixed-sized output value, known as a ‘hash’ or a ‘digest’.
What makes these algorithms incredibly useful are the guarantees they make about that output hash value:
- Deterministic: Given the same input data, the algorithm will always produce the same output hash.
- Collision-Resistant: The probability that two different inputs will generate the same output hash (known as a ‘collision’) is extremely low, and decreases exponentially with the size of the output hash. With a 256 or 512-bit output, this probability becomes so low that we can effectively ignore it in almost all circumstances.
- Irreversible: Since the function is one-way, you can’t directly calculate the input data from the output hash. You could try hashing every possible input value until you find a match, but that quickly becomes intractable as the number of possible inputs grows.
These guarantees are why people often refer to cryptographic hashes as “fingerprints” of their input data. Our fingerprints are relatively small compared to our entire bodies, but they remain unique (enough) to identify us. Similarly, a cryptographic hashing algorithm can reduce gigabytes of data to a relatively short fingerprint hash that is both deterministic and collision-resistant.
To get a feel for these algorithms, let’s generate some hashes at the command line. If you’re on MacOS or Linux, open your terminal application. If you’re on Windows, use the Windows Subsystem for Linux so you have access to all the same commands. Then run this at your command line:
echo 'data to hash' | openssl dgst -sha256
tip
If you get an error saying “command not found,” you need to install openssl. Go to your favorite LLM and ask it how do I install the openssl command line utility on {OS} replacing {OS} with the name of your operating system. If you get some other kind of error, check your version by running openssl version—if it’s lower than 3.0, you probably need to upgrade.
If you are totally new to the command line, you might want to go through this interactive tutorial to learn the basics.
For those who are maybe new to the command line, let’s break that down a bit:
echo 'data to hash' |effectively sends the literal string “data to hash” to the next command after the pipe|character as its standard input stream.opensslis the Swiss Army knife of cryptographic algorithms for the command line. It can do a lot of things.dgstis the “digest” sub-command foropenssl, which calculates hashes (aka “digests”).-sha256tellsopensslto use the SHA-256 cryptographic hashing algorithm, which produces a 256-bit hash (hence the256part of the name). As you might expect, there’s also a-sha512switch that uses the SHA-512 algorithm, which produces…you guessed it…a 512-bit hash!
The output should include the name of the algorithm used, the source of the input data (in this case stdin for “standard input”), and the output hash encoded in hexadecimal. If you run that command multiple times, you should get the same hash every time. That’s the deterministic guarantee.
Now try this command and notice that the resulting hash is different, because the input data is different:
echo 'more data to hash' | openssl dgst -sha256
That’s the collision-resistance guarantee. In fact, you could try hashing different strings all day long and you will never get the same hash as the one you got for 'data to hash' (unless of course you try that exact same string again, which just demonstrates the deterministic guarantee).
Now let’s try hashing an entire file, which can be as big as you want. Remove the echo ... | part we were using before, and just provide the file’s path as the last argument to the openssl command.
openssl dgst -sha256 my-large-file.pdf
Regardless of how big the file is, the output hash will still be the same relatively small size—even if the input is gigabytes in size, the output hash will only be 256 bits when using SHA-256. That should make it pretty obvious that these hashes are irreversible—there’s no way you could reconstruct a multi-gigabyte file from a 256 bit hash.
tip
We’ve done all of this at the command line, but there are libraries that do the same thing for all the common programming languages. Just ask your favorite LLM how do I create a SHA-256 hash in {LANGUAGE} replacing {LANGUAGE} with the name of your programming language.
Cryptographic hashes are very useful in a few different ways:
- Content Identifiers: The deterministic and collision-resistant guarantees make cryptographic hashes ideal for compactly identifying potentially large content. For example, if you have a catalog of songs, along with their hashes, you can quickly determine if a new song uploaded to your catalog is the same as one you already have—you only need to compare the short hashes, not the large song files themselves. Decentralized source code control systems like git also use hashes to determine if you already have a commit fetched from a remote branch.
- Tamper Detection: The deterministic guarantee makes cryptographic hashes very useful for detecting if content has changed. For example, if you want to verify that a document or photo hasn’t changed since the last time you saw it, you can hash the current version and compare it with a hash you made earlier. Blockchains like bitcoin also use cryptographic hashes to ensure the integrity of the ledger.
- Irreversible but Verifiable Tokens: The irreversible and deterministic guarantees mean that hashes can be used to store sensitive information that we don’t need to reveal, but may still need to verify in the future. For example, we always store hashes of user passwords, never the passwords themselves. During sign-in, we can still verify the provided password by hashing it and comparing that to our stored hash, but an attacker can’t directly calculate the original password from the stored hash. We will discuss the details of password hashing, which are more complicated than this simple example, in a future tutorial.
Lastly, it’s important to note that not all hashing algorithms qualify as cryptographic algorithms. Some have much weaker guarantees, especially regarding collision-resistance. For example, the -md5 algorithm is very fast and produces a much shorter hash than -sha256 but it will also produce collisions, and it’s not considered secure enough for cryptographic uses. The most commonly used cryptographic algorithms these days (January 2025) are the SHA2 family of algorithms, specifically SHA-256 and SHA-512.
Hashing algorithms are very useful, but you can’t reverse them, so you can’t use them to send a secret message to someone else over a public network like the Internet. For that we need encryption.
Encryption
There are two major types of encryption algorithms:
- Symmetric: A single secret key is used to both encrypt and decrypt the data.
- Asymmetric: A pair of related keys are used, one to encrypt and the other to decrypt. One key is considered public (can be published and shared with everyone) while the other must be kept private and secret. Because of this public key feature, this style is sometimes called “public key” encryption.
Regardless of the type, the following terms are commonly used when talking about encryption algorithms:
- plaintext: The unencrypted data, which might be text, or could be binary content like music, photos, or video. Sometimes we just call this the “message” we want to encrypt.
- ciphertext: The encrypted form of the plaintext, which is always binary (base 2), but you can encode those bytes into something that looks more like text by converting them to base 64.
- encryption: The process of turning plaintext into ciphertext using a key.
- decryption: The process of turning ciphertext back into plaintext using a key.
Explanations of security protocols that involve multiple people talking over a public network traditionally use a standard cast of characters to make the explanations easier to follow:
- Alice: who typically wants to send a secret message to Bob.
- Bob: who receives messages from Alice and sends replies back.
- Eve: an attacker in the middle who can see what is sent across the public network, so the messages must be encrypted.
It’s also traditional to use gendered pronouns for these fictional characters, just to make the explanations easier to follow. I’ll follow suit, but add a twist by using ‘they’ for Eve, just to be a bit more inclusive.
Symmetric Encryption
Symmetric encryption algorithms are the easiest to understand and use. They are similar to codes you might have played with as a child: e.g., shift each character of your secret message forward on the alphabet by N characters, where N is the secret key. If you know the key, you can then decrypt the message by reversing the algorithm: e.g., shift backwards by N characters.
If you prefer physical metaphors, symmetric algorithms are like a box with an integrated lock. The same key can both lock the box and unlock it. Anyone with the key can put a secret message into the box and lock it to protect the message from those who don’t have a key. But anyone with a key can still unlock the box and read the message.
The symmetric encryption algorithms we use in computing are much more complicated than the simple codes that kids use, but they still rely on a single key to both encrypt and decrypt, so that key must remain secret. The key is passed to the algorithm as another argument, along with the data to encrypt/decrypt. In pseudomoji-code, it looks a bit like this:
🔑 = ...secret key...
📄 = ...some secret plaintext message...

// encrypt the plaintext using the secret key
🤐 = encrypt(📄, 🔑)

// decrypt the ciphertext using the same key
📄 = decrypt(🤐, 🔑)
The openssl command can do encryption as well. Run this at your command line, and when it prompts you for a password, enter one you can remember, and enter it again to verify that you typed it correctly:
export ENCRYPTED=$(echo 'secret message' | openssl enc -aes-256-cbc -pbkdf2 -base64)
Let’s break that down:
export ENCRYPTEDdeclares an environment variable in this shell instance that will hold our ciphertext.=$(...)tells the shell to run the contained command, and assign the output to thatENCRYPTEDenvironment variable. Most shells also support surrounding the command with back-ticks instead, like=`...`if you prefer that syntax.echo 'secret message' |effectively sends the literal string “secret message” to the command after the pipe|character.opensslis that same Swiss Army knife of cryptographic algorithms we used before.encis the “encryption” sub-command ofopenssl, which is confusingly used to both encrypt and decrypt (we add-dwhen decrypting).-aes-256-cbctellsopensslto use the AES symmetric encryption algorithm, with a 256-bit key, in cipher block chaining mode. You don’t need to understand all the particulars of the algorithm and its modes at this point, but there are several different modes AES can use when encrypting data larger than its relatively small block size (16 bytes). The right one depends on your goals. CGM is often recommended these days, but it’s unfortunately not supported on the default MacOS version anymore. So we’ll use CBC for this tutorial.-pbkdf2tellsopensslto derive the symmetric key from the password you enter.PBKDFis an acronym for “password-based key derivation function,” which is a kind of hashing function that can deterministically generate a symmetric encryption key of a particular size (256 bits in this case) from a password of arbitrary length. This allows you to keep the source of the key in your head instead of a file on disk.-base64tellsopensslto encode the binary ciphertext into base 64, which is safe to paste into a text-based communication medium like email (or print at the command line).
After entering your password, you won’t see any output, because it was assigned to the ENCRYPTED environment variable. But we can print that to the terminal using this command:
echo $ENCRYPTED
It should look like a bunch of random characters, numbers, and symbols. Without the key or the password it was derived from, an attacker can’t read it.
You could now copy/paste/send that to anyone who knows your secret password, and they can decrypt it on the other side. Let’s simulate that now by feeding the ENCRYPTED value back into openssl in decryption mode (add -d):
echo $ENCRYPTED | openssl enc -d -aes-256-cbc -pbkdf2 -base64
You’ll be prompted for your secret password again, and if you type it correctly, you should see the original “secret message” text as the output! If you mistype the password, or forget it, openssl will refuse to decrypt the message.
Most of the time we want to encrypt whole files instead of short strings, and openssl can do that too. Omit the echo part and instead use -in to specify the input plaintext file, and -out to specify the path where you want it to write the output ciphertext:
openssl enc -aes-256-cbc -pbkdf2 -in secret_file.pdf -out secret_file.enc
You can name the output file anything you want, but it’s common to use something like an .enc extension to indicate that it’s encrypted.
To decrypt, just add the -d switch again, and this time specify the encrypted file path as the -in argument, and the path where you want the decrypted file written as the -out argument. If that output path already exists, the file will just be overwritten, so use a new name:
openssl enc -d -aes-256-cbc -pbkdf2 -in secret_file.enc -out decrypted_secret_file.pdf
tip
We’ve done all of this at the command line, but there are libraries that do the same thing for all the common programming languages. Just ask your favorite LLM how do I do symmetric encryption in {LANGUAGE}, replacing {LANGUAGE} with the name of your programming language.
Symmetric encryption is quite fast and very secure if (and only if) you can keep the key secret. But this is relatively easy in some contexts:
- When a single machine needs to both encrypt and decrypt files. For example, FileVault on MacOS uses AES to encrypt files written to your hard drive.
- When a small group of trusted machines in a private cloud need to decrypt messages encrypted by one of the other machines. Most cloud providers offer a secrets management service that enables machines in the same virtual private cloud to securely access shared secrets like symmetric encryption keys.
But we often find ourselves in situations where we have two people (the fictional Alice and Bob) who want to send encrypted messages to each other across a public network without an attacker in the middle (Eve) intercepting and reading them. If Alice and Bob both know a particular symmetric key, no problem, but how do they agree on that key without sending it across the public network in a way that Eve can see? If Eve sees the key being passed, they can use it to read all the messages. Even worse, Eve could intercept the messages and replace them with messages of their own: if those are encrypted with the same key, Alice and Bob would never know the difference!
In these situations, we need to turn to asymmetric encryption.
Asymmetric Encryption
Instead of using a single key, asymmetric encryption algorithms use a pair of related keys. One key is private and must be kept secret, just like a symmetric key, but the other key is public, so it can be shared with anyone. You can even publish your public key on your website or social media profile.
Once you generate a pair of these public/private keys, you can use the algorithm to encrypt messages using either key, but the message can only be decrypted using the other key. That rule is very important to remember and understand—you can’t decrypt using the same key, only the other key.
You might be wondering, “if these keys are related, and one of them is public, couldn’t an attacker simply calculate the private key from the public key?” Thankfully that’s not possible, at least not in any reasonable amount of time. The two keys are mathematically related, but deriving one from the other is not computationally feasible given our current computing technology. The relationship relies on so-called “trapdoor” calculations, which are easy to do in one direction, but totally intractable to do in the other. For example, calculating the product of two sufficiently large prime numbers is relatively easy for a computer to do, but factoring that product back into its source primes would take several lifetimes to compute.
Whether you encrypt using the public or private key depends on what you’re trying to do, so let’s work through an example. Say Alice wants to send Bob an encrypted message that only he can decrypt. As noted above, Bob must keep his private key secret and never share it with anyone, but he can share his public key with anyone. So Bob shares his public key with Alice, or publishes it somewhere Alice (and everyone else) can read it. This means Eve also knows Bob’s public key, but that’s OK. If Alice encrypts the message using Bob’s public key, the message can only be decrypted using Bob’s private key, which only Bob can access.
The pseudomoji-code looks like this:
🔑 = ...Bob's secret private key...
📛 = ...Bob's public key...
📄 = ...some secret plaintext data...

Alice():
	// encrypt using Bob's public key
	🤐 = encrypt(📄, 📛)
	// send the ciphertext
	Bob(🤐)

Bob(🤐):
	// decrypt using private key
	📄 = decrypt(🤐, 🔑)
This works, but what we have so far has a major problem: although an attacker in the middle (Eve) can’t read the secret message, Eve can still intercept and replace it with one of their own. After all, Eve knows Bob’s public key too. In fact everyone knows Bob’s public key. That’s the whole point of a public key. So Eve could intercept Alice’s original message, encrypt and send a totally different message, and Bob wouldn’t know the difference
So how can Bob be sure that the message came from Alice, and not Eve (or someone else for that matter)? Well, Alice has her own key pair too, and can certainly share her public key with Bob. Then Alice can do something like this:
- Alice first encrypts the plaintext
Musing Alice’s private key. Only Alice can do this because only Alice has access to her private key. Let’s call the output of this first encryptionM1. - Alice then encrypts
M1again, but this time using Bob’s public key. Let’s call the output of this second encryptionM2. - Alice sends
M2to Bob over the public network, which Eve can see, but can’t decrypt. - Only Bob can decrypt
M2back intoM1becauseM2was encrypted using Bob’s public key, and only Bob has access to the corresponding private key. - Bob can then try to decrypt
M1back intoMusing Alice’s public key. IfM1was encrypted using Alice’s private key, it will work because Bob is using Alice’s public key. If it was actually encrypted by Eve, it will fail, because Eve would have used their own private key, because Eve has no access to Alice’s private key. - If the decryption is successful, Bob can now read
Mand be confident that it was sent by Alice.
The pseudomoji-code now looks like this:
🔑 = ...Bob's secret private key...
📛 = ...Bob's public key...

🗝️ = ...Alice's private key...
📢 = ...Alice's public key...

📄 = ...some secret plaintext data...

Alice():
	// encrypts using Alice's private key
	🤐 = encrypt(📄, 🗝️)
	// encrypts again using Bob's public key
	🔏🤐 = encrypt(🤐, 📛)
	// send the result to Bob
	Bob(🔏🤐)

Bob(🔏🤐):
	// decrypts first using Bob's private key
	🤐 = decrypt(🔏🤐, 🔑)
	// decrypt again using Alice's public key
	📄 = decrypt(🤐, 📢)
Of course, all of this assumes that the public key Bob has is really Alice’s public key, and not Eve’s public key pretending to be Alice’s. Typically Bob will get Alice’s key from some trusted source: for example her web site using an HTTPS connection, which is encrypted using a digital certificate that attests to her true legal identity. We’ll discuss those in the Digital Certificates section later in this tutorial.
Deriving a Symmetric Key from Public Keys
Asymmetric encryption is pretty magical, but it has a few downsides:
- It’s much slower and computationally-intensive than symmetric encryption.
- The message length is limited to the size of the asymmetric keys, minus some padding, so you can’t say much!
This is why asymmetric encryption is mostly used to agree upon a shared symmetric key so that the parties can switch to using symmetric encryption for the rest of the conversation.
One way to do this is to use asymmetric encryption to encrypt and share a symmetric key—that is, the message we encrypt/decrypt is actually just a symmetric key to use for subsequent messages. Symmetric keys are typically quite small, so the length limitations of asymmetric encryption are not an issue.
But it turns out that asymmetric keys also have a nifty mathematical property that allows Alice and Bob to derive the same shared secret (i.e., a password for deriving a symmetric key) without ever needing to send it in encrypted form across the public network. The algorithm is called Diffie-Hellman Key Exchange, and this video provides a fantastic visual explanation:

To get a feel for how this works in practice, we can use openssl again to generate two key pairs, one for Alice and one for Bob, and then derive the same shared secret. Let’s start by generating a key pair for Alice (this will create new files, so maybe do it in a new directory you can delete later):
openssl ecparam -name prime256v1 -genkey -noout -out alice_private.pem
openssl ec -in alice_private.pem -pubout -out alice_public.pem
Now do the same for Bob:
openssl ecparam -name prime256v1 -genkey -noout -out bob_private.pem
openssl ec -in bob_private.pem -pubout -out bob_public.pem
Alice and Bob must keep their own private key files private, but they can freely share and publish their public key files (the _public.pem ones). Once Alice has Bob’s public key, and once Bob has Alice’s public key, they can both combine them with their own private key to derive a shared secret without ever sending that secret over the network, even in encrypted form.
Alice does this:
openssl pkeyutl -derive -inkey alice_private.pem -peerkey bob_public.pem -out alice_shared_secret.key
And Bob does this:
openssl pkeyutl -derive -inkey bob_private.pem -peerkey alice_public.pem -out bob_shared_secret.key
Notice that each person is using their own private key, but the other person’s public key.
If you did it correctly, the two shared secret files should be identical. They are binary files, so you can’t read them directly, but you can view them encoded in hexadecimal using the xxd utility:
xxd -p alice_shared_secret.key
xxd -p bob_shared_secret.key
You can also use the diff utility to compare them byte-by-byte:
diff -q alice_shared_secret.key bob_shared_secret.key
If you don’t see any output, the files are identical! If you do see differences, then double-check what you ran against the commands above and try again.
Alice and Bob can now use this shared secret as the “password” to the openssl enc sub-command (which we used earlier), and let openssl derive a new symmetric key from it.
openssl enc -aes-256-cbc -pbkdf2 -pass file:alice_shared_secret.key -in secret_file.pdf -out secret_file.enc
Since Eve never saw that secret go across the public network, not even in encrypted form, Eve has no chance to decrypting those messages.
But given a sufficiently large number of these encrypted messages, Eve might be able to crack the key using clever cryptanalysis, so it’s a good idea for Alice and Bob to periodically rotate the shared secret and key. This is done using a protocol like this:
- Let’s say that Alice and Bob are currently encrypting their messages with symmetric key
K. After some number of messages encrypted byKthey decide to rotate keys. - Both Alice and Bob generate new asymmetric key pairs.
- Alice and Bob encrypt only their new public keys using
Kand send them to each other. They of course keep their corresponding private keys secret. Although public keys are not secret, encrypting them withKautenticates them: i.e., it helps Alice and Bob know that the keys weren’t intercepted and replaced. - Alice and Bob decrypt each other’s new public keys using
Kand derive a new shared secret using Diffie-Hellman with their new private key and the other person’s new public key. - Alice and Bob now use this new shared secret as the password for deriving the new symmetric key
K1, which they use to encrypt all subsequent messages, until they decide to rotate keys again.
Diffie-Hellman is very clever, but it’s not authenticated, so we have the same issue we had with asymmetric encryption: how does Bob know at the start that he has Alice’s real public key, and not an attackers? The answer here is the same as it was before. Bob must get Alice’s public key initially from a trusted source, which requires digital certificates. But to understand those, we first need to understand digital signatures.
Digital Signatures
Earlier we saw how Alice could first encrypt using her private key, and then encrypt using Bob’s public key, to demonstrate that she was the one who encrypted the message, and not an attacker like Eve. But we don’t really need to encrypt the entire message twice. And sometimes we want to ensure the authenticity the sender without actually encrypting the message: for example a public contract should remain readable to all, but anyone should be able to verify that a particular set of people signed it. This is where digital signatures come into play.
A digital signature is the digital equivalent of an ink-on-paper signature, only better. In essence, it is a cryptographic hash of the data being signed that is then encrypted by the signer. This signature guarantees two things:
- The message was signed by the person in control of a particular secret key.
- The message hasn’t been modified since it was signed.
Just as with encryption there are two different forms of digital signatures: symmetric and asymmetric. Since we were just learning about asymmetric encryption, let’s start with the asymmetric form.
Asymmetric Signatures
To explain the process of asymmetric signatures, let’s assume Alice is again wanting to send a message to Bob in a way that he can know for sure Alice sent it. She would follow this sort of process:
- Alice first hashes the message using a cryptographic hashing algorithm like SHA-256. Let’s call the output
H. - Alice then encrypts
Husing her private key. Let’s call thatSIG. - If the message being signed isn’t secret, Alice can just send the message to Bob along with
SIG. Otherwise Alice can encrypt the message using Bob’s public key (like above). - When Bob receives the message plus
SIGhe first decryptsSIGback intoHusing Alice’s public key. If the message was also encrypted, he decrypts it using his own private key. - Bob then re-hashes the message—let’s call that
H1. - Bob compares
H1toH: if they match, he knows that it was signed by Alice and the message was not changed in-transit. If not, the signature is invalid.
The pseudomoji code looks like this:
🗝️ = ...Alice's private key...
📢 = ...Alice's public key...

📄 = ...some message to sign...

Alice():
	#️⃣ = hash(📄)
	🔏 = encrypt( #️⃣, 🗝️ )
	Bob(📄, 🔏)

Bob(📄, 🔏):
	#️⃣ = decrypt(🔏, 📢)
	does #️⃣ == hash(📄) ?
If an attacker in the middle intercepts the message and tries to change it, the hashes won’t match. If the attacker tries to replace SIG with their own signed hash, the decryption of SIG will fail because it was encrypted using the attacker’s private key, not the true signer’s private key.
Since cryptographic hashes are typically much smaller than the original message (which might be a 100 page PDF), encrypting the hash is much more efficient than encrypting the original message twice. It also enables scenarios where you don’t want to encrypt the message being signed, as you want it to remain readable by anyone (e.g., a public contract).
To get a feel for how these work, let’s use the asymmetric keys we generated in the previous section to sign a document and verify that signature. You can use any document you already have on your machine, or you can create a new one just for testing using a command like this:
echo "a document to be signed" > document.txt
Now let’s sign it using Alice’s private key that we generated in the previous section:
openssl dgst -sha256 -sign alice_private.pem -out document.sig document.txt
Breaking that down:
opensslis that same Swiss Army knife of cryptographic algorithms.dgstis the digest sub-command we used in the hashing section, because a signature is an encrypted hash of the document being signed.-sha256tellsopensslto use the SHA-256 hashing algorithm.-sign alice_private.pemspecifies which private key to use when encrypting the hash.-out document.signames the file to whichopensslwill write the output signature.document.txtnames the file to sign.
The signature file will always be written in binary (base-2), but you can convert it to base-64 if you need to copy/paste it into an email or instant message (or if you just want to view it in your terminal):
export BASE64SIG=$(openssl enc -base64 -in document.sig)
echo $BASE64SIG
The receiver can use a similar command to decode the base-64 back into binary:
echo $BASE64SIG | openssl enc -base64 -d -out document.sig
To verify the signature, use the dgst sub-command again, but pass the signer’s public key as the -verify argument, and the binary signature file as the -signature argument.
openssl dgst -sha256 -verify alice_public.pem -signature document.sig document.txt
If the document hasn’t changed, the signature should be valid. Try changing document.txt and running just the verify command again—it should then fail because the document is now different than when it was signed!
Symmetric Signatures
Asymmetric signatures are very useful when the signer and verifier are different actors, but when the signer and verifier are the same, you can use symmetric signatures instead.
For example, web services often need to send some data to the client, which the client needs to include in subsequent requests (e.g., an authenticated session token). Since this is sensitive data, the service needs to ensure the client (or an attacker in the middle) hasn’t tampered with the data in-between requests. Since the service is both signing and verifying the data, it can use symmetric signatures, as it can keep the symmetric key secret.
The pseudomoji code looks like this:
🔑 = ...secret key...
📄 = ...some message to sign...

sign():
	#️⃣ = hash(📄)
	🔏 = encrypt( #️⃣, 🔑 )
	verify(📄, 🔏)

verify(📄, 🔏):
	#️⃣ = decrypt(🔏, 🔑)
	does #️⃣ == hash(📄) ?
These kinds of signatures are often called “Message Authentication Codes” or MACs, as they ensure the data is authentic and not modified since it was signed. The most popular symmetric signature algorithm is known as HMAC, which is actually a special kind of hashing function that mixes the symmetric key into the data as it hashes it.
Let’s get a feel for how this works by using openssl to create an HMAC signature for the same document.txt file we were using earlier. First we need to create a secret symmetric key. This can be just some random bytes that we generate using openssl (let’s do 32 bytes = 256 bits, encoded in hexadecimal):
export SIGNING_KEY=$(openssl rand -hex 32)
Now use the openssl mac sub-command to generate an HMAC signature using our secret symmetric key:
openssl mac -digest SHA256 -macopt hexkey:$SIGNING_KEY -in document.txt HMAC
Breaking that down:
macis theopensslsub-command for generating and verifying message authentication codes (aka symmetric signatures).-digest SHA256tellsopensslto use the SHA-256 algorithm when hashing (you can alternatively useSHA512if you wish).-macopt hexkey:$SIGNING_KEYspecifies the signing key to use, which we provide via theSIGNING_KEYenvironment variable that was set when we ran theopenssl randcommand earlier.-in document.txtnames the file to sign.HMACspecifies we want to use the HMAC symmetric signature algorithm.
Verifying symmetric signatures is even easier than verifying asymmetric ones: you just run the same command on the current version of the document, and compare the resulting signature to the previous one. If they match, the signature is still valid. If not, either the document changed, or the signing key is different. Try changing the contents of document.txt and re-run the command to see that the signature changes!
Digital Certificates
Earlier we noted that Alice and Bob may not know each other previously, so they need a way to exchange public keys over a public network and know for sure they got the key they expected. If an attacker in the middle can intercept those keys and swap them for the attacker’s public key, the attacker could decrypt, read, re-encrypt and forward the messages without Alice and Bob ever realizing they’ve been compromised.
The way we handle this on the Internet is through digital certificates, which are the digital equivalent of a passport issued by a government. They combine all the algorithms and techniques we’ve been discussing so far to create a document that Bob can verify to know for sure that the public key in the document really belongs to Alice.
Digital certificates are issued by an authority, which everyone in the conversation decides to trust. Alice gets hers using a process like this:
- Alice uses her private key to sign a file called a Certificate Signing Request (CSR). This file has a specific format in which she can specify her public key and some properties about herself that the authority will validate. Typically these are properties that would help others identify her, such as her legal name, email address, and maybe mailing address.
- Alice sends the CSR to a/the trusted Certificate Authority (CA).
- The CA validates the properties in the CSR. How they do this depends on the properties—e.g., validating an email address can be done by simply sending it a message with a link Alice must click, but validating a legal name and address might require a background/credit check plus sending letters through the post.
- Once the CA validates all the properties, the CA creates and signs a certificate. The certificate contains all the info from the CSR (including Alice’s public key), as well as similar info about the CA (including their public key). It also typically includes a date range during which the certificate should be considered valid.
- Alice can now share this certificate with others who trust the same CA, like Bob.
- Bob can verify the CA’s signature in the certificate to ensure it really came from the trusted CA.
- Bob can verify that the identity properties in the certificate match what he knows about Alice.
- If everything checks out, Bob can be confident that the public key in the certificate really came from Alice.
Of course, all of this comes down to how well the properties in the certificate really identify the person, and the rigor of the CA’s validation methods. If the certificate only contains an email address, and Bob doesn’t already know Alice’s email address, the certificate doesn’t really help Bob know for sure that it came from Alice. But if it contains a verified domain name that is owned by Alice, that might be sufficient for Bob to know it’s the real Alice.
To get a feel for this process, let’s use the private key we created for Alice above to create a CSR. You’ll be prompted for the various properties, and you can enter whatever you want since we won’t be sending this to a real CA:
openssl req -new -key alice_private.pem -out certificate.csr
If you want to view that generated CSR in its structured form, use this command:
openssl req -in certificate.csr -text -noout
If you want to generate a real certificate from this CSR, we can create what is known as a “self-signed” certificate. This is the equivalent of a passport written in crayon. Applications won’t trust it by default, but you can often override this and force the application to use it just for testing purposes:
openssl x509 -req -days 365 -in certificate.csr -signkey alice_private.pem -out certificate.crt
To view that generated certificate in its structured form, use this command:
openssl x509 -in certificate.crt -text -noout
In practice, certificates are mostly issued to organizations and Internet domains to enable HTTPS web sites. You can see these in action in your web browser when it’s using HTTPS to talk with a particular domain. If you’re using Chrome, click on the site information icon next to the URL in the address bar (screenshots from January 2025):

Then click on the “Connection is secure” link:
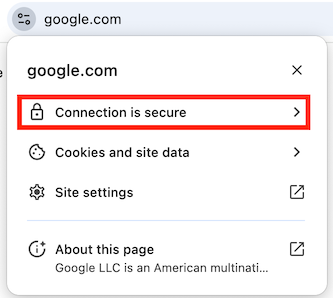
Then click on the “Certificate is valid” link:
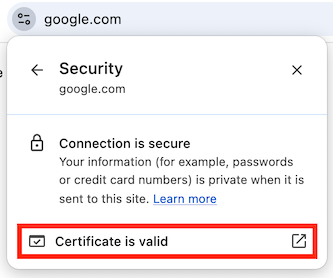
You should then see the details of the google.com certificate:
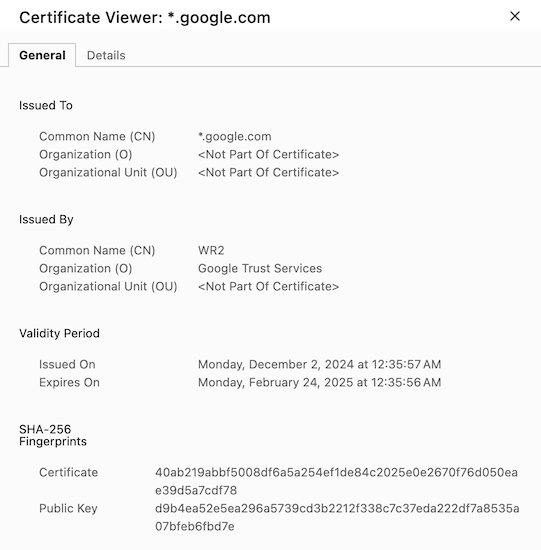
tip
Other browsers have similar UI for viewing a site’s certificate. If you can’t find it, ask your favorite LLM how do I view a site's certificate in {BROWSER} replacing {BROWSER} with the name of your browser.
You might be wondering, “if both parties need to trust the CA, when did I decide to trust the CA that issued the google.com certificate?” Well, you did when you decided to install and run your particular browser, which comes with a set of trusted CA certificates pre-installed. If the certificate for a given web site was signed by one of those CAs, your browser will automatically trust it. Administrators within a given company can also add their own certificate to browsers installed on the company’s machines so they can act as a local CA within the company.
These pre-installed CAs are also called “root CAs” because they can delegate some of their issuing authority to other companies. A digital certificate can actually contain a whole tree of certificates, and as long as the root of that tree is one of the pre-installed trusted root CAs, the browser will trust it.
Conclusion
That was a lot, but if you read carefully and worked through the example openssl commands, you should now have at least a basic understanding of cryptographic hashing, symmetric and asymmetric encryption, digital signatures, and digital certificates. We will build upon this understanding in other tutorials.
Identifiers
If you’ve ever taken a relational database course, your instructor probably told you to use database-assigned integers for your primary keys. For example, columns of type serial or bigserial in PostgreSQL will be automatically assigned a unique integer when inserting a row:
-- PostgreSQL
create table posts (
	id bigserial primary key,
	-- other columns...
);
In MySQL you get a similar behavior when adding the AUTO_INCREMENT modifier to any numeric column:
-- MySQL
create table posts (
	id bigint unsigned auto_increment primary key,
	-- other columns...
);
For each column like this, the database tracks a last-used integer value. When you insert a row, the database locks and increments this value, assigns the incremented value to the id column, and returns that value to your application. Your application can then return that ID in your API response, or use it to insert related records.
When you are just starting out, these database-assigned IDs seem to offer some handy features:
- The database handles all the locking and incrementing to ensure the new ID is unique even when there are multiple inserts happening at the same time.
- Because the IDs are always incremented, rows inserted earlier are guaranteed to have a lower ID than those inserted later, providing a natural creation ordering.
- Because the IDs are integers, they are compact both within the database and in URLs (e.g.,
GET /posts/1).
Unfortunately, as your system grows in scale and complexity, these database-assigned IDs start to become problematic, and most of these benefits start to erode. In this tutorial I’ll explain why, and describe an alternative that you should use instead.
Idempotency
One of things that make building distributed systems hard is the unreliability of the network. When one process makes a request across the network to another process, it sends a message and waits for a response. Typically that response comes back very quickly, but sometimes it takes a long time. This could be due to congestion on the network itself, or an overloaded/crashed target server.
When a client process makes any kind of network request, it specifies a timeout, which is the amount of time it is willing to wait for a response. If no response is received within that time duration, an error is returned/thrown to the client process.
This same thing happens when your API server (or any system component) executes an INSERT query against your database. The database client library turns that into a network request with a timeout. If the database doesn’t respond within that timeout, the database client library returns/throws an error to your application code. This can easily happen when there is a network partition, or when your database becomes overloaded and slow to respond.
This sort of error leaves your application in a bit of quandary: did the database server even receive the INSERT request? If so, was it processed successfully? Your application has no way of knowing because it never received a response. The database might have inserted the record and tried to send a response, but it might have been too slow because it was overloaded, or a network partition might have kept the response from reaching your application.
To make matters worse, if the new record was actually inserted, your application has no idea what the new database-assigned ID is, because that ID is in the response your application never received! So you can’t just query the database to see if it’s actually there.
You could retry the INSERT query at this point, but when using database-assigned IDs, you run the risk of inserting that record twice. If the original insert went through, and you retry the insert with the same data, the database will just generate a new ID and insert the record again, creating a duplicate.
What we want is for our insert operations to be idempotent. An idempotent operation is one that results in the same effect whether it is executed once, or multiple times. Idempotent operations are very handy in distributed systems because they allow us to safely retry network requests that timeout.
One way to make database inserts idempotent is to add an idempotency_key column with a unique index. When your application wants to insert a new record, it generates a new unique value for this column, and uses that same value in the original request, as well as any subsequent retries. If the original insert never went through, the retry will succeed because there is no other record in the table with that same value in the idempotency_key column. But if the original insert did go through, the retry will fail with a unique constraint violation, which your application can catch. Because the idempotency_key field is indexed, you can now efficiently query for the row with the idempotency key you were using, and discover the ID of the previously-inserted record.
But this begs the question: why should we add another unique index to our table when every table already has a unique index on the primary key id column? Every additional index slows down inserts because the database must not only append to the base table, but also update each index. Extra indexes also increase the amount of data storage used by the database, which limits per-server data growth.
If we generated our IDs in another way, could we eliminate the need for this extra column and index, while still ensuring that record inserts are idempotent? Before we answer that, let’s consider another scenario in which database-assigned IDs can become problematic.
Partitioning
Database-assigned IDs are handy when you have only one database server, but most large-scale systems end up needing to partition (aka shard) data across multiple database servers. This can happen for a few reasons.
The first and most obvious is that your system will eventually accumulate more data than will reasonably fit on a single database server. Databases must write data to persistent storage and that storage has a fixed size, so there is a limit to what a single server can hold. As you system gains more users, and is used by them more often, the amount of data will start to increase dramatically. If your system goes ‘viral’ you will reach the limits of a single database server surprisingly quickly.
Even if your single server has enormous data storage capacity, it still has only one database engine processing all the queries. As your system gets more and more requests from clients, your API servers will send more and more queries to the database. Eventually that load will saturate that database’s CPU and memory, causing a sharp increase in query latency, which will naturally make your API slower as well. So you may end up having to partition your data for compute reasons even before you run out of data storage space.
Lastly, if your system is used in a country that has data locality regulations, you might be required to keep the data created by its residents on a database server physically located within that country’s jurisdiction. Some of these regulations apply only to narrow types of data (e.g., financial) but others apply very broadly to “all personal data.” So you may end up needing to partition your data by country simply to comply with these data locality regulations, even if you have plenty of space in the database located in your home country.
Regardless of what causes you to partition your data, once you do, these database-assigned IDs become a bit problematic. Remember that each database server is tracking a last-used value for each ID column, but they are doing so independently. There is no central coordination between the various servers. So what keeps the servers from assigning the same ID to different records stored in different servers?
If you want to keep using database-assigned IDs, the typical solution is to partition the ID space as well. For example, if you decide that each shard can handle about a trillion records, you can manually set the starting and max ID values on each shard to ensure the IDs won’t overlap. This is how you’d do it in PostgreSQL:
-- SERVER 1
create sequence posts_id_seq_1
	minvalue 1
	maxvalue 1000000000000;

create table posts (
	id bigint primary key default nextval('posts_id_seq_1')
);


-- SERVER 2
create sequence posts_id_seq_2
	minvalue 1000000000001
	maxvalue 2000000000000;

create table posts (
	id bigint primary key default nextval('posts_id_seq_2')
);
Note: You can actually use the same sequence name on both servers, as they are totally separate servers with separate namespaces, but I added the index to this example just to keep things clear.
With these changes, the first record inserted into server 1 will get the ID 1, but the first record inserted into server 2 will get the ID 1000000000001. IDs will keep incrementing within each server’s respective ranges, so they will never overlap, but the number of records you can store per-server is now capped at a trillion. You can of course make this cap larger from the start, but you can’t change it once you start inserting records.
So we successfully avoided duplicate IDs, but we also lost one of the important benefits of database-assigned IDs noted above: natural creation ordering.
For example, if rows are evenly spread between servers 1 and 2 in the example above, the first row inserted will get ID 1, the second will get ID 1000000000001, and the third will get ID 2. If you sort the records by ID, they will no longer be in creation order.
This may or may not be important, depending on your system’s specific needs and goals. And you could add a created_at timestamp column to your table and sort by that instead when combining the results from multiple servers. But at this point we should step back and ask, “is there a better alternative?” Could we generate our IDs in another way that ensures uniqueness, doesn’t require partitioning the ID space and setting arbitrary limits, but still retains natural creation ordering?
Application-Assigned IDs
Many large-scale distributed systems use application-assigned IDs instead of database-assigned ones, for the reasons outlined above. Application-assigned IDs provide a natural idempotency, as the same value can be used in the original insert request, as well as all subsequent retries. And application-assigned IDs can be designed to maintain a natural creation ordering regardless of the number of database partitions you have.
There are various formats and algorithms out there, but the common recipe is as follows:
- Start with the number of seconds or milliseconds since a well-known timestamp (known as the ‘epoch’). This provides a natural creation ordering. The major cloud providers now offer hyper-accurate clocks and time-sync services that keep all servers generating these timestamps within a few microseconds of each other.
- Append a value that will keep multiple IDs generated within the same time duration unique. This could be a sufficiently long random value, or a pre-configured machine ID plus a machine-specific step counter, or a shorter random value plus a machine-specific counter.
- Encode the combined values in a URL-friendly string format, like base 16 (0-9, A-F), base 36 (0-9, a-z) or base 62 (0-9, a-z, A-Z).
- Optionally add a prefix indicating what type of entity the ID identifies. For example,
post_for Posts, orpay_for Payments. This allows humans and machines to distinguish the entity type given just the ID, and quickly load the database record from the appropriate table.
There are a few commonly-used implementations of this recipe that should be available via libraries in most programming languages:
- UUIDv7: A newer version of the Universal Unique Identifier standard, which uses a 48-bit timestamp with millisecond granularity, 74 randomly assigned bits, and a few hard-coded bits required by the standard to indicate format and versioning. Overall the ID is 128 bits long, which is typically encoded into a 36 character hexadecimal string (e.g.,
01976b10-a45c-7786-988e-e261ef5d015b). This is rather long to include in URLs, but you can implement a base36 encoding instead to make it shorter (see below). - Snowflake IDs: First developed at Twitter (before it was X), but now used by several social media platforms. It uses a 41-bit timestamp with millisecond granularity, plus a 10-bit pre-configured machine ID, plus a 12-bit machine-specific sequence number. The machine ID requires some central coordination (something has to tell each new API server what it’s unique ID is), but it also reduces the number of bits needed to ensure uniqueness of IDs generated within the same millisecond. The machine ID plus the 12-bit sequence number allows you to generate 2^12 = 4,096 IDs per-machine per-millisecond. Because they use less bits, they can fit into a
bigintcolumn in your database, while the other options must be saved as strings. Abiginttakes up less space than its string representation, and is a tiny bit faster to load, compare, transmit, etc. - MongoDB Object IDs: Available in every MongoDB/BSON library, these IDs use a 32 bit timestamp with second granularity, plus a 40 bit random value, plus a 24 bit machine-specific counter. The overall ID in binary form is 96 bits, and when encoded in hexadecimal the resulting string is 24 characters (e.g.,
507f191e810c19729de860ea).
Separate ID Types
Regardless of which implementation you use, it’s a good idea to declare separate types for each of your IDs. For example, an AccountID should be a different type from a SessionID. That way you can type parameters that expect AccountID values appropriately, and your tooling will flag any code that tries to pass the incorrect type.
In Python you can support this using a base class like so:
import string
import secrets
from typing import Final, Type
import uuid_utils as uuid


class BaseID(str):
    """
    Abstract base class for all prefixed ID types.

    To define a new ID type, create a class that inherits from
    `BaseID`, and set its `PREFIX` class variable to a string
    value that is unique across all BaseID subclasses.

    Example:
        >>> class TestID(BaseID):
        ...     PREFIX = "test"

    If the PREFIX value is not unique across all subclasses
    of BaseID, a ValueError will be raised when the class is
    created.

    To generate a new ID, just create a new instance of your
    derived class with no arguments:

    Example:
        >>> id = TestID()

    The value of the new `id` will have the form
    `"{PREFIX}_{uuid7-in-base36}"`. UUIDv7 values start with
    a timestamp so they have a natural creation ordering. The
    UUID is encoded in base36 instead of hex (base16) to keep
    it shorter.

    If you instead want a totally random ID, set the class
    property `ORDERED = False`, and `secrets.randbits()` will
    be used instead. This is appropriate when you are using the
    IDs as authorization tokens and you want them to be totally
    unguessable (e.g., session or password reset token).

    The `id` will be typed as a `TestID`, but since it inherits
    from `BaseID` and that inherits from `str`, you can treat
    `id` as a string. Database libraries and other encoders
    will also see it as a string, so it should work seamlessly.

    To rehydrate a string ID back into a `TestID`, pass it
    to the constructor as an argument:

    Example:
        >>> rehydrated_id = TestID(encoded_id)

    A `ValueError` will be raised if `encoded_id` doesn't have
    the right prefix.

    If you have a string ID but aren't sure what type it is,
    use `BaseID.parse()` to parse it into the appropriate type.

    Example:
        >>> parsed_id = BaseID.parse(encoded_id)

    You can then test the `type(parsed_id)` to determine
    which type it is.

    author: Dave Stearns <https://github.com/davestearns>
    """

    PREFIX_SEPARATOR: Final = "_"
    ALPHABET: Final = string.digits + string.ascii_lowercase
    ALPHABET_LEN: Final = len(ALPHABET)

    PREFIX: str
    """
    Each derived class must set PREFIX to a unique string.
    """

    ORDERED: bool = True
    """
    When set to True, new IDs will start with a timestamp,
    so they have a natural creation ordering. If you instead
    want a totally random ID set this to False. Random IDs are
    good for situations where you're using the ID as an
    authorization token, so you need it to be unguessable.
    """

    prefix_to_class_map: dict[str, Type["BaseID"]] = {}

    def __new__(cls, encoded_id: str | None = None):
        if encoded_id is None:
            # Generate a new UUID
            id_int = uuid.uuid7().int if cls.ORDERED else secrets.randbits(128)

            # Base36 encode it
            encoded_chars = []
            while id_int > 0:
                id_int, remainder = divmod(id_int, cls.ALPHABET_LEN)
                encoded_chars.append(cls.ALPHABET[remainder])
            encoded = "".join(reversed(encoded_chars))

            # Build the full prefixed ID and initialize str with it
            prefixed_id = f"{cls.PREFIX}{cls.PREFIX_SEPARATOR}{encoded}"
            return super().__new__(cls, prefixed_id)
        else:
            # Validate encoded_id
            expected_prefix = cls.PREFIX + cls.PREFIX_SEPARATOR
            if not encoded_id.startswith(expected_prefix):
                raise ValueError(
                    f"Encoded ID '{encoded_id}' does not have the expected"
                    f" prefix '{expected_prefix}'"
                )
            return super().__new__(cls, encoded_id)

    def __repr__(self) -> str:
        """
        Returns the detailed representation, which include the specific
        ID class name wrapped around the string ID value.
        """
        return f"{self.__class__.__name__}('{self.__str__()}')"

    def __init_subclass__(cls):
        """
        Called when new subclasses are initialized. This is where we ensure
        that the PREFIX value on a new subclass is unique across the system.
        """
        if not hasattr(cls, "PREFIX"):
            raise AttributeError(
                "ID classes must define a class property named"
                "`PREFIX` set to a unique prefix string."
            )
        if cls.PREFIX in cls.prefix_to_class_map:
            raise ValueError(
                f"The ID prefix '{cls.PREFIX}' is used on both"
                f" {cls.prefix_to_class_map[cls.PREFIX]} and {cls}."
                " ID prefixes must be unique across the set of all ID classes."
            )
        cls.prefix_to_class_map[cls.PREFIX] = cls
        return super().__init_subclass__()

    @classmethod
    def parse(cls, encoded_id: str) -> "BaseID":
        """
        Parses an string ID of an unknown type into the appropriate
        class ID instance. If the prefix does not match any of the
        registered ones, this raises `ValueError`.
        """
        for prefix, cls in cls.prefix_to_class_map.items():
            if encoded_id.startswith(prefix):
                return cls(encoded_id)

        raise ValueError(
            f"The prefix of ID '{encoded_id}' does not match a known ID prefix."
        )
This BaseID class is generic and can be used in any project. You can even package it into a reusable library if you wish. By default it uses a UUIDv7 for the unique ID portion, but encodes it to characters using base36 instead of base16 to keep the string form shorter. The base36 alphabet is just the characters 0-9 and a-z, so the IDs remain case-insensitive and URL-safe.
To define your specific ID type, create classes that inherit from BaseID and set the class variable PREFIX to a unique string. The base class ensures that these prefix strings remain unique across all sub-classes.
class AccountID(BaseID):
    PREFIX = "acct"


class PostID(BaseID):
    PREFIX = "post"
Now you can create these various strongly-typed IDs, turn them into strings, and parse them back into concrete types:
def func_wants_account_id(account_id: AccountID) -> None:
    print(repr(account_id))

# Generate a new AccountID
id = AccountID()

# Pass it to functions expecting an AccountID.
# Trying to pass a different type will trigger
# a static type checking error.
func_wants_account_id(id)
# func_wants_account_id(PostID()) -- type error!

# When you get an id string from a client, you can
# re-hydrate it back into an instance of ID class.
# (will raise ValueError if wrong prefix)
id_from_client: str = str(id)
rehydrated_id = AccountID(id)

assert type(rehydrated_id) is AccountID
assert rehydrated_id == id
IDs vs Authorization Tokens
One drawback of ordered IDs (i.e., those that start with a timestamp) is that they are more guessable than a totally random value. For example, a Snowflake ID is a timestamp followed by a machine ID followed by a step counter. If you have one valid Snowflake ID (from your own record), you can pretty easily guess another valid ID that was minted from that same machine around the same time.
A UUIDv7 is a bit better: it has 74 random bits after the timestamp. If the implementation uses a cryptographically secure random number generator (not all do), this value will be much harder to guess, but it’s still a much smaller search space than 128 random bits.
So ordered IDs are a tradeoff: we get a nice feature (natural creation ordering) in exchange for a less security. And this tradeoff is typically fine because in most cases, these IDs will be used with APIs that are authenticated. The client trying to read a resource identified by one of these IDs must first sign-in with valid credentials, so your system knows who they are, and whether they are allowed to access the specified resource.
But sometimes systems need to return unique values that provide access to a resource without authentication. For example, a video conferencing system might need to generate a unique meeting ID and include it in a URL that participants can use to join without authentication. Or a file sharing site that lets users share a file with “anyone who has the link” needs to generate a unique value for that document that is difficult for anyone without the link to guess.
These unique values are IDs, but they are actually something much more powerful: authorization tokens. If an anonymous client provides the correct token, they are authorized to read the resource, without needing to sign-in first.
In these cases, the security tradeoff of ordered IDs becomes more dangerous. If an attacker can guess a valid ID, they gain immediate access to that resource, even if no one shared the link with them.
Although it might be tempting, it’s a bad idea to use ordered IDs, especially Snowflake IDs, for authorization tokens. Instead, you should use a cryptographically-random value of sufficient length (128 or even 256 bits), and if possible, digitally sign it using a secret key known only on the server.
For more details, see the tutorial on Authenticated Sessions
Authenticated Sessions
In the HTTP tutorial, I discussed how its stateless nature is a classic software tradeoff—it enables good things like horizontal scaling, but it also makes things like authenticated sessions more difficult to support. In this tutorial I will show you how to support authenticated sessions over HTTP, which is actually a specific case of a more general problem: secure authorization tokens.
important
This tutorial assumes you have a basic understanding of HTTP, cryptographic hashing, and digital signatures. If you don’t, please read the HTTP and Intro to Cryptography tutorials first.
Sessions
Under the hood, HTTP is a stateless protocol that remembers nothing between requests, but that’s not your typical user experience on the web. When you use social media, shop online, or pay bills electronically, you sign-in once, and then perform multiple operations as that authenticated user. You don’t have to provide your credentials every time you do something that interacts with the server.
This implies that you have some sort of authenticated session with the server, but if HTTP is stateless, how is that possible? If your sign-in request went to one downstream server, but your subsequent request went to a different server, how does that different server know who you are?
Although we can’t keep any state on the server related to the network connection, we can pass something back and forth on that connection. This value is the ID of a session state record stored in our database (or cache) that all of our API servers can load when needed. That ID is bundled together with a digital signature into a session token, which protects it against tampering.
The typical sign-in flow goes like this:
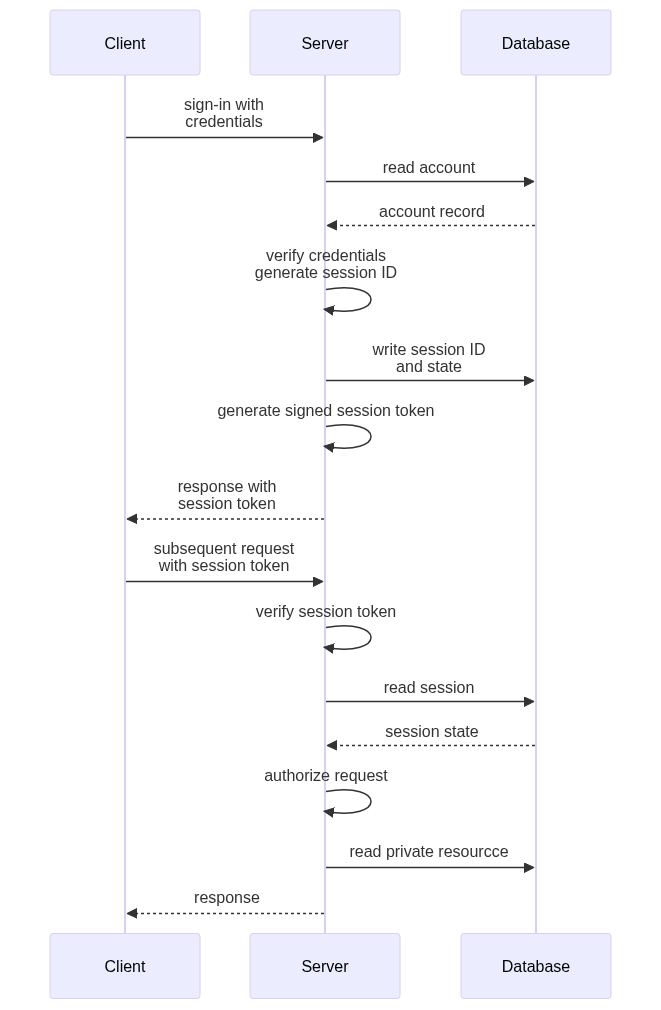
We will dig into the details of each of these things below, but here is a brief overview the steps in that diagram:
- When you sign in, the client sends your credentials to the server.
- The server loads the account record associated with those credentials from the database.
- The server verifies the provided credentials against the account record.
- The server generates a unique identifier for the session, known as the session ID. This should be a random value that is effectively impossible to guess given previous examples—e.g., a 128 or 256-bit value from a cryptographically-secure pseudorandom number generator (CSPRNG).
- The server inserts a session record into the database (or cache) using the session ID as the primary key. The record also contains a time at which the session expires, the ID of the authenticated account, and any other data you want to associate with the session.
- The server generates a digitally-signed session token from the session ID.
- The server includes this signed session token (not the bare session ID) in the response.
- The client holds on to this value, and sends it back to the server in all subsequent HTTP requests.
- When one of the servers receives the subsequent request, it verifies the session token’s signature and extracts the session ID.
- The server loads the associated session record from the database (or cache) and ensures it hasn’t already expired.
- The server now knows who the authenticated account is, and can decide if the current request is something that account is allowed to do.
At a high level this is how authenticated sessions work over HTTP, but let’s expand on each of these concepts in more detail.
Accounts
To use your system, a customer (person, corporation, or agent) needs to create an account. First-time system designers will often assume that an account will always belong to just one person, and one person will create only one account, but that’s hardly every true in the long run. Instead:
- A given customer will probably create multiple accounts. For example, it’s common to create separate work and personal accounts if your system could be used for both purposes.
- A given account will probably be used by multiple people, especially if your service costs money. Nearly every media streaming service learned this the hard way.
You can avoid some of these issues by designing your accounts to be hierarchical from the start. For example, let customers create one main account to handle the service subscription and billing centrally, and then create child accounts for each of their family members, perhaps with restricted permissions. The same setup would be applicable for corporation with multiple subsidiaries, or a platform with multiple customers of their own, or a person using your system for both business and personal reasons.
Existing accounts should also be able to band together under a new parent account for centralized billing and monitoring—e.g., when two corporations merge, or when two people with individual accounts get married and want to take advantage of a family sharing discount.
The authorization rules for parent accounts will depend on your particular system. In some cases it will make sense to let parent accounts view all resources that belong to child accounts, but in others those child resources might need to remain private. In some cases it might also make sense for parent accounts to create new resources or adjust configuration on behalf of their child accounts, and in others this should not be allowed. Think about what would make sense in your scenario and design your authorization rules accordingly.
Credentials
Regardless of your account structure, when a customer creates an account they must also provide some credentials they can use to prove their ownership of that account. These credentials are something the customer knows (password), something customer has (phone or hardware security key), or something customer is (biometrics tied to a passkey). Systems that manage particularly sensitive data might require multiple of these.
Something You Know: Email and Password
Typically systems start out requiring only an email and password. Email names are already unique, and account holders can prove their ownership of an email address by responding to a verification message sent by your system (more on that below). Once verified, the email address can be used for notifications and account recovery.
But don’t use an email address as the account’s primary key—people sometimes need to change their email address, for example when leaving a school or corporation. Use an application-assigned ID for the account record, and store the email address as one of the account’s credentials.
Passwords are again a classic design tradeoff. They are simple and familiar, and can be used anywhere the account holder happens to be, including shared computers or public kiosks. But they are also a shared secret, so if an attacker learns an account’s password, they immediately gain unrestricted access. If people were disciplined about creating unique and strong passwords on each site and keeping them secret, this might be OK, but sadly most people are not. Even those who are can be tricked into revealing their passwords on phishing sites that look like the real sign-in pages of popular services.
Something You Are: Passkeys
Thankfully there is now an alternative to passwords that is well supported by the major browsers and client operating systems: passkeys. These use asymmetric cryptography to securely authenticate without ever passing a shared secret like a password over the network.
Passkeys are relatively simple to understand in principle, but their actual implementation can get complex, so you should definitely leverage the official libraries for your client and server programming languages. To help you understand how they work, let’s look at a simplified version of the sign-up flow:
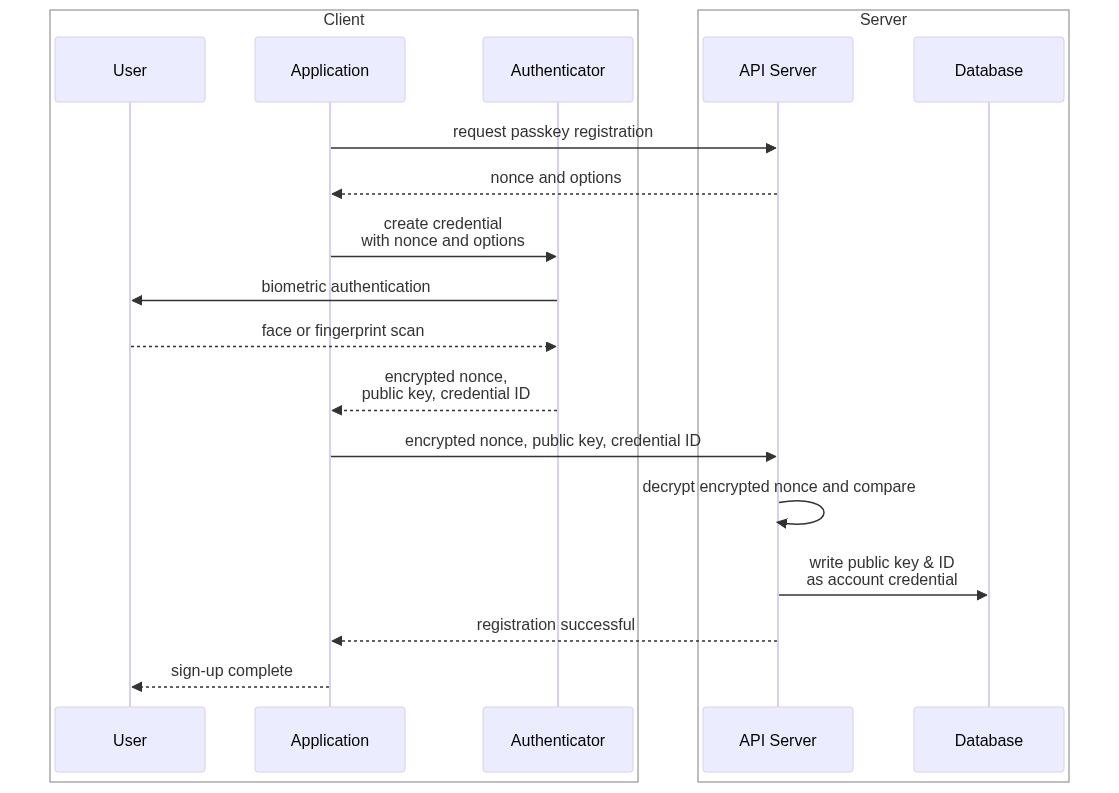
- The client makes a request to the server to create a new passkey for the account.
- The server responds with a unique and unguessable value, which is typically called a ‘nonce’.
- The client application asks its security hardware (known as the ‘Authenticator’) to create a new asymmetric key pair scoped to the server domain, encrypt the nonce with the private key, and return: the encrypted nonce; the associated public key; and a unique ID for the passkey to the application. This triggers the device’s biometric sensors to authenticate the person using the device (e.g., touch or face ID).
- The client sends the encrypted nonce, public key, and passkey ID to the server.
- The server uses the public key to decrypt the encrypted nonce and verify it matches the one the server sent in the the step 2.
- The server stores the public key and its ID in the database as one of the account’s passkey credentials.
Signing in works almost the same way, except that the key pair is already generated and the server already has the public key, so it only needs to verify the encrypted nonce against the previously-stored public key.
- The client requests to sign-in.
- The server responds with the previously recorded passkey ID and a unique and unguessable nonce.
- The client application asks the Authenticator to encrypt the nonce with the previously created private key. This triggers the device’s biometric sensors to authenticate the person using the device.
- The client sends the encrypted nonce and the passkey ID to the server.
- The server loads the previously-stored public key associated with the passkey ID, and uses it to decrypt the encrypted nonce, comparing the result to the nonce sent in step 2.
- If it matches, the server knows that the client is in control of the associated private key, and is therefore authenticated.
Most client devices will now synchronize passkeys across devices signed into the same account. For example, Apple devices will share passkeys with all other Apple devices signed into the same iCloud account. This allows you to sign-in on your phone with a passkey originally created on your laptop, or vice-versa.
Passkeys will likely become the new standard for authentication, but they are still relatively new and unfamiliar (in 2025), and some of your potential customers might not yet have a device capable of generating or using a passkey. Even if they do, if the device manufacturer doesn’t offer a mechanism to backup and sync passkeys, your customers will lose access if their device is lost, stolen, or damaged. Without another credential, like an email and password, they may not be able to prove their identity during an account recovery flow.
That said, password managers like 1Password can act as software-based passkey Authenticators on devices that lack native passkey support. They also backup those keys to the cloud, and synchronize them across all kinds of devices from various manufacturers. Their mobile apps can even scan QR codes shown on a public computer screen (e.g., check-in kiosk) to perform passkey authentication via your phone. So passkeys can be used in a wide variety of scenarios provided your target customers are willing to install a password manager app on devices that lack native passkey support.
Something You Have: Phones and Hardware Keys
If your system manages particularly sensitive data, you might want to require another credential that is something the account holder has. For example:
- mobile phone with text messaging (ok): The account holder can register a mobile phone number during sign-up, and during sign-in your system can send a unique, unguessable, one-time use code via text messaging that the account holder must enter into a challenge form. This benefits from the ubiquity of text messaging, but it’s also not as secure, since SMS text messages are not encrypted and can be intercepted.
- authenticator app (better): The account holder can install an authenticator application on their phone or laptop, add your site during sign-up, and provide the current code shown on the screen during sign-in. During sign-up your server provides a seed value, and the algorithm generates time-based codes from that seed that rotate every 30 seconds or so. Since both your server and the authenticator app know the initial seed value, both can generate the same codes, so your server knows which code should be provided at any given time. But if an attacker learns that seed value and knows the algorithm, they too can generate valid codes.
- hardware key (best): A physical USB device like a Yubikey can provide either time-based codes like an authenticator app, or act like a passkey described above (preferred). Since it plugs into a USB port, and is relatively small, account holders can carry the key with them and plug it into any device they happen to be using. Newer keys also work with mobile devices that support Near Field Communication (NFC), which is the same technology used for mobile payments.
These extra credentials are typically prompted for after successfully authenticating with a password or passkey, acting as a “second factor” that increases your confidence that the person signing in is the actual account holder. To break into an account, an attacker would need to not only compromise the account holder’s password or passkey, but also steal their physical hardware key, which is tough to do when the attacker is actually located in another part of the world.
Password Hashing
If you do collect password credentials from your account holders, never store those passwords in plain text! Sadly, several major sites in the early 2000s did just this, and after they were hacked, millions of passwords were leaked on the Internet.
Instead, you should always hash passwords using an approved password-hashing algorithm, and only store the resulting hash in your database. As I discussed in the cryptography tutorial, hashing is a good way to store data that you don’t need to reconstruct, but you do need to verify in the future. Because hashing algorithms are deterministic, the password provided during sign-in will hash to the same value as the identical password supplied during sign-up. But because they are also irreversible, an attacker can’t directly recompute the original password from a stolen hash.
I say “directly” because it is of course possible for an attacker to simply hash every known password and compare these pre-computed results to a stolen hash. This is why password hashing algorithms differ from ordinary hashing algorithms like SHA-256 in two important ways:
- They add a unique and unguessable ‘salt’ value to each password before hashing it.
- They are purposely designed to be relatively slow, and allow you to increase their complexity as computing speeds increase to keep them relatively slow.
The first quality prohibits attackers from comparing pre-computed hashes of known passwords to a new batch of stolen hashes, because those pre-computed hashes don’t include the unique salt values. The second quality makes recomputing the hashes for all known passwords plus those unique salt values prohibitively slow. This discourages attackers from attempting this sort of brute-force attack, and gives you time to detect the breach, revoke all existing authenticated sessions, and invalidate all existing passwords.
The currently recommended password hashing algorithm (in 2025) is argon2. Libraries are available for all major programming languages, and most are very easy to use. Typically the implementation will generate the salt value automatically, and return an encoded string containing the salt value as well as the hash. Store that in your database, and feed it back into the verify method to verify a password provided during sign-in.
In Python, it’s a simple as this:
from argon2 import PasswordHasher, VerificationError

# To make it slower, set time_cost argument to
# a value higher than the default (currently 3)
hasher = PasswordHasher()

# During sign-up...
sign_up_password_hash = hasher.hash(sign_up_password)
# Store password_hash in your database

# During sign-in...
try:
	hasher.verify(sign_up_password_hash, sign_in_password)
except (VerificationError):
	# Password didn't match!
Session IDs and Tokens
Regardless of which kinds of credentials you require, once the account holder is successfully authenticated, you need to return something to the client that the client can send back in all subsequent requests. But what should this value be? What qualities should it have?
- It should be unique and unguessable so an attacker can’t guess another valid session ID given one of their own.
- It should be digitally-signed using a secret key known only to the server so that even if an attacker can guess another valid session ID, they can’t sign it because they don’t know the secret signing key.
Your best bet for a session ID is a sufficiently long random value generated by a cryptographically secure pseudo-random number generator (CSPRNG). Given that you will be signing it, 128 bits is likely sufficient for current computing hardware, but you can increase that to 256 bits if you’re paranoid.
Generating a 128-bit cryptographically-random value in Python is as easy as this:
import secrets

session_id = secrets.randbits(128)
Other programming languages offer similar functionality, so ask your favorite AI tool how to do it in your chosen language.
To digitally sign this value, use a symmetric digital signature algorithm like HMAC. This algorithm requires a key that must be kept secret on the server, but since the server is the only thing signing and verifying, that is relatively easy to do. In Python, the code looks like this:
import os
from hmac import HMAC, compare_digest

# Get the secret signing key from an env var,
# or some other secure mechanism like a secrets service.
secret_key = os.getenv("SESSION_TOKEN_SIGNING_KEY")

session_id_bytes = session_id.to_bytes(16), # 128 bits / 8 = 16 bytes

hmac = HMAC(
	key=secret_key,
	msg=session_id_bytes,
	digestmod=hashlib.sha256, # use SHA-256 for hashing
)
signature = hmac.digest()
Again, you should be able to find an HMAC library for all major programming languages, so this isn’t something exclusive to Python. Just paste this code into your favorite AI tool and ask it how to do this same thing in your desired programming language.
Now that you have the ID and a digital signature for that ID, you can combine them together into a single binary token. You can then encode that into an ASCII-safe format like Base 64 to include in your HTTP response. In Python that looks like this:
from base64 import urlsafe_b64decode

binary_token = signature + session_id_bytes
token = urlsafe_b64encode(binary_token).decode("ascii")
When the client sends this token back to your server during subsequent requests, you can verify it using code like this:
from base64 import urlsafe_b64decode
from hmac import HMAC, compare_digest

SIGNATURE_BYTES_LEN = 32 # SHA 256 bits / 8 = 32 bytes

# Decode the base-64 string back into bytes.
decoded = urlsafe_b64decode(token)

# Split the signature and session ID bytes.
signature = decoded[:SIGNATURE_BYTES_LEN]
session_id_bytes = decoded[SIGNATURE_BYTES_LEN:]

# Recalculate what the signature of session_id_bytes
# should be using our secret key.
hmac = HMAC(
	key=secret_key,
	msg=session_id_bytes,
	digestmod=hashlib.sha256, # use SHA-256 for hashing
)
expected_signature = hmac.digest()

# Compare them to make sure they are the same
token_is_valid = compare_digest(signature, expected_signature)
Note that we use compare_digest() here and not a simple == comparison. The former is constant-time, meaning it will take the same amount of time regardless of how similar or different the two signatures are. This prevents a sophisticated form of attack, known as a timing attack, where the attacker uses the request latency differences to detect how close a tampered token is to being valid. A simple == comparison will stop as soon as it encounters a byte on the left that is different from the corresponding byte on the right.
Session State
This secure session token reveals nothing about the authenticated user nor the details of the current session. That is actually a good thing since we will be sending it back to the client, where it can be easily seen in the browser developer tools. So before we return it, we need to write a Session record to our database, using the token as the unique identifier (primary key). This record should contain the following fields:
- The ID of the authenticated account
- When the session began
- When the session expires
- If your API can be used by multiple origins (see below), the value of the
Originrequest header when the account holder authenticated, so you can verify subsequent requests come from the same origin - If you’re using CSRF tokens (see below), the CSRF token value
How quickly the session expires will depend on how secure the system really needs to be. An online banking site might use a fairly short duration, while a social media site might use a very long one. Many sites will also keep the session active as long as the account holder continues making requests, resetting the expiration field as needed.
Session Token Transmission
Now that you have a session token, the remaining question is how should we transmit it in the HTTP response to the client, and how should the client send it back in subsequent HTTP requests?
Your best bet these days (2025) is a Secure HttpOnly SameSite Cookie. Besides being delicious, cookies are an automatic mechanism already supported by HTTP, web browsers, HTTP libraries, and API server frameworks. Any cookie set in an HTTP response will be stored by the web browser or HTTP library, and automatically sent back in subsequent requests to the same origin.
In recent years cookies also gained a few important options that finally made them suitable for authenticated session tokens with web-based clients:
- HttpOnly: The cookie can’t be accessed by client-side JavaScript running in a browser. This protects your session tokens from Cross-Site Scripting (XSS) attacks.
- Secure: The browser/library will send the cookie only when making requests over encrypted HTTPS, not unencrypted HTTP. This protects your session tokens from being intercepted by attackers sitting between clients and your servers.
- SameSite=Strict: The cookie is sent by the browser only when the current page was loaded from the same site as the API being called. This effectively eliminates Cross-Site Request Forgery (CSRF) attacks.
The definition of ‘site’ in SameSite=Strict is subtly different than ‘origin’. A site is defined as the protocol (or scheme) plus the domain, but not the sub-domain(s). So https://example.com and https://api.example.com are considered the same site with respect to cookie behavior, but not the same origin with respect to CORS. This allows you to host your API on a subdomain but still use SameSite=Strict to protect against CSRF attacks.
But if your API is designed to be used by web clients service from other sites, you can’t use SameSite=Strict. For example, if your API’s origin is api.example.com but the web client that calls it is served from someothersite.com the SameSite=Strict option will block the browser from sending the session cookie to your API. In these cases, there are two other techniques you can use to protect against CSRF attacks.
Origin Header
When JavaScript in a web page makes fetch() requests to another origin, the browser automatically includes an Origin header set to the origin from which the current page was loaded. The JavaScript can’t override this value, nor suppress it, so you can use it as security signal.
If your API can only be used by web clients that come from a known set of origins, you can use this Origin header to determine if the request is coming from one of the allowed web clients, or another nefarious site. For example, if an account holder is signed in through a legitimate web client, and is then tricked to go to a page on evil.com, that page could try to do a fetch() request to your API and the browser will happily send along the cookies associated with your API’s origin. But on the server-side, you will see that the Origin is evil.com, which is not one of your allowed origins, so you can immediately reject the request with a 401 Unauthorized.
CSRF Tokens
If your API can be used by any origin, and you don’t have a known list of valid ones, you can use something like CSRF tokens instead. These are like session tokens, but they are transmitted using a different, custom, non-cookie header, such as X-CSRF-Token. The session token is still transmitted via a Secure HttpOnly cookie, but this extra CSRF token is passed via a different header that requires manual handling, and is never persisted by the web client.
Clients must manually check for this header in all fetch() responses, hold on to the latest value sent by the server in memory, and manually include this value in all subsequent fetch() requests. The server verifies that the value matches the one it handed out in the latest response on the same session, and rejects the request if they don’t match.
The CSRF token value should be different for each session, and can rotate more often than the session token if needed. Because the CSRF token is handled manually and never persisted, a nefarious site can’t know what it should be, and thus can’t provide it in fetch() requests, even though the browser automatically sends the session token cookie. This effectively blocks CSRF-style attacks, though it obviously requires more work for both the server and web client.
The obvious downside of CSRF tokens like these is that sessions effectively expire when the browser tab is closed. Since the token is never persisted, it disappears when the tab is closed, and when the legitimate web client is reloaded, it has no idea what value it should pass. The client must instead make the account holder re-authenticate in order to get a valid CSRF token.
Because CSRF tokens are handled manually in JavaScript, they are also susceptible to Cross-Site Scripting (XSS) attacks. If your web client render content supplied by users (e.g., most any social media site), and if accidentally renders that content as interpreted HTML instead of plain text, an attacker can inject script that runs within the web client of another innocent user. That script will be able to read the current CSRF token and send it in a fetch() request. Popular web frameworks like React automatically do this content escaping, but if you are using a more obscure framework, or just raw JavaScript, you must ensure that all user-supplied content is properly rendered as plain text (e.g., set the innerText attribute instead of innerHTML).
Multi-Level Authentication
If your API manages resources that are particularly sensitive, like payment card details or highly-personal information, you may want to also use a technique called multi-level authentication. This reduces the damage an attacker can do if they somehow managed to get access to an account holder’s valid session token.
With this approach, the initial session token in the browser’s cookie jar only grants authorization to relatively insensitive resources—for example, you can maybe read content posted by friends, but you can’t interact with billing details or change account configuration. The session associated with this token can be fairly long-lived (expires far in the future).
To access more sensitive resources, the client must authenticate again to gain a higher-level session token associated with a session that expires very quickly. This higher-level token is returned as a different cookie with no Max-Age setting so that it is never persisted, and disappears as soon as the web client unloads.
Session Expiration and Revocation
I mentioned earlier that the session records written to your database should have an expiration time so that the tokens associated with them have a bounded lifetime. When your API servers receive a valid session token and attempt to load the associated session record, you can simply apply a WHERE clause to the query to filter out sessions that have already expired. If you don’t find the record, the session either doesn’t exist or has expired. In either case, you should return a 401 Unauthorized response.
But in some cases you may want sessions to expire only after a period of inactivity. For example, you might want the session to stay active as long as the client keeps making requests, but expire an hour after the last request you received. In these cases, simply update the session record each time it is loaded with a new expiration time set to one hour from now.
Lastly, when a user signs out, or when you need to forcibly end all sessions for an account that has been compromised, either delete the session records altogether, or update the expiration time to now (or to be safe, a few minutes before now, to accommodate some clock skew between your API servers). Updating the expiration and keeping the records around allows you to do forensic and usage analytics in the future, but you will naturally pay for the extra data storage, so you may want to eventually archive and delete those records after a year or so.
Other Kinds of Authorization Tokens
Session tokens are actually a specific form of a more general concept known as authorization tokens. These are tokens that, once verified, authorize access to something without providing authentication credentials. A verified session token actually authorizes access to the session state, which happens to contain the previously-authenticated account, but it’s really just an authorization token in the end.
Authorization tokens, like session tokens, have the following qualities:
- They contain a unique, unguessable value.
- They also contain a digitally signature of that value, generated using a signing key known only to the server.
- They may be associated with an existing account in the database, but are sometimes used by anonymous clients.
- They typically expire at some point, often quickly if they allow access to sensitive resources or operations.
- They may be deleted/consumed after first use.
Other examples of authorization tokens include:
- Email/Phone Verification: Many systems will ask you to verify your email address or phone number by sending a message to that address/number with a link. The link contains an authorization token that was previously created, signed, and associated with your account. If the submitted token signature is valid, it proves you have control over that email account or phone number. These tokens are typically deleted immediately after they are used to prevent replay attacks.
- Account Recovery: If you forget your password or lose your passkey, most systems will send an email to your account’s email address containing a link you can click to recover your account. Just like the verification scenario, that link will contain an authorization token. When you follow the link, the server will verify the token, and then let you reset your password or create a new passkey. These tokens are also typically deleted immediately after use.
- Public Access Keys: When you share a document with “anyone who has the link,” or create a video conference meeting link, those contain an authorization token that lets anonymous users access the document or join the call. The server will verify the signature on the token, but since it’s not associated with an account, and can be used multiple times, the server won’t delete the token until it expires (if ever).
- Magic Sign-In Links: Some low-risk systems will let account holders sign-in by requesting a magic link sent to their registered email address or phone number. Just as in the verification scenario, that link will contain a one-time-use authorization token. When the account holder follows the link, the server verifies the token, starts a new authenticated session, and deletes the token.
Since these kinds of authorization tokens are really the same thing as session tokens, you can use the same code to generate and verify them!
note
🍻 Many thanks to my friend Clinton Campbell, founder of Quirktree, for patiently explaining security concepts and techniques to me over the years, and reviewing drafts of these tutorials.
API Servers
One of the most common building blocks you will see in systems you create, extend, or maintain are API servers. These are continuously-running programs that listen on a port for incoming requests, process those requests, and write responses. The body of those requests and responses are structured data, encoded in something like JSON or protobuf, as opposed to content formatted for a particular user interface (e.g., HTML for a web browser).
Sending structured data instead of formatted content decouples your API servers from the clients that use them. The clients could be anything from a browser-based web application, to a native mobile application, to a command line utility, or even another API server. These different types of clients have vastly different user interfaces (or none at all), but they can all consume structured data and do something with it. For example, a web app will transform it into HTML shown on the current page, while a native mobile app will display it in native UI elements, and a command line utility might print it to the terminal.
In this tutorial we will dive into the details of API servers, but this won’t be a simple guide to building “Hello, World!” in some trendy scripting language. Instead, this tutorial will teach you the universal principles, techniques, and best practices used to build the kind of real-world services you use every day. You can apply these to any API server you build, in any programming language, with any framework.
important
The code examples in this tutorial assume you’ve already read the Authenticated Sessions tutorial. If you haven’t, you might want to read that first before proceeding.
Internal Architecture
If you use an AI model to generate a “Hello, World!” web server, it will probably spit out a bunch of badly-structured code all in one file. If you were to take this as a template, and simply keep extending it in the same style, with more and more functionality, you’d end up with a giant unmaintainable mess. If you want to build feature-rich servers, you need to adopt a better internal architecture from the start.
But what sort of architecture? When we started building HTTP servers in the 1990s, there wasn’t an obvious or established answer to that question. Many tried to replicate the Model-View-Controller (MVC) architecture that was used to build desktop applications like word processors and spreadsheets, but this was always a poor fit. MVC was designed for interactive, single-user, stateful applications, where the state was mutated in-memory and re-displayed after every keystroke. HTTP servers are quite different: they are multi-user, mostly-stateless programs that need to process a multitude of concurrent but independent network requests as quickly as possible.
As engineers gained experience with HTTP servers, and as new browser capabilities like AJAX were released, a common architectural pattern emerged that works well for most kinds of services:
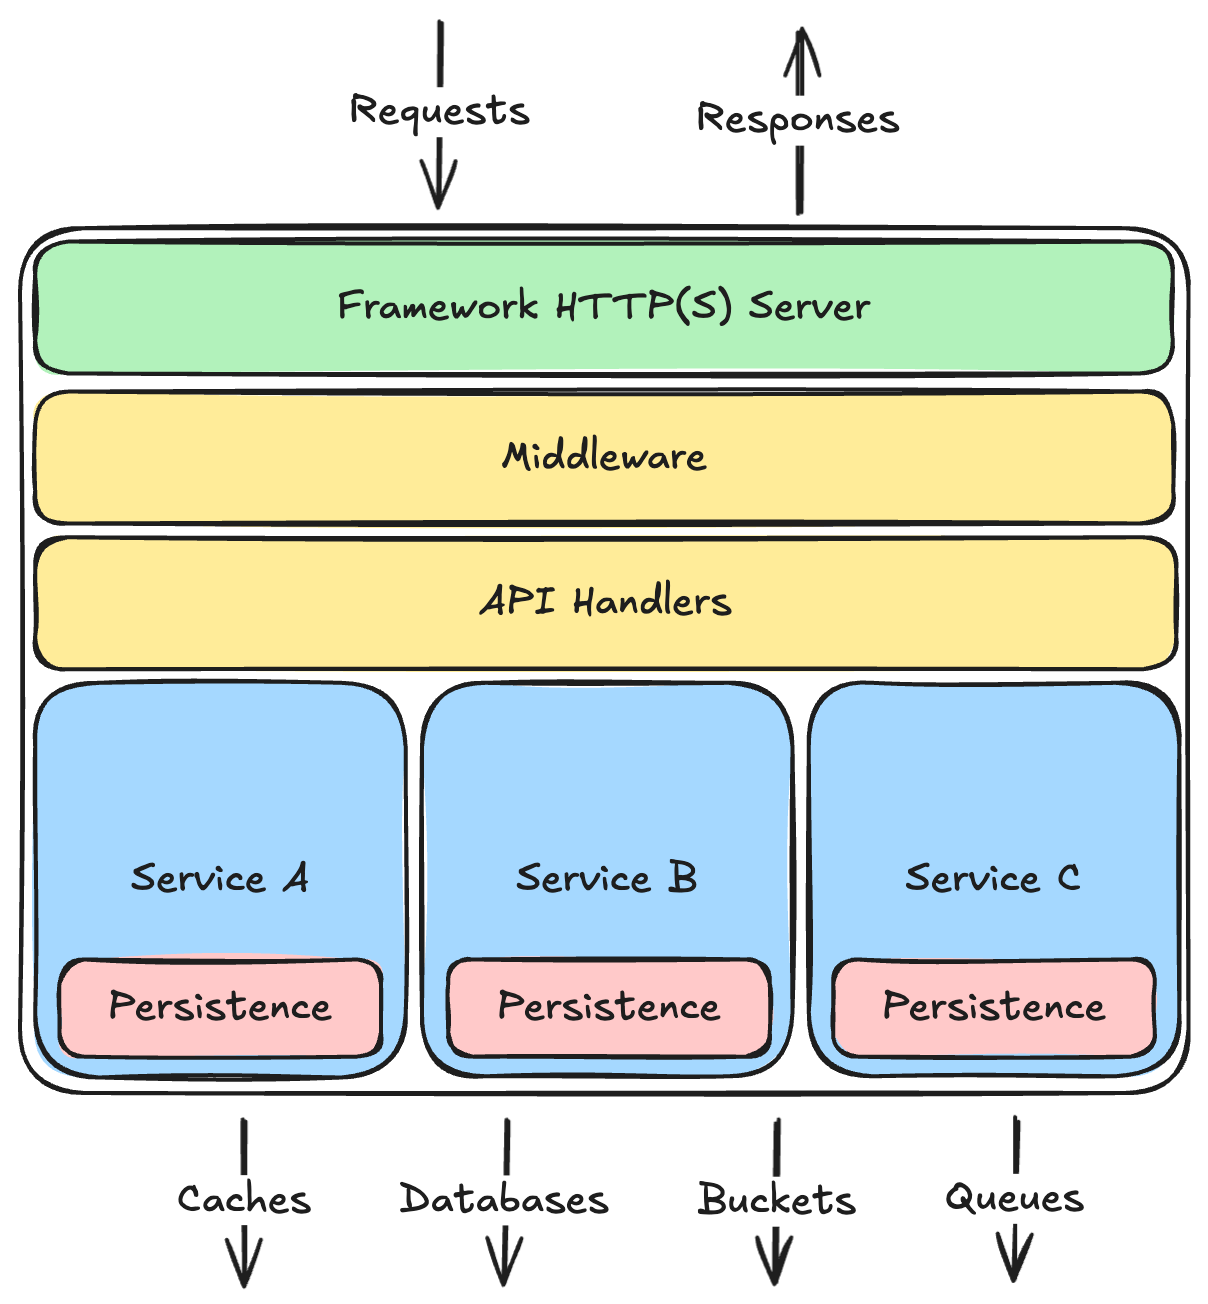
There are a few important things to note about this architecture:
- Divided into layers, with dependencies only running downward: Each layer depends on the ones below it, but never on the ones above it. In fact, each layer should have no specific knowledge about layers above it, and shouldn’t care if those layers completely change in the future.
- Layers use each other via internal APIs: Just like your overall server, each layer exposes an API to the layers above. Higher layers always talk to lower layers through their APIs, and all other code within the layer is considered private to that layer.
- Each layer has a separate concern: API handlers only deal with the API semantics, not business rules. Services only enforce business rules, not API semantics, nor persistence details. The persistence layer only knows how to save and load data, not how to properly validate or mutate it, and definitely has no idea what sort of API style the server is using. All of this keeps the layers relatively independent, and keeps core business logic (which tends to change more often than the rest) all in one place.
- Business logic is vertically segmented into isolated services: For example, in a social-media style system, the logic pertaining to user accounts should be isolated into an internal service that is separate from the logic pertaining to posts made by those accounts. These services will often need to interact with each other, but that is done through the same internal API the HTTP handlers use. This allows you to repackage a service into a separate HTTP server in the future if you need to scale or deploy it independently.
- Persistence abstracts the data stores and ensures data isolation: The persistence layer should be the only thing that knows what kind of databases or caches or message queues it talks to—the internal API this layer exposes to the services layer above should be simple enough to be supportable on different kinds of databases so you can change that over time.
All of this might be a bit abstract, so let’s look at how this works in practice with some real code. We will build upon what you read in the Authenticated Sessions tutorial by implementing a simple identity service within an API server. I’ll do this in Python, but the same principles and techniques apply to any language. Let’s start with the persistence layer and work our way up.
Persistence
As shown above, each service should have its own isolated persistence layer, so let’s begin by creating a directory structure for our code containing an identity service and its associated identity store interface:
.
└── src
    ├── main.py
    └── services
        └── identity
            ├── identity_service.py
            └── stores
                └── identity_store.py
I’m doing this in Python, but a similar directory structure can be used for most programming languages (except Java, which has some pretty specific requirements around directory structures). You can add __init__.py files in each of these packages if your tooling requires it, or if you want to re-export symbols at the package level for easier importing.
The identity_store.py will define a common programming interface that the identity_service.py will depend upon. We can then implement that interface over several different kinds of database engines. If we start out using a relational database, but decide later to switch to a key/value store like DynamoDB, the identity service doesn’t have to know or care—it just continues talking to the same common programming interface.
This common interface will define not only methods the service uses to read and write data, but also the data structures those methods will accept and return. Let’s start by defining those in the identity_store.py file.
# src/services/identity/stores/identity_store.py

from dataclasses import dataclass
from datetime import datetime

# See the Identifiers tutorial
# for details on BaseID.
from src.lib.ids import BaseID


class AccountID(BaseID):
    PREFIX = "acct"


class SessionID(BaseID):
    PREFIX = "ses"
    ORDERED = False


@dataclass(frozen=True)
class NewAccountRecord:
    id: AccountID
    email: str
    password_hash: str
    display_name: str


@dataclass(frozen=True)
class AccountRecord:
    id: AccountID
    email: str
    password_hash: str
    display_name: str
    created_at: datetime


@dataclass(frozen=True)
class AccountRecordUpdates:
    email: str | None = None
    password_hash: str | None = None
    display_name: str | None = None


@dataclass(frozen=True)
class NewSessionRecord:
    id: SessionID
    account_id: AccountID
    expires_at: datetime


@dataclass(frozen=True)
class SessionRecord:
    id: SessionID
    account_id: AccountID
    created_at: datetime
    expires_at: datetime


@dataclass(frozen=True)
class SessionWithAccountRecord:
    id: SessionID
    account_id: AccountID
    created_at: datetime
    expires_at: datetime
    account_email: str
    account_display_name: str
    account_created_at: datetime
I’m using basic data classes here because I did my implementation without using an Object-Relational Mapping (ORM) library. The SQL required to insert, select, and update these records is so simple that I didn’t feel the need to use an ORM, but if you want to use one, define these classes using your ORM’s base class instead (e.g., DeclarativeBase for the SQL Alchemy ORM).
We are using application-assigned IDs on these records for the reasons discussed in that tutorial. They will be created and assigned by the service layer, so the persistence layer only needs to save them to the database
When signing in, account holders will provide an email address and password, so the email address on a NewAccount must be unique across the system. How you ensure that will depend on what kind of database you are using. If your database supports unique constraints, you can simply add one to that column, but if not, you might need to query first or use some other technique. Regardless, we should also define a common error type that the store implementation will raise when the email already exists:
# src/services/identity/stores/identity_store.py

# ...code from above...

class EmailAlreadyExistsError(Exception):
    """
    Raised when inserting an account with an email address that is already registered
    with another existing account.
    """
Now let’s define the interface and methods that all identity stores must implement:
# src/services/identity/stores/identity_store.py

from typing import Protocol

# ...code from above...

class IdentityStore(Protocol):

    async def insert_account(self, new_account: NewAccountRecord) -> AccountRecord: ...

    async def get_account_by_id(self, id: AccountID) -> AccountRecord | None: ...

    async def get_account_by_email(self, email: str) -> AccountRecord | None: ...

    async def update_account(
        self, prev_record: AccountRecord, updates: AccountRecordUpdates
    ) -> AccountRecord: ...

    async def insert_session(self, new_session: NewSessionRecord) -> SessionRecord: ...

    async def get_session(
        self, session_id: SessionID
    ) -> SessionWithAccountRecord | None: ...

    async def delete_session(self, session_id: SessionID) -> None: ...

    async def delete_all_sessions(self, account_id: AccountID) -> None: ...
The only thing left now is to implement this interface for your chosen database engine. You could probably ask your favorite AI tool to do this for you based on the Protocol and data classes we’ve already defined.
If you want to see my implementation for PostgreSQL, check out the following files:
- schema.sql: SQL script to create the various tables and a
viewthat pre-joins the session rows to their related account rows. - pg_identity_store.py: Implementation of
IdentityStoreover that PostgreSQL schema. ThePostgresStorebase class has some common methods that any Postgres store would need, and theSqlGeneratorhelper class generates the various SQL statements easily and efficiently.
I also defined a Dockerfile and compose.yaml that make it easy to spin up a local PostgreSQL instance with that schema pre-installed (requires Docker Desktop). You can use this for testing not only on your local development machine, but also within a GitHub action runner, as they have Docker pre-installed.
Services
The services layer is where all of your business logic should be. The HTTP-related details will be handled by the API layer above, so this code won’t really be specific to an HTTP server at all—it will be just everyday classes or functions. And since the database-related details are handled by the persistence layer below, this code won’t contain any SQL or database-specific operations. That leaves just the business logic.
In a very simple API server, you might have only one internal service, but in most cases you’ll end up having several. These services may need to interact at points—for example, the accounts service may need to use the notifications service to send a welcome email to new accounts. To ensure these services remain isolated from each other, they should only talk to each other through the service’s public interface. Services should never directly query or manipulate the data belonging to another service, nor use another service’s private internal code.
To make this a bit more concrete, let’s see what the code would look like for an IdentityService that uses the IdentityStore we defined in the previous section. As a reminder, the current directory structure looks like this:
.
└── src
    ├── main.py
    └── services
        └── identity
            ├── identity_service.py
            └── stores
                ├── identity_store.py
                └── pg_identity_store.py # PostgreSQL implementation
For the IdentityStore we defined an interface (Python Protocol) that we could implement over different database engines. For the IdentityService there only needs to be one implementation, so it will be just a normal Python class. That class will expose methods that the API layer and other services will use to create accounts and authenticated sessions. Let’s start by defining the data structures those methods will accept and return:
# src/services/identity/identity_service.py

from datetime import datetime, timezone, timedelta
from dataclasses import dataclass
from argon2 import PasswordHasher

# Import all the things we defined
# in identity_store.py
from .stores.identity_store import (
    IdentityStore,
    AccountID,
    SessionID,
    AccountRecord,
    NewAccountRecord,
    NewSessionRecord,
)

@dataclass(frozen=True)
class NewAccount:
    email: str
    password: str
    display_name: str


@dataclass(frozen=True)
class Account:
    id: AccountID
    email: str
    display_name: str
    created_at: datetime


@dataclass(frozen=True)
class Credentials:
    email: str
    password: str


@dataclass(frozen=True)
class Session:
    token: str
    id: SessionID
    account_id: AccountID
    created_at: datetime
    expires_at: datetime
    account_email: str
    account_display_name: str
    account_created_at: datetime
These data classes are similar, but noticeably different from the ones we defined in the identity store. For example, when the API layer creates a NewAccount it will provide the password sent by the client, but the identity service will hash that to set the password_hash on NewAccountRecord passed to the persistence layer. Password hashing belongs in the service layer because we want passwords hashed regardless of whether the service is called from the API layer or another service. The same is true for generating the new AccountID.
We also want to define a few errors that the IdentityService can raise to callers.
# src/services/identity/identity_service.py

# ...code from above...

class InvalidCredentialsError(Exception):
    """
    Raised when the credentials provided during authentication
    are not correct. This can happen when the email or the
    password are incorrect, and no distinction is made to
    avoid leaking information to the attacker.
    """


class SessionExpiredError(Exception):
    """
    Raised when verifying a session that has expired.
    """
Now let’s start defining the IdentityService itself:
# src/services/identity/identity_service.py

# ...code from above...

class IdentityService:
    _store: IdentityStore
    _session_duration: timedelta
    _password_hasher: PasswordHasher

    def __init__(self, store: IdentityStore, session_duration: timedelta):
        self._store = store
        self._session_duration = session_duration
        self._password_hasher = PasswordHasher()
Note how a particular IdentityStore implementation is passed into the IdentityService constructor. This is a technique known as dependency injection (sometimes called “inversion of control”), where the things a class depends upon are injected via the constructor rather than created by that class directly. This allows you to pass a different IdentityStore in automated tests (e.g., a fake in-memory one) from the one your HTTP server uses in deployment.
Now let’s use that injected IdentityStore to implement a create_account() method on this IdentityService class:
class IdentityService:
    # ... __init__() code form above ...

    async def create_account(self, new_account: NewAccount) -> Account:
        password_hash = self._password_hasher.hash(new_account.password)
        new_record = NewAccountRecord(
            id=AccountID(),
            email=new_account.email,
            password_hash=password_hash,
            display_name=new_account.display_name,
        )
        record = await self._store.insert_account(new_record)
        return Account(
            id=record.id,
            email=record.email,
            display_name=record.display_name,
            created_at=record.created_at,
        )
Experienced Python developers are probably thinking that I could have converted the AccountRecord to an Account in one line, like this:
return Account(**asdict(record))
That would work for now because the source and target data classes happen to have all the same fields, but what would happen if in the future we decide to add a field to AccountRecord that we don’t want to expose on Account? Or change the name of a field on AccountRecord but not on Account? As soon as we did that, this code would break.
So while it is more cumbersome to type out all the various field assignments manually, it is less error-prone in the long run. If you use an AI-powered IDE, it could just generate this more explicit assignment code for you, so it’s not all that much of a burden.
Now that we can create accounts, let’s add methods to start and verify authenticated sessions:
from argon2.exceptions import InvalidHashError, VerificationError, VerifyMismatchError

class IdentityService:
    # ... all the methods already shown above ...

    async def authenticate(self, credentials: Credentials) -> Account:
        record = await self._store.get_account_by_email(credentials.email)
        if record is None:
            raise InvalidCredentialsError()
        else:
            try:
                self._password_hasher.verify(record.password_hash, credentials.password)
                return self._to_account(record)
            except (VerificationError, VerifyMismatchError, InvalidHashError):
                raise InvalidCredentialsError()

    async def start_session(self, credentials: Credentials) -> Session:
        account = await self.authenticate(credentials)
        record = NewSessionRecord(
            id=SessionID(),
            account_id=account.id,
            expires_at=datetime.now(timezone.utc) + self._session_duration,
        )
        inserted_session = await self._store.insert_session(record)

        # TokenSigner is a helper class with code like that
        # shown in the Authenticated Sessions tutorial.
        token = self._token_signer.sign(inserted_session.id.encode())

        return Session(
            token=token,
            id=inserted_session.id,
            account_id=inserted_session.account_id,
            created_at=inserted_session.created_at,
            expires_at=inserted_session.expires_at,
            account_email=account.email,
            account_display_name=account.display_name,
            account_created_at=account.created_at,
        )

    async def verify_session(self, session_token: SessionToken) -> Session:
        id_bytes = self._token_signer.verify(session_token)
        session_id = SessionID(id_bytes.decode())
        record = await self._store.get_session(session_id)
        if record is None or datetime.now(timezone.utc) >= record.expires_at:
            raise SessionExpiredError()

        return Session(
            token=session_token,
            id=record.id,
            account_id=record.account_id,
            created_at=record.created_at,
            expires_at=record.expires_at,
            account_email=record.account_email,
            account_display_name=record.account_display_name,
            account_created_at=record.account_created_at,
        )
Note how the start_session() method returns not only the session details, but also the digitally-signed session token. This work belongs in the services layer because any kind of API or other service that starts a session needs that token.
Given what we’ve done so far, you can add the rest of the methods to support ending a session and ending all sessions for an given account. Or you can see my implementation here.
API Handlers
API handlers are just functions that receive a parsed request and return a response. In some frameworks, these functions return nothing and use another input argument to write the response instead (e.g., a response or writer argument), but the gist is the same.
In most “Hello, World!” tutorials, you’ll typically see a lot of code in these API handlers, including direct calls to the database. Please hear me when I tell you that is a very Bad Idea™. Calls to the database are the responsibility of the persistence layer. Data validation and business rules are the responsibility of some service in the services layer.
The API handler functions should only concern themselves with the details of the API semantics, and nothing else. For example, during an account sign up request, the handler should only construct a NewAccount object and pass it to the AccountsService. The service will do all the data validation and business logic necessary to create a new AccountRecord, and the persistence layer will save that to the database. If an exception occurs, the API handler catches it and translates it into the appropriate HTTP response status code and message.
The reason for this strict separation is so you can evolve your API separately from your services. For example, many startups will at some point change their API in a backwards incompatible way, but still need to support older clients that haven’t yet moved to the new API. Or they may decide to move from a REST style to GraphQL or gRPC or whatever new shiny style emerges in the future. Regardless, both the new and old APIs can use the same set of internal services, making it relatively easy to support both with little code duplication.
To make this more concrete, let’s define a few API handler functions assuming we’re using the FastAPI web framework with pydantic for input validation. Start by creating a new api directory under src/ and a new file within that called susi.py (for sign-up/sign-in).
.
└── src
    ├── main.py
    ├── api
    │   └── susi.py
    └── services
        └── identity
            ├── identity_service.py
            └── stores
                ├── identity_store.py
                └── pg_identity_store.py
Let’s start by defining an API route for POST /accounts, which will let a customer sign up for a new account. We begin by defining what the request and response bodies will look like:
# src/api/susi.py

from datetime import datetime
from pydantic import BaseModel, EmailStr, Field
from fastapi import APIRouter, Depends, HTTPExceptio

class NewAccountRequest(BaseModel):
    email: EmailStr
    password: str = Field(min_length=6)
    display_name: str = Field(min_length=1)

class AccountResponse(BaseModel):
    id: str
    email: str
    display_name: str
    created_at: datetime
Pydantic models help you validate the request body JSON passed to your APIs. If a client omits one of the required fields defined in the model, the FastAPI framework will automatically respond with a detailed error. The same is true if the values sent are not of the correct data types, or fail the validations defined in the Field() definitions.
We can now reference these request and response types in a new API handler function.
# src/api/susi.py

# ...code from above...

router = APIRouter()

@router.post("/accounts", status_code=201)
async def post_accounts(
    new_account_request: NewAccountRequest,
    identity_service: IdentityService = Depends(identity_service),
) -> AccountResponse:
    new_account = NewAccount(
        email=new_account_request.email,
        password=new_account_request.password,
        display_name=new_account_request.display_name,
    )
    try:
        account = await identity_service.create_account(new_account)
    except EmailAlreadyExistsError:
        raise HTTPException(
            409, f"Email address '{new_account_request.email}' is already registered."
        )

    return AccountResponse(
        id=account.account_id,
        email=account.email,
        display_name=account.display_name,
        created_at=account.created_at,
    )
Note how the API handler code is actually quite simple. It’s job is merely to translate:
- the API request body into whatever the service requires as input;
- the return value from the service into the API response body;
- and any exceptions raised by the service into an HTTPException with the relevant response status code.
You might be wondering how the identity_service got passed as the second argument to that handler function. FastAPI has its own dependency injection features that make it rather easy to inject service instances into API handler functions. You can see the functions that provide these dependencies here.
Keep going and add APIs for signing in to start an authenticated session, and signing out!
Middleware
As we built more and more API servers throughout the 2000s, we discovered that we were doing the same sort of things over and over in all of our request handlers: logging, authentication, authorization, routing, response compression, etc. These are things you want to do on all, or at least most, of the requests sent to every API server. It would be handy to implement this logic once, and just inject it into the request processing stack. Thus was born middleware.
Middleware is just a fancy term for a function that wraps around your API handler functions, or another middleware function. For each request, the HTTP server invokes the top-level middleware function, which does some work, calls the next function in the chain, and then maybe does some more work after that function returns. Graphically it looks like this:
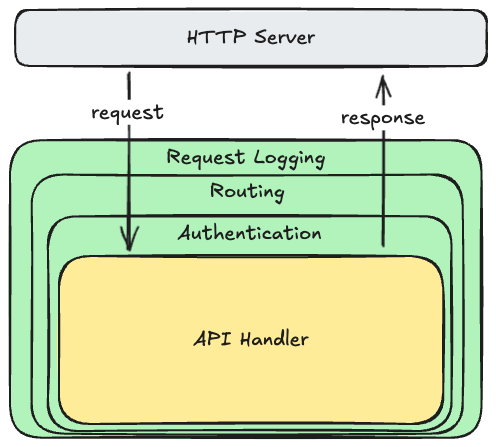
Because each middleware function wraps around the next, it can do work before and after the inner function executes. For example, the request logging middleware might start a timer and collect some information from the request on the way in (e.g., the method and the resource path), and then write a log line on the way out containing the request/response details and how long it took to process. Other middleware functions only do work on one side: for example the routing middleware will decide which API handler to call based on the request method and resource path, but doesn’t need to do anything after that handler returns.
The most common middleware you will see is a request router (the APIRouter() above is an example). This is responsible for deciding which of your API handler functions to invoke depending on what is in the request. For example, you can configure the router to call your signup() API handler when the request is for POST /accounts, but your signin() handler when the request is for POST /sessions. In some frameworks the router is exposed as part of the HTTP server, or passed to it during construction, but it’s really just a bit of middleware.
Most frameworks come with a wide array of built-in middleware already included, and more that you can simply plug into the server when you construct it. Most will allow you to write your own middleware functions as well. To see how, consult the documentation for your framework, or ask your favorite API model to generate some starting code for you. But keep this code separate from your API handlers and the rest of the layers.
HTTP(S) Server
The top-most HTTP(S) layer is typically provided by whatever web server framework you are using—you should never have to write this yourself. For example, if you’re using Node.js with Express, the Node runtime handles this part. If you’re using Rust with Axum, or Python with FastAPI, or Java with Spring, it’s a similar story. In Go, you could use just the standard library, or a more sophisticated package like Gin that builds upon it.
Most frameworks offer servers that can speak both version 1 and 2 of HTTP, though some older ones may only support version 1. If you supply a digital certificate and private key when constructing the server, it will also support HTTPS.
This layer is concerned only with managing network connections, protocol negotiation, encryption/decryption, parsing requests, invoking a top-level middleware or handler function, and writing responses to the network. Because it’s typically provided by your framework, it’s fairly generic and only knows about the top-level middleware or handler function you register with it.
Observability
Unlike a graphical client application, API servers are mostly invisible by default. If you send a request, you’ll be able to see the response, but you can’t see what it’s doing at other times. This makes it especially hard to know when your server is slowing down, running out of memory, encountering unexpected errors, or about to crash.
To overcome this, we typically add some functionality that lets us continuously observe and monitor our system components. For API servers, this usually consists of writing log messages about every request, and publishing various metrics.
Request and Error Logging
At the very least, your API servers should write a line to the standard output stream describing every request the server processes. Most web server frameworks will do this for you automatically, or via a request logging middleware library you can add.
You should also log any exception/errors that occur while processing requests. Again, many web server frameworks will do this automatically via try/catch blocks wrapped around your API handlers, but if you catch and handle exceptions lower-down in your services or persistence layers, you should also write those to standard out.
When developing and debugging on your local machine, you can see these messages in the terminal you used to start the server. In deployment, these are typically piped to a logging service like Splunk or something similar offered by your cloud provider (e.g., AWS CloudWatch).
Frameworks that do request logging automatically will typically include only the most basic details about the request and response: method, resource path, response status code, and latency. But many will let you extend this with other properties from the request and response that might be relevant to your API. For example, if you support idempotency keys for data creation APIs, you could include those in the log messages so you can see when these requests are being retried.
These log messages are useful not only for observing the current set of requests being made to your server, but also diagnosing failures when they occur. For example, if you see a lot of 5xx response status codes in the log, you can look at the exception messages to figure out what happened.
Metrics
Log messages are mostly useful for diagnosing problems after a failure has occurred, but it’s also useful to continuously monitor key metrics for your server, and alert when those metrics go out of acceptable range, before your server crashes.
Key metrics include things like:
- number of requests processed by the server
- latency of those requests at various percentiles
- number of requests with a successful response vs an error response
- number of exceptions caught
- number of queries being sent to the database, and their latency
- number of requests being made to other API servers, and their latency
- amount of memory currently in use, and how much memory is still free
- the percentage of available CPU that is being used
Note that these are values that constantly change over time, so your server must periodically report them in some way. In the past, we typically used a library called statsd to push these to a metrics and dashboard service like Graphite, but in 2025 it’s more common to expose them via another API that a metrics service like Prometheus calls periodically.
Most web server frameworks can track and report metrics related to HTTP requests automatically, or via middleware you add. But metrics about requests to your database, or other API services, must be added by your own code. How you do this will depend on what framework and metrics service you use—ask GitHub Copilot or your favorite LLM to generate some example code for your particular context.
Regardless of which metrics service you use, these metrics are used for two things:
- Dashboards that display these metrics on scrolling charts, so you can visualize what your server is doing.
- Automatic alerts that go off when a metric goes outside it’s acceptable bounds. For example, you can configure an alert to fire when your server experiences more than five error responses within five consecutive minutes, or when the latency of your APIs gets too high (or whatever makes sense for your API). These alerts can trigger emails, Slack messages, phone calls, or mobile push notifications via a service like PagerDuty. When these alerts go off, it’s usually a sign that your server is having troubles, and manual intervention might be necessary to avoid a crash.
Conclusion
We’ve covered a lot of details in this tutorial, but hopefully you’ve now learned some of the universal principles, techniques, and best practices professional engineers use to build the kind of real-world services you interact with every day. These principles and techniques can be applied to any API server you build, regardless of what programming language or framework you use.
API Design
In the previous tutorial on API Servers we learned how to use a layered architecture to separate concerns, keeping the code easy to understand and extend. Now it’s time talk about what the API actually looks like to callers. Since this is an HTTP server, the caller ultimately must send HTTP requests and handle HTTP responses, but we have a lot of options for what those requests and responses actually look like.
Over the years a few common API design patterns have emerged, and these days there are really only three that are typically used: REST, RPC, and GraphQL. Let’s look at each in turn.
REST
REST is an acronym that stands for Representational State Transfer, which is the name of a design pattern first described by Roy Fielding in his PhD dissertation. The full details of this pattern are complex and elegant, and few systems follow it completely, but the basic ideas became a very popular choice for API servers over the last couple of decades.
In its most basic form, a REST API exposes a set of logical resources, which are the core objects your API server can manipulate. In a social media system these would be things like Accounts, Posts, DirectMessages, Feeds, Notifications, etc.
Callers refer to these resources using the resource path in the HTTP request. This path can be hierarchical, which makes it easy to refer to the set of objects as a whole, or one specific object in the set, or even other objects related to a specific object. For example:
| Resource Path | Meaning |
|---|---|
/accounts | All accounts in the system |
/accounts/123 | The specific account with the identifier 123 |
/sessions/me | The currently authenticated account |
/accounts/123/friends | All accounts that are friends of account 123 |
/accounts/123/posts | All posts made by account 123 |
The words used in resource paths should always be nouns or unique identifiers. Resource paths with verbs, like /signin or /send_email, should be avoided. Use POST /sessions for signing in, and something like POST /outbox to send an email.
A REST API also exposes a set of basic operations that callers might be able to perform on these resources. The operation is specified as the method in the HTTP request. In theory this method could be anything the client and server understand, but in practice the set of methods you can use is often dictated by proxy servers in-between. To be safe, REST APIs tend to use only the core HTTP methods that every server and proxy should support:
| Method | Meaning |
|---|---|
| GET | return the current state of the resource |
| PUT | completely replace the current state of the resource with the state in the request body |
| PATCH | partially update the current state of the resource with the partial state in the request body |
| POST | add a new child resource with the state in the request body |
| DELETE | delete the resource |
| OPTIONS | list the methods the current user is allowed to use on the resource |
When sending or returning resource state, it should be some text-based format that is easy to work with in the browser as well as other types of clients like native mobile apps. The default choice these days is to use JSON. Because of this, we often refer to REST APIs as REST/JSON APIs.
Combining methods and resource paths, callers can do a wide variety of things:
| Method & Path | Meaning |
|---|---|
POST /accounts | Create a new system account (sign up) |
POST /sessions | Create a new authenticated session (sign in) |
GET /sessions/me | Get the details for the currently authenticated account |
GET /accounts/123/posts | Get all posts made by account 123 |
POST /posts | Create a new general post from the currently authenticated account |
DELETE /posts/123 | Delete a previously-created post with the ID 123 |
POST /channels/abc/posts | Create a new post that is only visible in channel abc |
DELETE /sessions/mine | Delete the currently authenticated session (sign out) |
GET requests against large resource collections will typically return only a page of resources at a time (e.g., 100 records at a time). Otherwise your API server and database will bog down trying to read and transmit far too much data during a single request. Clients can iteratively move through these pages by specifying a ?last_id=X query string parameter containing the last ID they got in the previous page. It’s common to restrict how many pages one can retrieve in total, so that bots can’t simply scrape all of your data.
Large resource collections might also provide limited forms of filtering and sorting via other query string parameters. For example, one might be able to get all posts made during during January 2025 using a request like GET /accounts/123/posts?between=2025-01-01_2025-02-01.
The set of method and resource combinations you support becomes your API. Some combinations might be available only during an authenticated session, and some might be allowed only if the authenticated account has permissions to perform the operation (e.g., only the creator of a post can delete it).
When done well, REST APIs are simple, intuitive, and ergonomic. But the REST pattern has some drawbacks:
- It’s difficult or clumsy to model more complex operations that don’t neatly correspond to the basic HTTP verbs. For example, an API for controlling an audio system might want to expose operations for pausing and resuming the current playlist, but there are no standard HTTP methods for that. One could expose a
PATCH /playlists/currentAPI to which the client can send{ "paused": true}, but that is fairly inelegant and obscure. APIs that needs to do this should consider an RPC style instead. - As the size of a resource’s state grows, more and more data is sent to clients, even if they only need a small fraction of it. This gets even worse when returning lists of those resources. One can support partial projections through a query string parameter, but this again becomes clumsy and inelegant. This scenario was one of the motivations for GraphQL.
- If a client needs several different resources all at once, it needs to make several HTTP requests to different resource paths. If the state of one resource determines the resource paths for others, the requests must be done sequentially, which slows down rendering, making the client feel sluggish. This scenario was also a key motivation for GraphQL.
- How does a client know which methods and resource paths are available? And how do they know what kind of data to send in a request, and what shape of data they will receive in the response? Some frameworks can generate this sort of documentation automatically from your code, but with others you have to write the documentation manually. RPC and GraphQL APIs are typically self-documenting.
RPC
Long before the REST pattern became popular, various kinds of servers exposed APIs that looked more like a set of functions or procedures that clients could invoke remotely. These APIs were just like the ones exposed from internal services, but clients could now call them across a network. This pattern is known as Remote Procedure Calls, or RPC, and it actually pre-dates HTTP, but has been adapted to HTTP in recent years.
The most popular implementation of this pattern on HTTP is Google’s gRPC. It defines a high-level universal language for describing your API, and includes tooling to generate the corresponding code in a wide variety of languages. It builds upon Google’s binary data encoding standard, Protocol Buffers (protobuf), which is used to define and encode/decode the data structures passed on the wire.
For example, say you wanted to expose an API that could return the basic Open Graph properties for a given URL, so that the caller can display a preview card like the ones you see in a social media app. The service definition would look something like this:
service PreviewExtractor {
	// Extracts preview information for a given URL
	rpc Extract(ExtractRequest) returns (Preview) {}
}

message ExtractRequest {
	// The URL from which to extract preview properties
	string url = 1;
}

// Properties about a URL suitable for
// showing in a preview card
message Preview {
	// The URL from which these properties were extracted
	string url = 1;
	// The type of content returned from the URL
	string content_type = 2;
	// A title for this content
	optional string title = 3;
	// Zero, one, or multiple preview images
	optional repeated Image preview_image = 4;
}

message Image {
	// The URL that will return this preview image
	string url = 1;
	// The mime type of the image (jpg, png, tiff, etc.)
	string mime_type = 2;
	// The width of the image if known
	optional uint32 width = 3;
	// The height of the image if known
	optional uint32 height = 4;
	// A textural description of the image
	optional string alt_description = 5;
}
When you run this through the gRPC tooling, it will generate classes in your specified programming language for each message defined in the file. It will also generate an empty PreviewExtractor service implementation that you can fill out for the server, as well as a stub class that clients can use to call the procedures. For example, the Python calling code looks as simple as this:
# Connect to the server and create the stub once.
with grpc.secure_channel('...net address of server...', credentials) as channel:
    preview_extractor = PreviewExtractorStub(channel)

    # Calling an API then looks like calling a local method.
    preview = preview_extractor.Extract(ExtractRequest(url='https://ogp.me'))

    print(f'page title is {preview.title or "(No Title)"}')
The calling stub makes it look to client code like they are just calling a method on a class, but under the hood, the stub class actually makes an HTTP request to the server. The resource path contains the name of the procedure to run, and the request body contains the input message(s) encoded into protobuf format. The HTTP response body will similarly contain the message returned by the procedure, and the client stub will decode this back into an instance of the class generated for your programming language.
A gRPC API has a few natural advantages:
- The service definition file is effectively self-documenting.
- It is well supported in all the popular programming languages (especially those used by Google).
- Everything is statically typed. The procedures exposed by the service are real methods on the stub, and all inputs and return values are generated classes with explicit properties/methods. This allows IDEs to do statement completion, and compilers or type checkers to catch typos.
- Protobuf encoding is much more compact than JSON, so gRPC tends to be a bit faster than REST/JSON especially when the requests and responses include arrays of objects with many properties.
- It’s easy to model APIs that are more action-oriented than resource-oriented.
- Because it is built upon HTTP/2, it supports bidirectional streaming without requiring WebSockets.
The only real drawback of gRPC is that (as of 2025) it’s not possible to directly call a gRPC API from JavaScript running in a web browser. Native mobile apps, command line utilities, and other servers can easily call gRPC APIs, but you can’t do so directly using the fetch() API in the browser.
There are a few options for working around this limitation, however. One of the most popular is gRPC Web, which requires a separate HTTP proxy server sitting between the browser and your gRPC server. This proxy handles converting text-based request/response bodies into protobuf, and switching from HTTP/1 to 2 when necessary.
Another option is gRPC Gateway, which also requires a separate HTTP proxy server, but this server effectively translates your gRPC API into a REST/JSON one. This translation can’t be done automatically, so you do have to provide a good bit of configuration, but once you do, browser apps can go through the REST/JSON proxy, while all other clients can use your gRPC API directly.
GraphQL
The REST APIs for large social media sites can return a lot of data. Part of this is because they can’t really know ahead of time what any given client might need, so they just return everything they know about a resource. The response bodies of these APIs can get enormous, which slows down the network processing and can make the client feel sluggish. And if the client needs multiple resources in order to render a screen, performance gets even worse.
But these REST APIs are ultimately making queries to a database, and those databases already support a flexible query language that lets the caller specify which fields they actually want. They even let you execute multiple queries in one round-trip. So what if we applied those same techniques to our HTTP APIs?
Thus was born GraphQL. It’s essentially a query language for a graph database exposed through an HTTP API. Clients can ask for only the properties they really need, and can fetch multiple related resources all in one HTTP request. In addition to flexible querying, GraphQL APIs can also support mutations through syntax that looks a bit like gRPC.
Unfortunately, when GraphQL was first introduced it received a lot of hype, which caused many engineers to use it regardless of whether it made any sense for their particular API. If your system doesn’t have the needs that motivated its creation, GraphQL APIs can actually be harder to implement, complicated to use, and tricky to make performant. Eventually some sanity returned, and engineers realized that it’s not always the right choice, which led to even sillier proclamations that it was now dead.
Don’t listen to hype cycles. If your API exposes a lot of data that can be organized into a graph, and you want to support clients with unpredictable needs, GraphQL might be a good choice. If not, REST or gRPC might be a better choice. Use the right tool for the job!
Idempotency
Regardless of which style you choose, if your API allows creating new data, you need to handle the following scenario:
- Client makes a request to your data creation API.
- Your server receives and processes that request.
- But for whatever reason, the client never receives the response. This can happen if your server takes longer to respond than the client’s configured timeout, or if there is a network partition/failure that blocks the response from getting back to the client.
- The client now has no way of knowing whether the operation succeeded or not. How can it safely retry the request without creating duplicate data?
In some systems, creating duplicate data may be OK. For example, if you end up posting the same picture twice to a photo sharing site, no real harm is done, and the user can always delete the duplicate post later. But if you are talking to a payments API, you really don’t want to charge your customers payment card twice!
One way to make it safe to retry data creation requests is to make that request idempotent. Idempotent operations result in the same outcome whether they are executed just once, or multiple times. Read and delete operations are naturally idempotent, and update operations can be, but data creation operations need something extra to make them idempotent.
That extra thing is some unique value that the client sends with the original request, as well as any retries of that same operation. We often call this an idempotency key but others may call it a transaction ID or a logical request ID. Regardless, it is just some value (typically a UUID) that is unique for each data creation operation, and included in all retries of that same operation.
This idempotency key allows your API server to disambiguate between new data creation operations it hasn’t yet seen, and retries of a previously-processed operation. If you see a request with an idempotency key you’ve already processed, your API server can stop processing and simply return a successful response.
There are two primary options for how to implement this:
- Use a cache to track all the idempotency keys you’ve seen within the last hour (or whatever you want your idempotency duration to be). Each time you receive a request, check the idempotency key against your cache to see if you’ve already processed it. This works best when your idempotency duration is limited to a relatively short period of time.
- Save the idempotency key with the record created by the operation, and add a unique constraint to that field. If you try to insert the same record again with the same idempotency key, the database will reject the operation, and you can catch/handle that exception in your code. This works best when you want to enforce idempotency for the lifetime of the data created by the operation.
Regardless of which option you choose, make it clear in your API documentation how you support idempotency and how to use it. Your customers will thank you!
Cross Origin Resource Sharing (CORS)
important
This tutorial assumes you have a good working knowledge of HTTP. If you don’t read the HTTP tutorial first.
Back in the early 2000s, web browsers started allowing JavaScript to make HTTP requests while staying on the same page: a technique originally known as AJAX, but today is known as the fetch() function. This was very exciting because it transformed the web browser from a mostly static information viewing tool into an application platform. We could now build rich interactive web applications like those we had on the desktop, but without requiring our customers to run an installer and keep the application up-to-date. The browser just automatically downloaded and ran the latest published version of our web application whenever our customers visited our site.
But the browser vendors faced a difficult question: should we allow JavaScript to make requests to a different origin than the one the current page came from? In other words, should JavaScript loaded into a page served from example.com be able to make HTTP requests to example.com:4000 or api.example.com or even some-other-domain.com?
On the one hand, browsers have always allowed page authors to include script files served from other origins: this was how one could include a JavaScript library file hosted on a Content Delivery Network (CDN). Browsers also let HTML forms POST their fields to a different origin to enable “Contact Us” forms that posted directly to an automatic emailing service.
On the other hand, there were some very significant security concerns with allowing cross-origin requests initiated from JavaScript. Many sites use cookies to track authenticated sessions, which are automatically sent with every request made to that same origin. If a user was signed-in to a sensitive site like their bank, and if that user was lured to a malicious page on evil.com, JavaScript within that page could easily make HTTP requests to the user’s bank, and the browser would happily send along the authenticated session cookie. If the bank’s site wasn’t checking the Origin request header, the malicious page could conduct transactions on the user’s behalf without the user even knowing that it’s occurring.
Not surprisingly, the browser vendors decided to restrict cross-origin HTTP requests made from JavaScript. This was the right decision at the time, but it also posed issues for emerging web services like Flickr, del.icio.us, and Google Maps that wanted to provide APIs callable from any web application served from any origin.
Several creative hacks were developed to make this possible, the most popular being the JSONP technique. But these were always acknowledged as short-term hacks that needed to be replaced by a long-term solution. The great minds of the Web got together to figure out how to enable cross-origin API servers without compromising security. The result was the Cross-Origin Resource Sharing standard, more commonly referred to as CORS.
How CORS Works
The CORS standard defines new HTTP headers and some rules concerning how browsers and servers should use those headers to negotiate a cross-origin HTTP request from JavaScript. The rules discuss two different scenarios: simple requests; and more dangerous requests that require a separate preflight authorization request.
Simple Requests
Simple cross-origin requests are defined as follows:
- The method is
GET,HEAD, orPOST - The request may contain only “simple” headers, such as
Accept,Accept-Language,Content-Type, andViewport-Width. - If a
Content-Typeheader is included, it may only be one of the following:application/x-www-form-urlencoded(format used when posting an HTML<form>)multipart/form-data(format used when posting an HTML<form>with<input type="file">fields)text/plain(just plain text)
If JavaScript in a page makes an HTTP request that meets these conditions, the browser will send the request to the server, adding an Origin header set to the current page’s origin. The server may use this Origin request header to determine where the request came from, and decide if it should process the request.
If the server allows the request and responds with a 200 (OK) status code, it must also include a response header named Access-Control-Allow-Origin set to the value in the Origin request header, or *. This tells the browser that it’s OK to let the client-side JavaScript see the response.
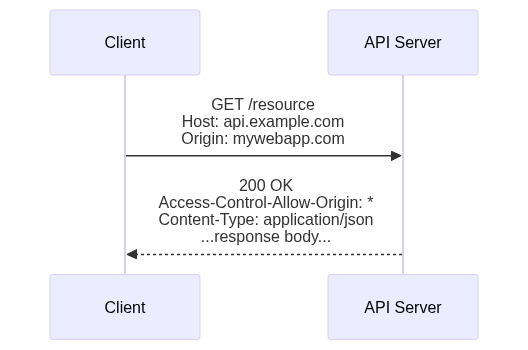
This Access-Control-Allow-Origin header protects older servers that were built before the CORS standard, and are therefore not expecting cross-origin requests to be allowed. Since this header was defined with the CORS standard, older servers will not include it in their responses, so the browser will block the client-side JavaScript from seeing those responses.
This made sense for GET and HEAD requests since they only return information and shouldn’t cause any changes on the server. The inclusion of POST was a bit problematic—it was added to ensure that existing HTML “Contact Us” forms that posted cross-origin would continue to work. This is why the Content-Type is also restricted to those used by HTML forms, and doesn’t include application/json, which is used when posting JSON to more modern APIs.
Supporting simple cross-origin requests on the server-side is therefore as easy as adding one header to your response: Access-Control-Allow-Origin: *. If you want to restrict access to only a registered set of origins, you can compare the Origin request header against that set and respond accordingly.
Preflight Requests
If the client-side JavaScript makes a cross-origin request that doesn’t conform to the restrictive “simple request” criteria, the browser does some extra work to determine if the request should be sent to the server. The browser sends what’s known as a “preflight request,” which is a separate HTTP request for the same resource path, but using the OPTIONS HTTP method instead of the actual request method.
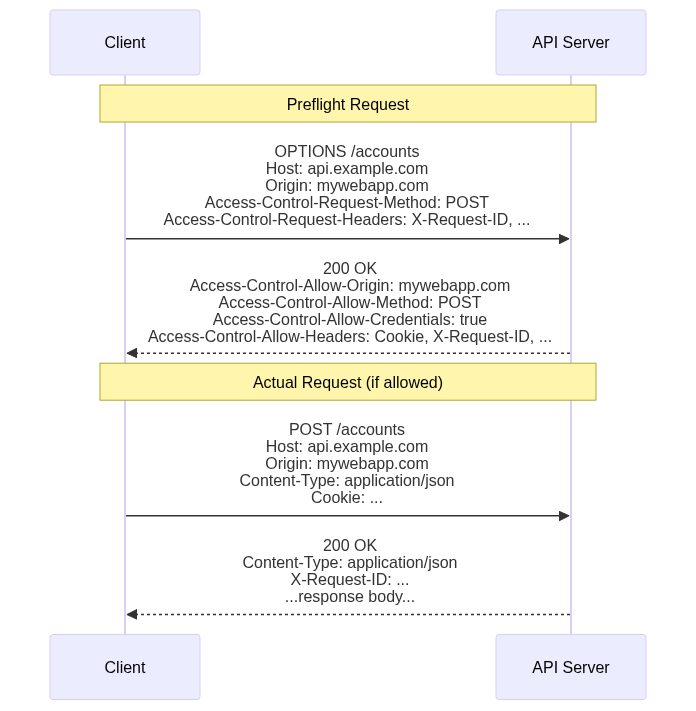
The browser also adds the following headers to the preflight request:
Originset to the origin of the current page.Access-Control-Request-Methodset to the method the JavaScript is attempting to use in the actual request.Access-Control-Request-Headersset to a comma-delimited list of non-simple headers the JavaScript is attempting to include in the actual request.
When the server receives the preflight request, it can examine these headers to determine if the actual request should be allowed. If so, the server should respond with a 200 (OK) status code, and include the following response headers:
Access-Control-Allow-Originset to the value of theOriginrequest header. You can also set it to*but this will block the browser from sending cookies in the actual request, so don’t do this if you are using authenticated session cookies.Access-Control-Allow-Credentialsset totrueif the server will allow the browser to send cookies during the actual request. If omitted or set tofalse, the browser will not include cookies in the actual request. When set to true, setAccess-Control-Allow-Originto the specific origin making the request, not*.Access-Control-Allow-Methodsset to a comma-delimited list of HTTP methods the server will allow on the requested resource, or the specific method requested in theAccess-Control-Request-Methodheader.Access-Control-Allow-Headersset to a comma-delimited list of non-simple headers the server will allow in a request for the resource, or the specific ones mentioned in theAccess-Control-Request-Headers.Access-Control-Expose-Headersset to a comma-delimited list of response headers the browser should expose to the JavaScript if the actual request is sent. If you want the JavaScript to access one of your non-simple response headers (e.g.,AuthorizationorX-Request-ID), you must include that header name in this list. Otherwise the header simply won’t be visible to the client-side JavaScript.Access-Control-Max-Ageset to the maximum number of seconds the browser is allowed to cache and reuse this preflight response if the JavaScript makes additional non-simple requests for the same resource. This cuts down on the amount of preflight requests, especially for client applications that make repeated requests to the same resources.
All of the following must be true for the browser to then send the actual request to the server:
- The
Access-Control-Allow-Originresponse header matches*or the value in theOriginrequest header. - The actual request method is found in the
Access-Control-Allow-Methodsresponse header. - The non-simple request headers are all found in the
Access-Control-Allow-Headersresponse header.
If any of these are not true, the browser doesn’t send the actual request and instead throws an error to the client JavaScript.
CORS and CSRF Attacks
CORS enabled cross-origin APIs, but it also introduced a new security vulnerability: Cross-Site Request Forgery (CSRF). This is the scenario discussed earlier:
- A customer is signed into a CORS-enabled API, which uses cookies for authenticated session tokens.
- The customer is lured to a page on
evil.com - That page contains JavaScript that makes
fetch()requests to the CORS-enabled API. - The browser automatically sends the authentication session token cookie with the request.
- The CORS-enabled API verifies the session cookie, treats the request as authenticated, and performs a potentially damaging operation.
As discussed in the Authenticated Sessions tutorial, the only way a CORS-enabled API can defend against such an attack is to use the Origin request header. This header is set automatically by the browser to the origin from which the HTML page came. JavaScript in that page can neither change this header nor suppress it, so the server can use it as a security input.
CORS-enabled APIs can use the Origin request header in a few ways to protect against CSRF attacks:
- Compare the
Originto a set of allowed origins and reject requests with origins not in the set. - Prefix the session cookie names with a value that is derived from the
Origin: either a hash of the origin value, or an ID associated with the origin in your database. When reading the session cookie from the request, use theOriginto read the particular cookie corresponding to the request origin. This keeps sessions established by different origins separate from each other.
These options are not exclusive—if you track a set of allowed origins, and you want to keep sessions separate per-origin, you can do both. But you should do at least one of these to defend against CSRF attacks.
CORS Middleware
If you want to enable CORS for your API, most web frameworks offer this as a pre-packaged middleware you can simply add to your application with a bit of configuration. For example, in the Python FastAPI framework, it’s as simple as this:
from fastapi import FastAPI
from fastapi.middleware.cors import CORSMiddleware

app = FastAPI()

# List of allowed request origins.
origins = [
    "http://localhost:8080",
    "https://client.one.com",
    "https://client.two.com",
    "https://client.three.com",
]

app.add_middleware(
    CORSMiddleware,
    allow_origins=origins,
    allow_credentials=True,
    allow_methods=["GET", "POST", "DELETE"],
    allow_headers=["Cookie"],
)
In the Rust Axum/Tower framework, it looks like this:
#![allow(unused)]
fn main() {
use tower::{ServiceBuilder, ServiceExt, Service};
use tower_http::cors::{Any, CorsLayer};

// Allows everything, including credentials
let cors = CorsLayer::very_permissive();

let mut service = ServiceBuilder::new()
    .layer(cors)
    .service_fn(handle);
}
The process is similarly easy in all web frameworks. Ask your favorite API tool how to enable CORS with your particular web framework.
Message Queues and Asynchronous Work
The primary way clients interact with your system is through your API servers, which respond synchronously to the client’s request. But there are often tasks related to those requests that don’t necessarily need to be done synchronously before the response is written. For example, when a client signs up for a new account, your API server needs to create the account record in the database before responding, but your system could easily send the address verification email asynchronously, after the response is sent back to the client. If a client uploads an image to share with others, your API server needs to persist that full resolution file somewhere before responding, but the system could create the thumbnail and medium resolution versions a few seconds later.
To schedule such asynchronous work, we typically use a durable message queue. These are a bit like a database in the sense that they guarantee not to lose the messages written to them (that’s what the ‘durable’ part means). But unlike a database they typically don’t allow updates, random access, or ad-hoc queries. Instead, queue consumers can only read the messages sequentially, in the order they were written.
Popular open-source message queues include:
- Kafka: perhaps the most common choice, feature-rich and well-proven, written in Java.
- Redpanda: a newer drop-in replacement for Kafka written in C++, also offering a hosted “enterprise” version.
- RabbitMQ: An older but battle-tested queue written in Erlang.
Basic Operation
Although each of these have their own special features, they all work pretty much the same way: producers (e.g., your API servers) write new messages to the queue, and consumers read and process those messages in some way.

For example during account sign-up, your API server would publish (i.e., write) a NewAccount message to the queue after creating the new account record in the database but before responding to the client. A address verification email consumer, running in a separate process, would consume (i.e., read) that message as soon as it was written, generate a cryptographically-secure confirmation code, and send the verification email to the address provided during sign-up.
The message written to the queue can be any sort of data you want, but we typically use some sort of structured format like JSON or protobuf. It’s generally a good idea to include all the data in the message that the consumers will likely need, and not just a record identifier. That way the consumer doesn’t have to execute additional queries against your database to do its work.
Some queues require the consumers to track the last message ID successfully processed, and send that back to the queue when asking for the next set of messages. Others keep track of each consumer’s position internally, adjusting it when the consumer acknowledges a previously-read message (or set of messages) as successfully processed. Either way, the queue ensures that every message is eventually delivered.
Most queue servers support the creation of multiple distinct queues within the same server, often referred to as topics, which allow you to segment messages into different logical streams. For example, you might define one topic for new account signups, and a different topic for password resets. Consumers can read messages from their relevant stream and ignore the others.
Topology
Most queues will allow you to connect multiple consumers to a single queue. How the queue behaves in this scenario depends on the topology you configure for the queue, which ultimately depends on what you’re trying to accomplish.
In some cases you will want each consumer to see the same set of messages, which is known as a broadcast topology. It looks like this:
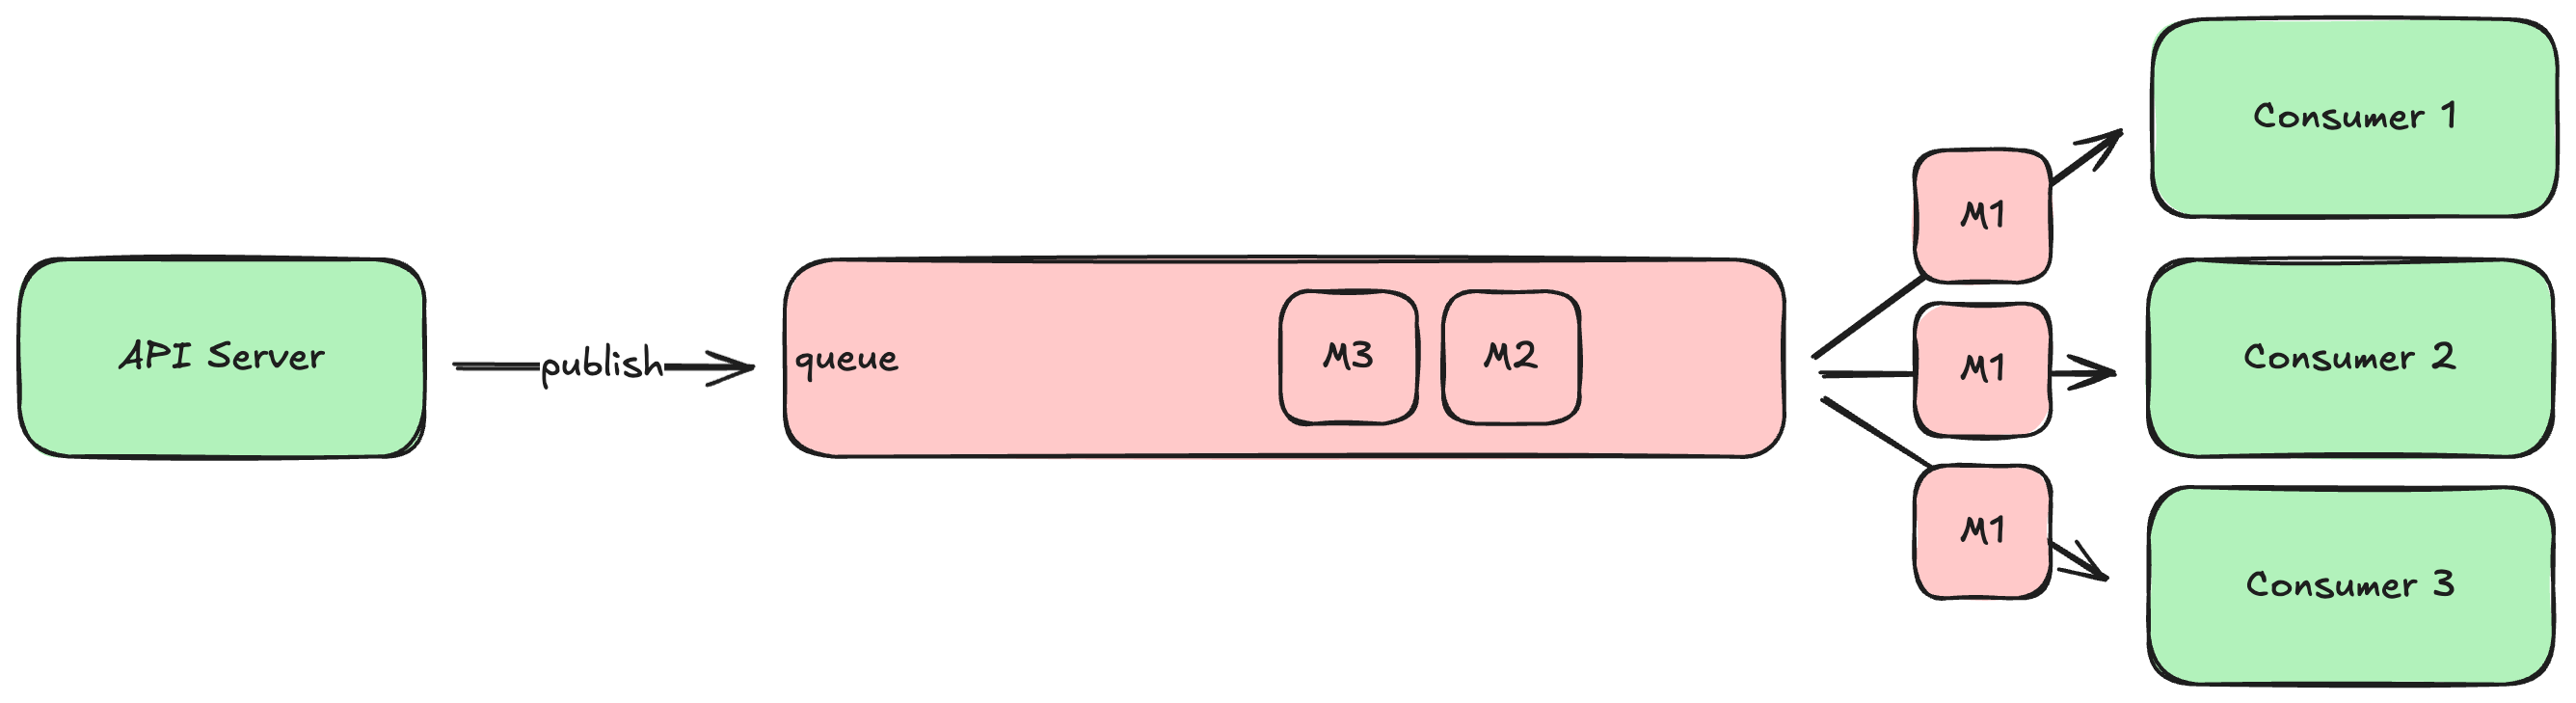
Broadcast topology is appropriate when you have different consumers doing different things in response to the same stream of messages. For example, a new account message might be processed by the aforementioned address verification email consumer, as well as a consumer that sends a similar verification SMS to the provided mobile number, as well as a consumer that posts a congratulations message your team’s internal Slack workspace. Each consumer needs to see all of the messages, so each message is broadcast to all consumers.
In other cases, you might want to configure the queue so that the multiple consumers share the workload. This is akin to how a load balancer distributes requests among a set of API server instances. If your system is producing messages faster than a single consumer can process them, you can run multiple instances of that consumer and configure the queue to distribute the messages among the set of consumers. This is often referred to as a work queue topology, and it looks like this:
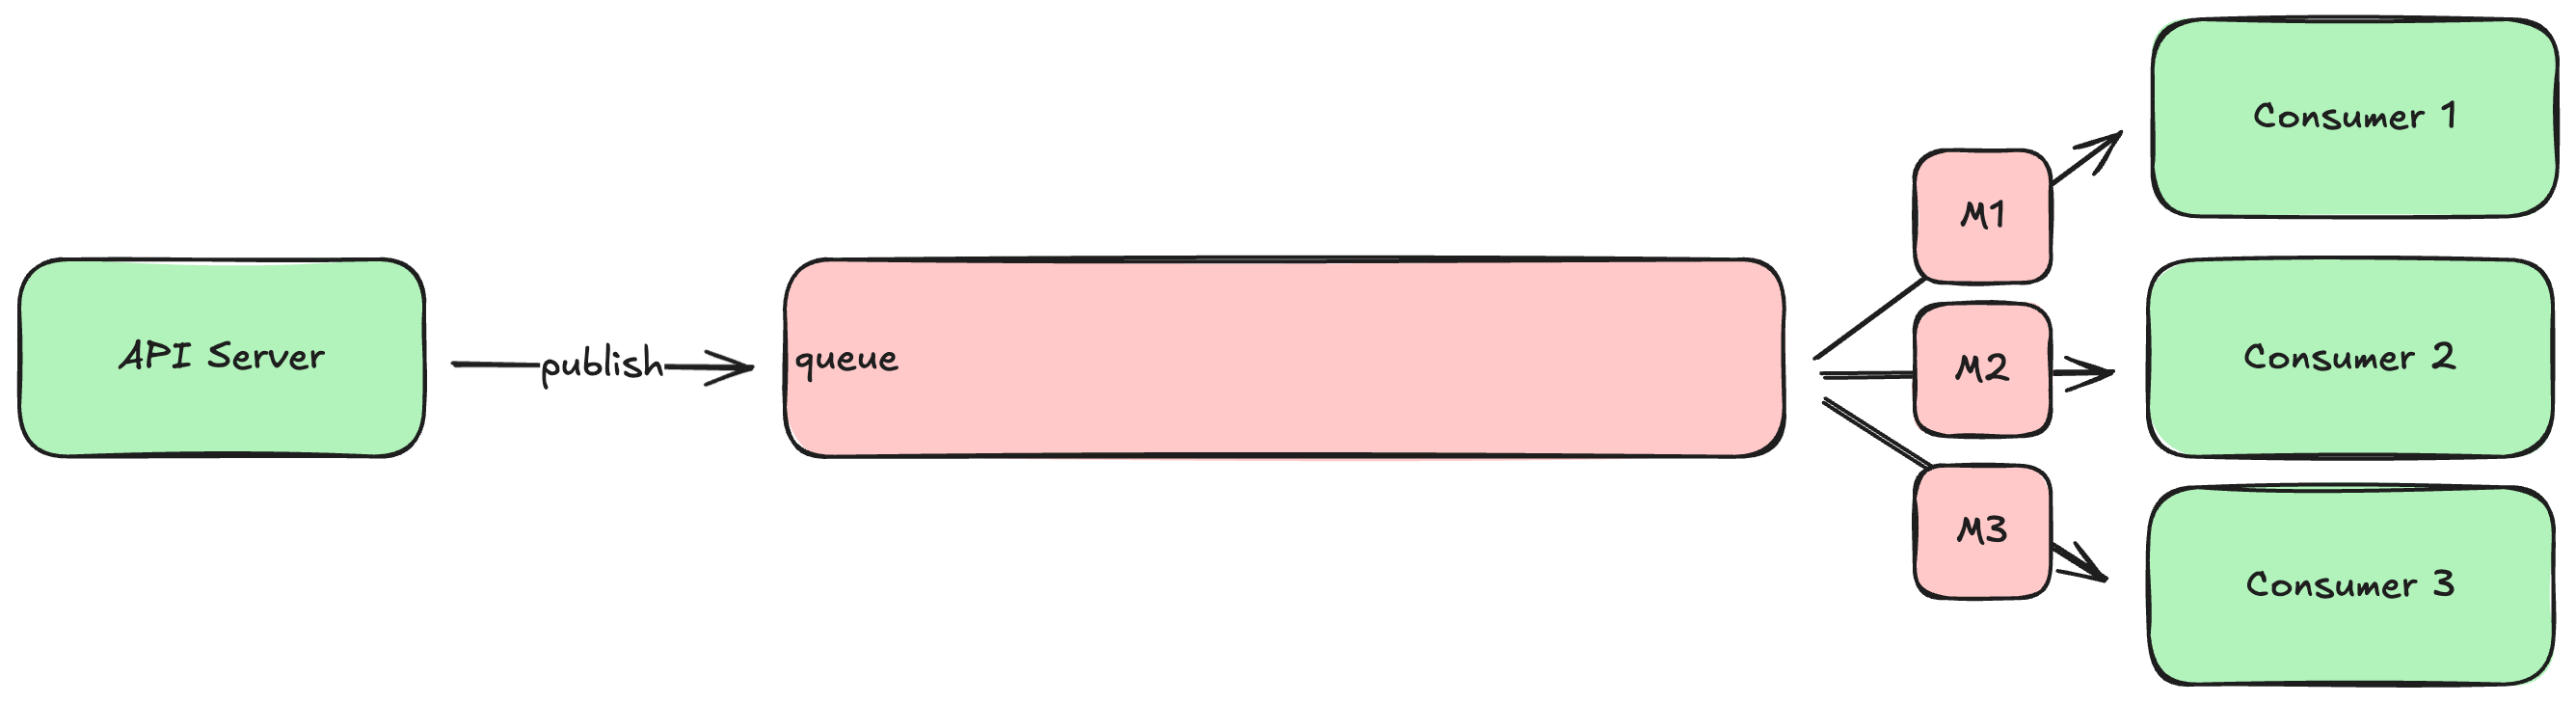
Work queues allow you to scale up and down the set of consumer instances to keep up with the pace of messages being produced, similar to how one scales up and down the number of API servers behind a load balancer to keep up with the request load. If your system gets a sudden rush of traffic, producing more messages than usual, you can simply spin up a few more consumer instances until you drain the backlog.
The more powerful queue servers can actually support both patterns at the same time: multiple logically distinct consumers see all the same messages (broadcast), but each of those logically distinct consumers can have multiple instances running to share the workload (work queue).
Handling Errors
So far we’ve discussed how queues operate when everything goes right, but what happens when a consumer fails to process a message successfully? What if the consumer has a bug that causes it to throw an exception or crash every time it tries to process a particular message?
By default, the queue will just try to redeliver this poison pill message to the consumer every time it asks for new messages, and the consumer will fail to make progress. As the producer continues to publish new messages, they just accumulate, creating a large backlog that eventually fills the space available to the queue. At that point the queue will start rejecting new messages from the producer, causing errors with your API servers.
We typically avoid this scenario by configuring the queue to retry delivery a fixed number of times, and if it continues to fail, move the unprocessed message to a different queue, known as the dead letter queue. This is just a queue, like any other, but it is reserved for messages that were never processed successfully.

Once you fix the bug in the consumer that caused the message processing failure, you can move all the messages accumulated in the dead letter queue back into the main queue. The newly-fixed consumer will naturally receive and process them as if they had just been published, and no messages will be lost!