Authenticated Sessions
In the HTTP tutorial, I discussed how its stateless nature is a classic software tradeoff—it enables good things like horizontal scaling, but it also makes things like authenticated sessions more difficult to support. In this tutorial I will show you how to support authenticated sessions over HTTP, which is actually a specific case of a more general problem: secure authorization tokens.
important
This tutorial assumes you have a basic understanding of HTTP, cryptographic hashing, and digital signatures. If you don’t, please read the HTTP and Intro to Cryptography tutorials first.
Sessions
Under the hood, HTTP is a stateless protocol that remembers nothing between requests, but that’s not your typical user experience on the web. When you use social media, shop online, or pay bills electronically, you sign-in once, and then perform multiple operations as that authenticated user. You don’t have to provide your credentials every time you do something that interacts with the server.
This implies that you have some sort of authenticated session with the server, but if HTTP is stateless, how is that possible? If your sign-in request went to one downstream server, but your subsequent request went to a different server, how does that different server know who you are?
Although we can’t keep any state on the server related to the network connection, we can pass something back and forth on that connection. This value is the ID of a session state record stored in our database (or cache) that all of our API servers can load when needed. That ID is bundled together with a digital signature into a session token, which protects it against tampering.
The typical sign-in flow goes like this:
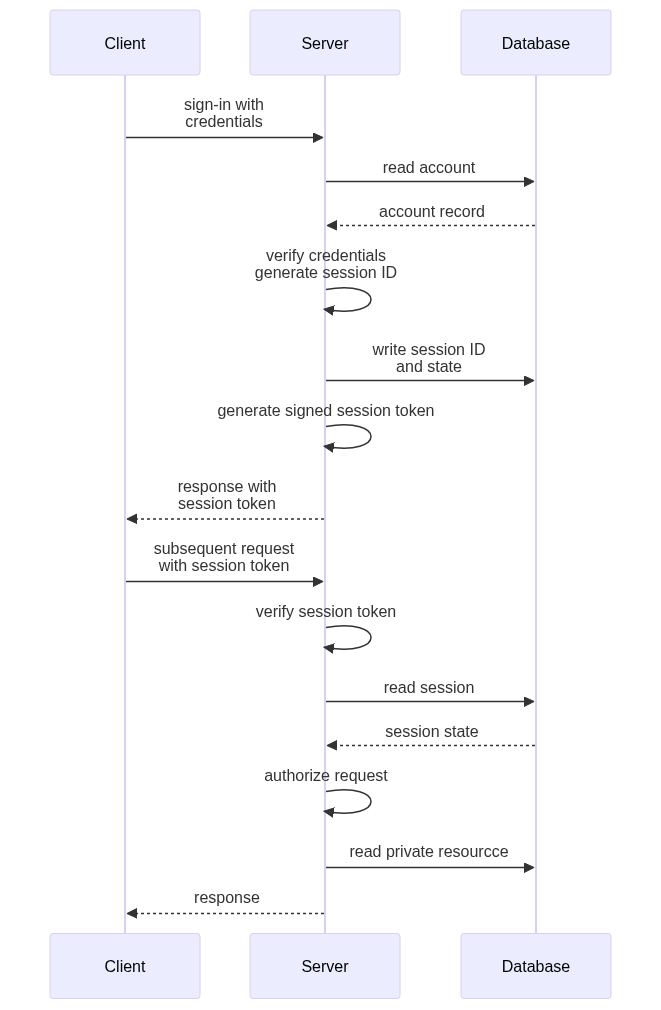
We will dig into the details of each of these things below, but here is a brief overview the steps in that diagram:
- When you sign in, the client sends your credentials to the server.
- The server loads the account record associated with those credentials from the database.
- The server verifies the provided credentials against the account record.
- The server generates a unique identifier for the session, known as the session ID. This should be a random value that is effectively impossible to guess given previous examples—e.g., a 128 or 256-bit value from a cryptographically-secure pseudorandom number generator (CSPRNG).
- The server inserts a session record into the database (or cache) using the session ID as the primary key. The record also contains a time at which the session expires, the ID of the authenticated account, and any other data you want to associate with the session.
- The server generates a digitally-signed session token from the session ID.
- The server includes this signed session token (not the bare session ID) in the response.
- The client holds on to this value, and sends it back to the server in all subsequent HTTP requests.
- When one of the servers receives the subsequent request, it verifies the session token’s signature and extracts the session ID.
- The server loads the associated session record from the database (or cache) and ensures it hasn’t already expired.
- The server now knows who the authenticated account is, and can decide if the current request is something that account is allowed to do.
At a high level this is how authenticated sessions work over HTTP, but let’s expand on each of these concepts in more detail.
Accounts
To use your system, a customer (person, corporation, or agent) needs to create an account. First-time system designers will often assume that an account will always belong to just one person, and one person will create only one account, but that’s hardly every true in the long run. Instead:
- A given customer will probably create multiple accounts. For example, it’s common to create separate work and personal accounts if your system could be used for both purposes.
- A given account will probably be used by multiple people, especially if your service costs money. Nearly every media streaming service learned this the hard way.
You can avoid some of these issues by designing your accounts to be hierarchical from the start. For example, let customers create one main account to handle the service subscription and billing centrally, and then create child accounts for each of their family members, perhaps with restricted permissions. The same setup would be applicable for corporation with multiple subsidiaries, or a platform with multiple customers of their own, or a person using your system for both business and personal reasons.
Existing accounts should also be able to band together under a new parent account for centralized billing and monitoring—e.g., when two corporations merge, or when two people with individual accounts get married and want to take advantage of a family sharing discount.
The authorization rules for parent accounts will depend on your particular system. In some cases it will make sense to let parent accounts view all resources that belong to child accounts, but in others those child resources might need to remain private. In some cases it might also make sense for parent accounts to create new resources or adjust configuration on behalf of their child accounts, and in others this should not be allowed. Think about what would make sense in your scenario and design your authorization rules accordingly.
Credentials
Regardless of your account structure, when a customer creates an account they must also provide some credentials they can use to prove their ownership of that account. These credentials are something the customer knows (password), something customer has (phone or hardware security key), or something customer is (biometrics tied to a passkey). Systems that manage particularly sensitive data might require multiple of these.
Something You Know: Email and Password
Typically systems start out requiring only an email and password. Email names are already unique, and account holders can prove their ownership of an email address by responding to a verification message sent by your system (more on that below). Once verified, the email address can be used for notifications and account recovery.
But don’t use an email address as the account’s primary key—people sometimes need to change their email address, for example when leaving a school or corporation. Use an application-assigned ID for the account record, and store the email address as one of the account’s credentials.
Passwords are again a classic design tradeoff. They are simple and familiar, and can be used anywhere the account holder happens to be, including shared computers or public kiosks. But they are also a shared secret, so if an attacker learns an account’s password, they immediately gain unrestricted access. If people were disciplined about creating unique and strong passwords on each site and keeping them secret, this might be OK, but sadly most people are not. Even those who are can be tricked into revealing their passwords on phishing sites that look like the real sign-in pages of popular services.
Something You Are: Passkeys
Thankfully there is now an alternative to passwords that is well supported by the major browsers and client operating systems: passkeys. These use asymmetric cryptography to securely authenticate without ever passing a shared secret like a password over the network.
Passkeys are relatively simple to understand in principle, but their actual implementation can get complex, so you should definitely leverage the official libraries for your client and server programming languages. To help you understand how they work, let’s look at a simplified version of the sign-up flow:
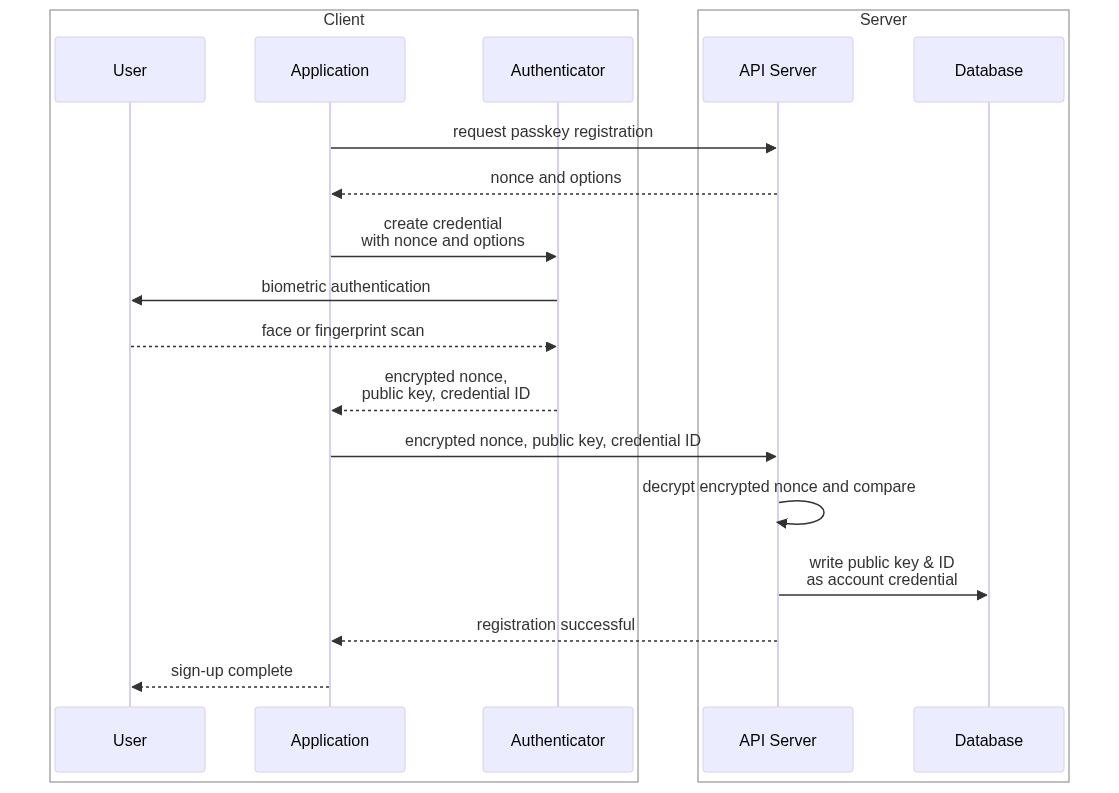
- The client makes a request to the server to create a new passkey for the account.
- The server responds with a unique and unguessable value, which is typically called a ‘nonce’.
- The client application asks its security hardware (known as the ‘Authenticator’) to create a new asymmetric key pair scoped to the server domain, encrypt the nonce with the private key, and return: the encrypted nonce; the associated public key; and a unique ID for the passkey to the application. This triggers the device’s biometric sensors to authenticate the person using the device (e.g., touch or face ID).
- The client sends the encrypted nonce, public key, and passkey ID to the server.
- The server uses the public key to decrypt the encrypted nonce and verify it matches the one the server sent in the the step 2.
- The server stores the public key and its ID in the database as one of the account’s passkey credentials.
Signing in works almost the same way, except that the key pair is already generated and the server already has the public key, so it only needs to verify the encrypted nonce against the previously-stored public key.
- The client requests to sign-in.
- The server responds with the previously recorded passkey ID and a unique and unguessable nonce.
- The client application asks the Authenticator to encrypt the nonce with the previously created private key. This triggers the device’s biometric sensors to authenticate the person using the device.
- The client sends the encrypted nonce and the passkey ID to the server.
- The server loads the previously-stored public key associated with the passkey ID, and uses it to decrypt the encrypted nonce, comparing the result to the nonce sent in step 2.
- If it matches, the server knows that the client is in control of the associated private key, and is therefore authenticated.
Most client devices will now synchronize passkeys across devices signed into the same account. For example, Apple devices will share passkeys with all other Apple devices signed into the same iCloud account. This allows you to sign-in on your phone with a passkey originally created on your laptop, or vice-versa.
Passkeys will likely become the new standard for authentication, but they are still relatively new and unfamiliar (in 2025), and some of your potential customers might not yet have a device capable of generating or using a passkey. Even if they do, if the device manufacturer doesn’t offer a mechanism to backup and sync passkeys, your customers will lose access if their device is lost, stolen, or damaged. Without another credential, like an email and password, they may not be able to prove their identity during an account recovery flow.
That said, password managers like 1Password can act as software-based passkey Authenticators on devices that lack native passkey support. They also backup those keys to the cloud, and synchronize them across all kinds of devices from various manufacturers. Their mobile apps can even scan QR codes shown on a public computer screen (e.g., check-in kiosk) to perform passkey authentication via your phone. So passkeys can be used in a wide variety of scenarios provided your target customers are willing to install a password manager app on devices that lack native passkey support.
Something You Have: Phones and Hardware Keys
If your system manages particularly sensitive data, you might want to require another credential that is something the account holder has. For example:
- mobile phone with text messaging (ok): The account holder can register a mobile phone number during sign-up, and during sign-in your system can send a unique, unguessable, one-time use code via text messaging that the account holder must enter into a challenge form. This benefits from the ubiquity of text messaging, but it’s also not as secure, since SMS text messages are not encrypted and can be intercepted.
- authenticator app (better): The account holder can install an authenticator application on their phone or laptop, add your site during sign-up, and provide the current code shown on the screen during sign-in. During sign-up your server provides a seed value, and the algorithm generates time-based codes from that seed that rotate every 30 seconds or so. Since both your server and the authenticator app know the initial seed value, both can generate the same codes, so your server knows which code should be provided at any given time. But if an attacker learns that seed value and knows the algorithm, they too can generate valid codes.
- hardware key (best): A physical USB device like a Yubikey can provide either time-based codes like an authenticator app, or act like a passkey described above (preferred). Since it plugs into a USB port, and is relatively small, account holders can carry the key with them and plug it into any device they happen to be using. Newer keys also work with mobile devices that support Near Field Communication (NFC), which is the same technology used for mobile payments.
These extra credentials are typically prompted for after successfully authenticating with a password or passkey, acting as a “second factor” that increases your confidence that the person signing in is the actual account holder. To break into an account, an attacker would need to not only compromise the account holder’s password or passkey, but also steal their physical hardware key, which is tough to do when the attacker is actually located in another part of the world.
Password Hashing
If you do collect password credentials from your account holders, never store those passwords in plain text! Sadly, several major sites in the early 2000s did just this, and after they were hacked, millions of passwords were leaked on the Internet.
Instead, you should always hash passwords using an approved password-hashing algorithm, and only store the resulting hash in your database. As I discussed in the cryptography tutorial, hashing is a good way to store data that you don’t need to reconstruct, but you do need to verify in the future. Because hashing algorithms are deterministic, the password provided during sign-in will hash to the same value as the identical password supplied during sign-up. But because they are also irreversible, an attacker can’t directly recompute the original password from a stolen hash.
I say “directly” because it is of course possible for an attacker to simply hash every known password and compare these pre-computed results to a stolen hash. This is why password hashing algorithms differ from ordinary hashing algorithms like SHA-256 in two important ways:
- They add a unique and unguessable ‘salt’ value to each password before hashing it.
- They are purposely designed to be relatively slow, and allow you to increase their complexity as computing speeds increase to keep them relatively slow.
The first quality prohibits attackers from comparing pre-computed hashes of known passwords to a new batch of stolen hashes, because those pre-computed hashes don’t include the unique salt values. The second quality makes recomputing the hashes for all known passwords plus those unique salt values prohibitively slow. This discourages attackers from attempting this sort of brute-force attack, and gives you time to detect the breach, revoke all existing authenticated sessions, and invalidate all existing passwords.
The currently recommended password hashing algorithm (in 2025) is argon2. Libraries are available for all major programming languages, and most are very easy to use. Typically the implementation will generate the salt value automatically, and return an encoded string containing the salt value as well as the hash. Store that in your database, and feed it back into the verify method to verify a password provided during sign-in.
In Python, it’s a simple as this:
from argon2 import PasswordHasher, VerificationError

# To make it slower, set time_cost argument to
# a value higher than the default (currently 3)
hasher = PasswordHasher()

# During sign-up...
sign_up_password_hash = hasher.hash(sign_up_password)
# Store password_hash in your database

# During sign-in...
try:
	hasher.verify(sign_up_password_hash, sign_in_password)
except (VerificationError):
	# Password didn't match!
Session IDs and Tokens
Regardless of which kinds of credentials you require, once the account holder is successfully authenticated, you need to return something to the client that the client can send back in all subsequent requests. But what should this value be? What qualities should it have?
- It should be unique and unguessable so an attacker can’t guess another valid session ID given one of their own.
- It should be digitally-signed using a secret key known only to the server so that even if an attacker can guess another valid session ID, they can’t sign it because they don’t know the secret signing key.
Your best bet for a session ID is a sufficiently long random value generated by a cryptographically secure pseudo-random number generator (CSPRNG). Given that you will be signing it, 128 bits is likely sufficient for current computing hardware, but you can increase that to 256 bits if you’re paranoid.
Generating a 128-bit cryptographically-random value in Python is as easy as this:
import secrets

session_id = secrets.randbits(128)
Other programming languages offer similar functionality, so ask your favorite AI tool how to do it in your chosen language.
To digitally sign this value, use a symmetric digital signature algorithm like HMAC. This algorithm requires a key that must be kept secret on the server, but since the server is the only thing signing and verifying, that is relatively easy to do. In Python, the code looks like this:
import os
from hmac import HMAC, compare_digest

# Get the secret signing key from an env var,
# or some other secure mechanism like a secrets service.
secret_key = os.getenv("SESSION_TOKEN_SIGNING_KEY")

session_id_bytes = session_id.to_bytes(16), # 128 bits / 8 = 16 bytes

hmac = HMAC(
	key=secret_key,
	msg=session_id_bytes,
	digestmod=hashlib.sha256, # use SHA-256 for hashing
)
signature = hmac.digest()
Again, you should be able to find an HMAC library for all major programming languages, so this isn’t something exclusive to Python. Just paste this code into your favorite AI tool and ask it how to do this same thing in your desired programming language.
Now that you have the ID and a digital signature for that ID, you can combine them together into a single binary token. You can then encode that into an ASCII-safe format like Base 64 to include in your HTTP response. In Python that looks like this:
from base64 import urlsafe_b64decode

binary_token = signature + session_id_bytes
token = urlsafe_b64encode(binary_token).decode("ascii")
When the client sends this token back to your server during subsequent requests, you can verify it using code like this:
from base64 import urlsafe_b64decode
from hmac import HMAC, compare_digest

SIGNATURE_BYTES_LEN = 32 # SHA 256 bits / 8 = 32 bytes

# Decode the base-64 string back into bytes.
decoded = urlsafe_b64decode(token)

# Split the signature and session ID bytes.
signature = decoded[:SIGNATURE_BYTES_LEN]
session_id_bytes = decoded[SIGNATURE_BYTES_LEN:]

# Recalculate what the signature of session_id_bytes
# should be using our secret key.
hmac = HMAC(
	key=secret_key,
	msg=session_id_bytes,
	digestmod=hashlib.sha256, # use SHA-256 for hashing
)
expected_signature = hmac.digest()

# Compare them to make sure they are the same
token_is_valid = compare_digest(signature, expected_signature)
Note that we use compare_digest() here and not a simple == comparison. The former is constant-time, meaning it will take the same amount of time regardless of how similar or different the two signatures are. This prevents a sophisticated form of attack, known as a timing attack, where the attacker uses the request latency differences to detect how close a tampered token is to being valid. A simple == comparison will stop as soon as it encounters a byte on the left that is different from the corresponding byte on the right.
Session State
This secure session token reveals nothing about the authenticated user nor the details of the current session. That is actually a good thing since we will be sending it back to the client, where it can be easily seen in the browser developer tools. So before we return it, we need to write a Session record to our database, using the token as the unique identifier (primary key). This record should contain the following fields:
- The ID of the authenticated account
- When the session began
- When the session expires
- If your API can be used by multiple origins (see below), the value of the
Originrequest header when the account holder authenticated, so you can verify subsequent requests come from the same origin - If you’re using CSRF tokens (see below), the CSRF token value
How quickly the session expires will depend on how secure the system really needs to be. An online banking site might use a fairly short duration, while a social media site might use a very long one. Many sites will also keep the session active as long as the account holder continues making requests, resetting the expiration field as needed.
Session Token Transmission
Now that you have a session token, the remaining question is how should we transmit it in the HTTP response to the client, and how should the client send it back in subsequent HTTP requests?
Your best bet these days (2025) is a Secure HttpOnly SameSite Cookie. Besides being delicious, cookies are an automatic mechanism already supported by HTTP, web browsers, HTTP libraries, and API server frameworks. Any cookie set in an HTTP response will be stored by the web browser or HTTP library, and automatically sent back in subsequent requests to the same origin.
In recent years cookies also gained a few important options that finally made them suitable for authenticated session tokens with web-based clients:
- HttpOnly: The cookie can’t be accessed by client-side JavaScript running in a browser. This protects your session tokens from Cross-Site Scripting (XSS) attacks.
- Secure: The browser/library will send the cookie only when making requests over encrypted HTTPS, not unencrypted HTTP. This protects your session tokens from being intercepted by attackers sitting between clients and your servers.
- SameSite=Strict: The cookie is sent by the browser only when the current page was loaded from the same site as the API being called. This effectively eliminates Cross-Site Request Forgery (CSRF) attacks.
The definition of ‘site’ in SameSite=Strict is subtly different than ‘origin’. A site is defined as the protocol (or scheme) plus the domain, but not the sub-domain(s). So https://example.com and https://api.example.com are considered the same site with respect to cookie behavior, but not the same origin with respect to CORS. This allows you to host your API on a subdomain but still use SameSite=Strict to protect against CSRF attacks.
But if your API is designed to be used by web clients service from other sites, you can’t use SameSite=Strict. For example, if your API’s origin is api.example.com but the web client that calls it is served from someothersite.com the SameSite=Strict option will block the browser from sending the session cookie to your API. In these cases, there are two other techniques you can use to protect against CSRF attacks.
Origin Header
When JavaScript in a web page makes fetch() requests to another origin, the browser automatically includes an Origin header set to the origin from which the current page was loaded. The JavaScript can’t override this value, nor suppress it, so you can use it as security signal.
If your API can only be used by web clients that come from a known set of origins, you can use this Origin header to determine if the request is coming from one of the allowed web clients, or another nefarious site. For example, if an account holder is signed in through a legitimate web client, and is then tricked to go to a page on evil.com, that page could try to do a fetch() request to your API and the browser will happily send along the cookies associated with your API’s origin. But on the server-side, you will see that the Origin is evil.com, which is not one of your allowed origins, so you can immediately reject the request with a 401 Unauthorized.
CSRF Tokens
If your API can be used by any origin, and you don’t have a known list of valid ones, you can use something like CSRF tokens instead. These are like session tokens, but they are transmitted using a different, custom, non-cookie header, such as X-CSRF-Token. The session token is still transmitted via a Secure HttpOnly cookie, but this extra CSRF token is passed via a different header that requires manual handling, and is never persisted by the web client.
Clients must manually check for this header in all fetch() responses, hold on to the latest value sent by the server in memory, and manually include this value in all subsequent fetch() requests. The server verifies that the value matches the one it handed out in the latest response on the same session, and rejects the request if they don’t match.
The CSRF token value should be different for each session, and can rotate more often than the session token if needed. Because the CSRF token is handled manually and never persisted, a nefarious site can’t know what it should be, and thus can’t provide it in fetch() requests, even though the browser automatically sends the session token cookie. This effectively blocks CSRF-style attacks, though it obviously requires more work for both the server and web client.
The obvious downside of CSRF tokens like these is that sessions effectively expire when the browser tab is closed. Since the token is never persisted, it disappears when the tab is closed, and when the legitimate web client is reloaded, it has no idea what value it should pass. The client must instead make the account holder re-authenticate in order to get a valid CSRF token.
Because CSRF tokens are handled manually in JavaScript, they are also susceptible to Cross-Site Scripting (XSS) attacks. If your web client render content supplied by users (e.g., most any social media site), and if accidentally renders that content as interpreted HTML instead of plain text, an attacker can inject script that runs within the web client of another innocent user. That script will be able to read the current CSRF token and send it in a fetch() request. Popular web frameworks like React automatically do this content escaping, but if you are using a more obscure framework, or just raw JavaScript, you must ensure that all user-supplied content is properly rendered as plain text (e.g., set the innerText attribute instead of innerHTML).
Multi-Level Authentication
If your API manages resources that are particularly sensitive, like payment card details or highly-personal information, you may want to also use a technique called multi-level authentication. This reduces the damage an attacker can do if they somehow managed to get access to an account holder’s valid session token.
With this approach, the initial session token in the browser’s cookie jar only grants authorization to relatively insensitive resources—for example, you can maybe read content posted by friends, but you can’t interact with billing details or change account configuration. The session associated with this token can be fairly long-lived (expires far in the future).
To access more sensitive resources, the client must authenticate again to gain a higher-level session token associated with a session that expires very quickly. This higher-level token is returned as a different cookie with no Max-Age setting so that it is never persisted, and disappears as soon as the web client unloads.
Session Expiration and Revocation
I mentioned earlier that the session records written to your database should have an expiration time so that the tokens associated with them have a bounded lifetime. When your API servers receive a valid session token and attempt to load the associated session record, you can simply apply a WHERE clause to the query to filter out sessions that have already expired. If you don’t find the record, the session either doesn’t exist or has expired. In either case, you should return a 401 Unauthorized response.
But in some cases you may want sessions to expire only after a period of inactivity. For example, you might want the session to stay active as long as the client keeps making requests, but expire an hour after the last request you received. In these cases, simply update the session record each time it is loaded with a new expiration time set to one hour from now.
Lastly, when a user signs out, or when you need to forcibly end all sessions for an account that has been compromised, either delete the session records altogether, or update the expiration time to now (or to be safe, a few minutes before now, to accommodate some clock skew between your API servers). Updating the expiration and keeping the records around allows you to do forensic and usage analytics in the future, but you will naturally pay for the extra data storage, so you may want to eventually archive and delete those records after a year or so.
Other Kinds of Authorization Tokens
Session tokens are actually a specific form of a more general concept known as authorization tokens. These are tokens that, once verified, authorize access to something without providing authentication credentials. A verified session token actually authorizes access to the session state, which happens to contain the previously-authenticated account, but it’s really just an authorization token in the end.
Authorization tokens, like session tokens, have the following qualities:
- They contain a unique, unguessable value.
- They also contain a digitally signature of that value, generated using a signing key known only to the server.
- They may be associated with an existing account in the database, but are sometimes used by anonymous clients.
- They typically expire at some point, often quickly if they allow access to sensitive resources or operations.
- They may be deleted/consumed after first use.
Other examples of authorization tokens include:
- Email/Phone Verification: Many systems will ask you to verify your email address or phone number by sending a message to that address/number with a link. The link contains an authorization token that was previously created, signed, and associated with your account. If the submitted token signature is valid, it proves you have control over that email account or phone number. These tokens are typically deleted immediately after they are used to prevent replay attacks.
- Account Recovery: If you forget your password or lose your passkey, most systems will send an email to your account’s email address containing a link you can click to recover your account. Just like the verification scenario, that link will contain an authorization token. When you follow the link, the server will verify the token, and then let you reset your password or create a new passkey. These tokens are also typically deleted immediately after use.
- Public Access Keys: When you share a document with “anyone who has the link,” or create a video conference meeting link, those contain an authorization token that lets anonymous users access the document or join the call. The server will verify the signature on the token, but since it’s not associated with an account, and can be used multiple times, the server won’t delete the token until it expires (if ever).
- Magic Sign-In Links: Some low-risk systems will let account holders sign-in by requesting a magic link sent to their registered email address or phone number. Just as in the verification scenario, that link will contain a one-time-use authorization token. When the account holder follows the link, the server verifies the token, starts a new authenticated session, and deletes the token.
Since these kinds of authorization tokens are really the same thing as session tokens, you can use the same code to generate and verify them!
note
🍻 Many thanks to my friend Clinton Campbell, founder of Quirktree, for patiently explaining security concepts and techniques to me over the years, and reviewing drafts of these tutorials.